Part 1.- The Power Plant
Disclaimer.-
The conversion done here was carried out by a professional gunsmith. No warranties implied, or otherwise are intended in this article. The turning/milling operations carried are sensitive, not devoid of dangers and of a high precision nature.
Do NOT attempt this conversion if you are not completely qualified to do so.
This conversion has NOT been sanctioned by Weihrauch & Weihrauch GmbH & Co. KG.
This conversion proved safe IN THE GUN that it was performed. We cannot guarantee that all other guns will receive the conversion in the same way.
Please do not ask for measurements or dimensions, Connecticut Custom Airguns cannot provide these data.
All designs and parts' shapes and dimensions are proprietary to CCA and Weihrauch & Weihrauch GmbH & Co. KG and their Weihrauch brand as applicable.
Benchmark
When tackling an unknown rifle, I like to do a "Benchmark" test to see where we started and evaluate where we ended.
In THIS case, it was impossible, and the story is peculiar.
A friend asked me to make two sets of springs for his HW50 using Titan springs as basic material.
We consulted with the Titan manufacturer (John Knibbs & Co in the UK) and the suggestion was to use a Titan #7, so we ordered the springs and when they arrived, a couple of guides were made and shipped.
Time passed and then I was alerted to the fact that the springs would not allow the rifle's piston's stem to engage fully with the trigger, thereby the gun could not be cocked.
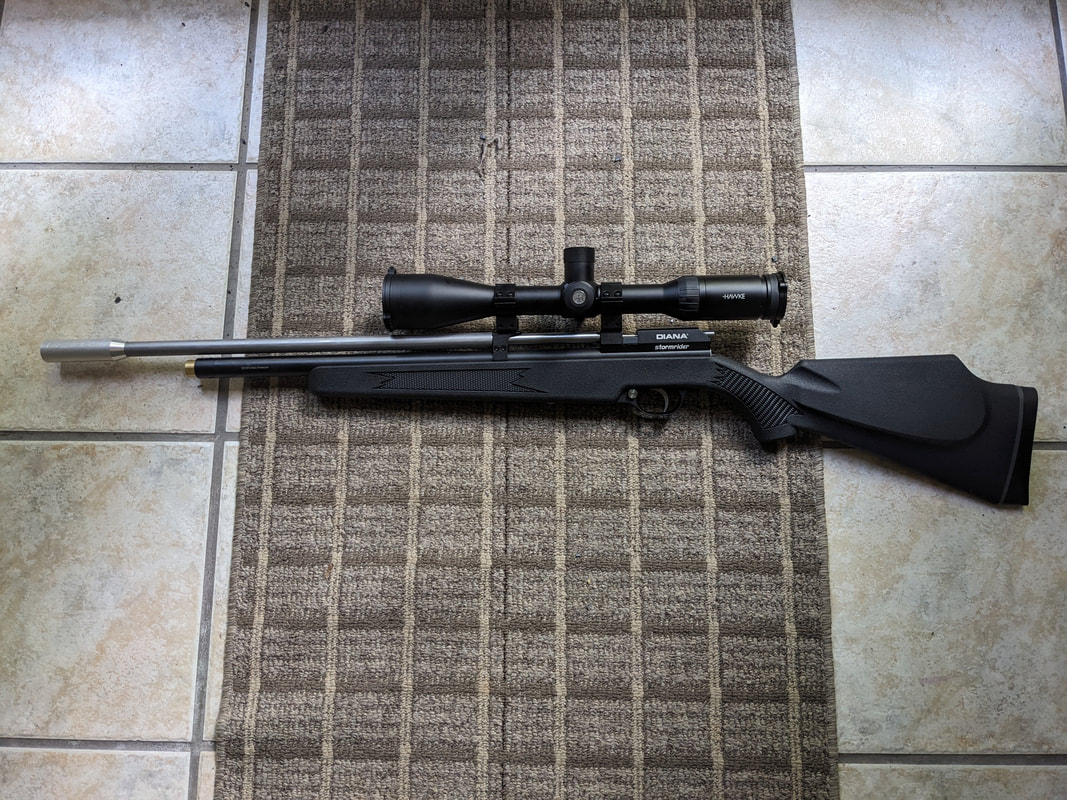
So I got the rifle and the springs with the instructions to add a CF sleeve to the barrel and to get the rifle up to WFTF level (that means sub-12 ft-lbs, and accurate to 55 yards).
And . . . the process began.
The first thing was to establish the real "capacity" spring-wise of the little rifle.
A search in the Internet came out with three important things:
1) most serious uses/best substantiated & published results of these guns are from the UK, under the 12 ft-lbs/0.22" cal. guise. Energies in the mid 10's and great 3 shot groups are reported in the E-press. Of special note are the "Sandwell Sports" special runs that seem to embody what would be an ideal "UK Garden rifle", though some of those specially commissioned guns are very capable at ranges in excess of 55 yards in the right hands.
2) the CURRENT HW50 in the US is the HW99 in the rest of the World.
3) the numbers for bore and stroke were all over the place, LOL!.
As a gunsmith, I have ways to measure the guns in all their states, and an important measurement is what's the REAL stroke of a specific rifle.
The way to measure this is to disassemble the gun, remove the spring, and use a "proofing" spring.
These springs are weak springs (2.5/3 mm's WD) that are powerful enough to make the gun operate, but would probably yield less than 3 ft-lbs if used to fire a pellet.
So a proofing spring was installed and the distance of travel between the positions of the piston's stem's notch start was measured:
In THIS case, it was impossible, and the story is peculiar.
A friend asked me to make two sets of springs for his HW50 using Titan springs as basic material.
We consulted with the Titan manufacturer (John Knibbs & Co in the UK) and the suggestion was to use a Titan #7, so we ordered the springs and when they arrived, a couple of guides were made and shipped.
Time passed and then I was alerted to the fact that the springs would not allow the rifle's piston's stem to engage fully with the trigger, thereby the gun could not be cocked.
So I got the rifle and the springs with the instructions to add a CF sleeve to the barrel and to get the rifle up to WFTF level (that means sub-12 ft-lbs, and accurate to 55 yards).
And . . . the process began.
The first thing was to establish the real "capacity" spring-wise of the little rifle.
A search in the Internet came out with three important things:
1) most serious uses/best substantiated & published results of these guns are from the UK, under the 12 ft-lbs/0.22" cal. guise. Energies in the mid 10's and great 3 shot groups are reported in the E-press. Of special note are the "Sandwell Sports" special runs that seem to embody what would be an ideal "UK Garden rifle", though some of those specially commissioned guns are very capable at ranges in excess of 55 yards in the right hands.
2) the CURRENT HW50 in the US is the HW99 in the rest of the World.
3) the numbers for bore and stroke were all over the place, LOL!.
As a gunsmith, I have ways to measure the guns in all their states, and an important measurement is what's the REAL stroke of a specific rifle.
The way to measure this is to disassemble the gun, remove the spring, and use a "proofing" spring.
These springs are weak springs (2.5/3 mm's WD) that are powerful enough to make the gun operate, but would probably yield less than 3 ft-lbs if used to fire a pellet.
So a proofing spring was installed and the distance of travel between the positions of the piston's stem's notch start was measured:
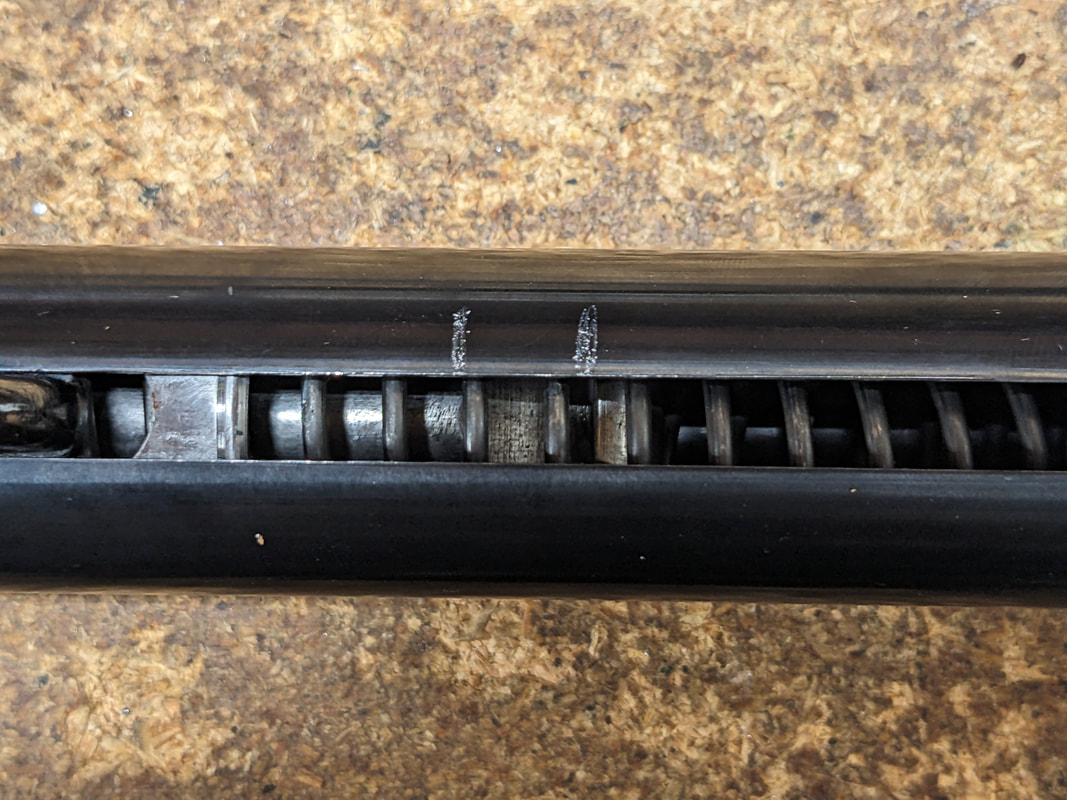
Here we are marking the start and the end of the stem's notch.
Now the gun has been cocked
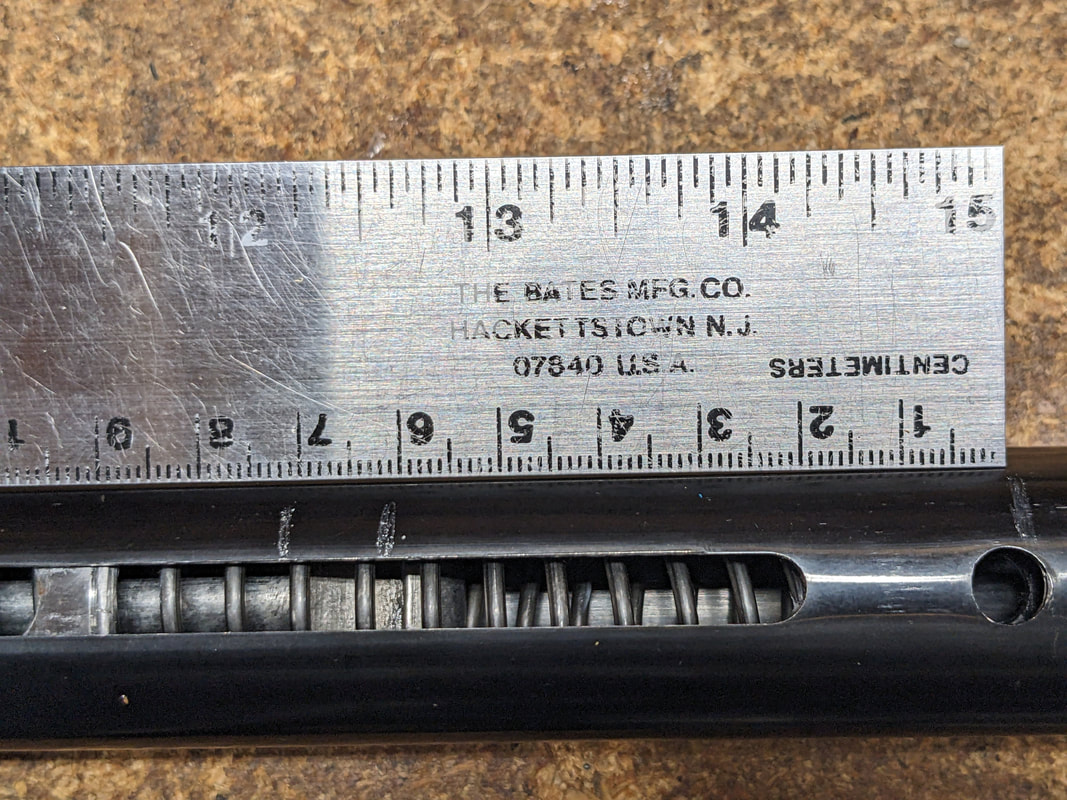
And we measure the distance. In this case the measurement was 71 mm's
To our "chagrin" the Titan #7 has a solid length of 99.06 mm's
Huh?!?!?!?!?!?!?!
So, a courteous Email was sent to HW.
And the very nice answer was:
"...
The cocking stroke of the mod. HW50 is about 71 mm.
...
"
Ooops!
We're in trouble. With 71 mm's of stroke there is no way a 26 mm's bore piston will reach the 12 ft-lbs without combustion in 0.177" cal.
After some conversations with the owner, he was gracious enough to allow experimenting to see where we could take the gun.
And from there, the title!
I assume everyone in the USA is familiar with the Army motto "Be all you can be"
Well, this little "recruit" was going to become "Private HW50" in boot camp, and we WERE going to find out what "All that he could be" meant.
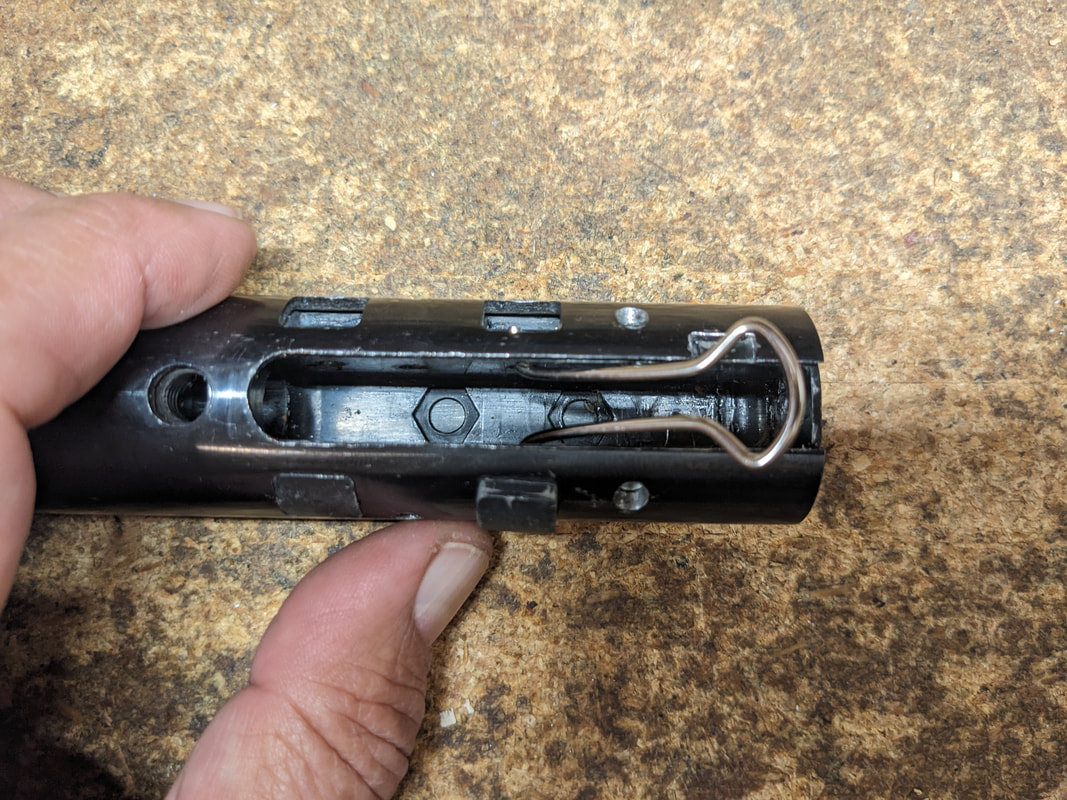
Taming the beast
The "beast" here is HW's extremely complicated method of assembling the gun.
You not only have two main pins (as in almost all other brands); you have, in addition, 4 little "blocks" that have very peculiar shapes (luckily, all of them are identical), and are destined to reinforce/lock the "closure" of the trigger block into the mechanisms tube.
I KNEW I was going to assemble and disassemble this rifle MANY times, so I needed to device a way to do it efficiently, with the least amount of effort possible and SAFELY.
And so, I went looking for a "secret weapon" something that would allow me to push the little blocks out of their recesses without damaging anything.
After some time at the bench contemplating how to build a tool, I was tired and I returned to my desk, only to find the solution staring at me in the face:
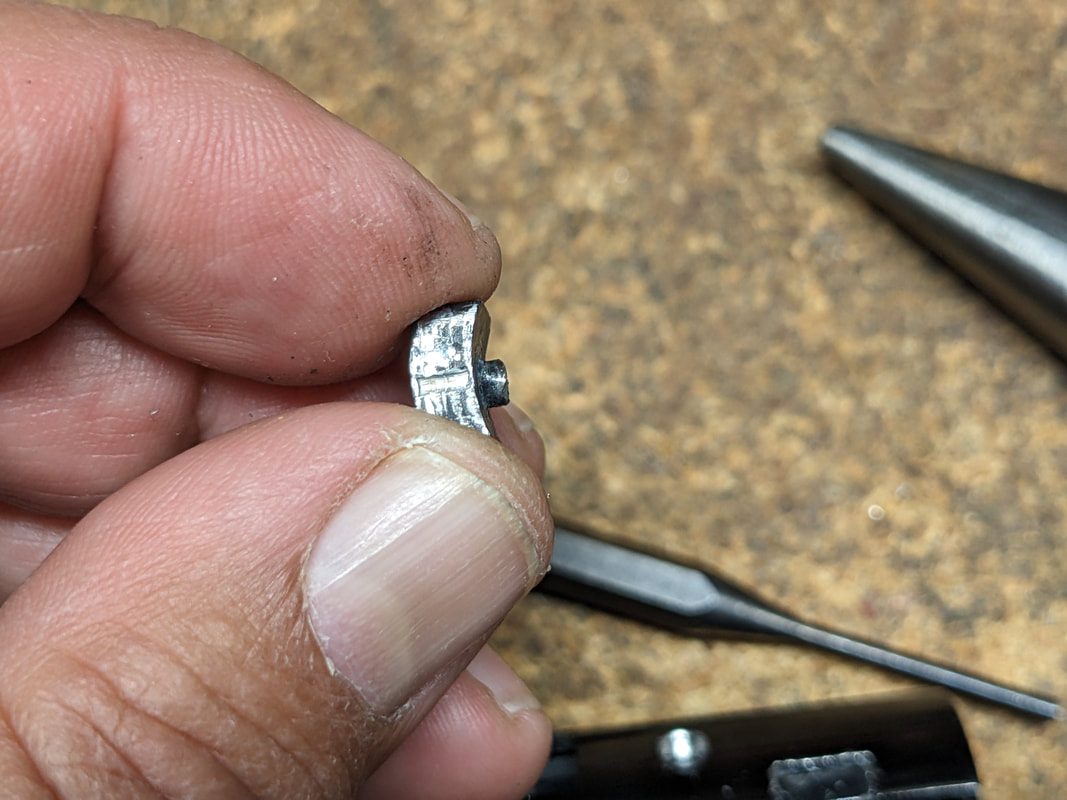
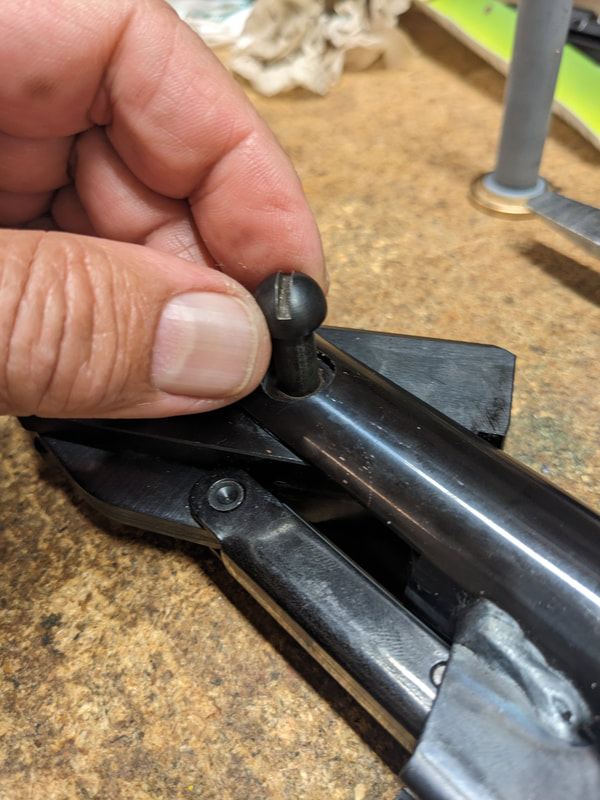
Yup!
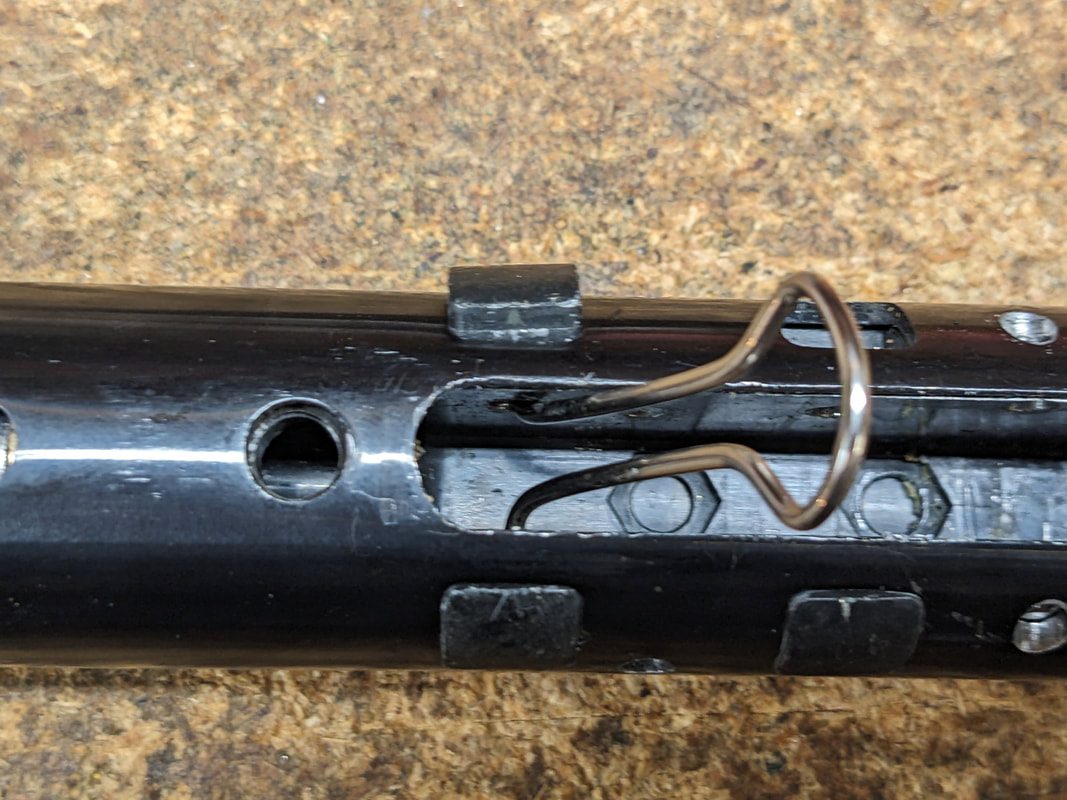
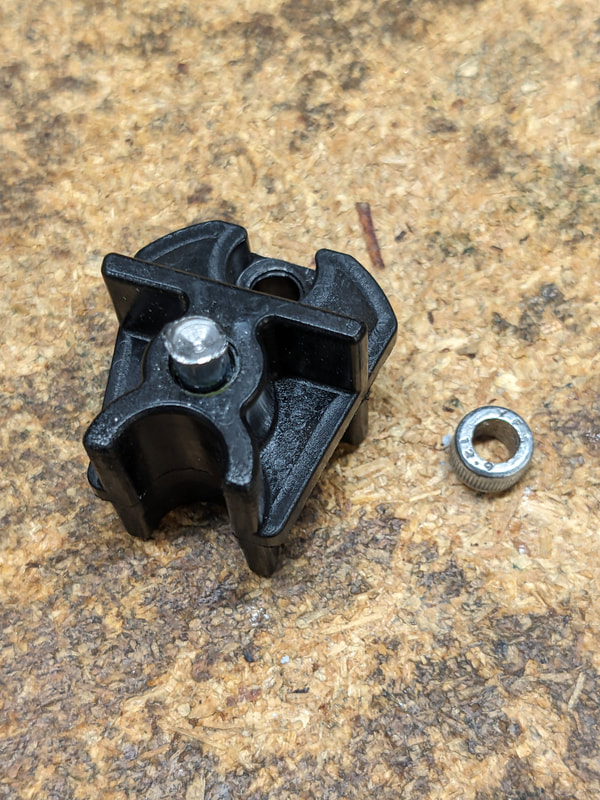
Those little thingies have two spring "legs" that, when removed, look like this:
Those little thingies have two spring "legs" that, when removed, look like this:
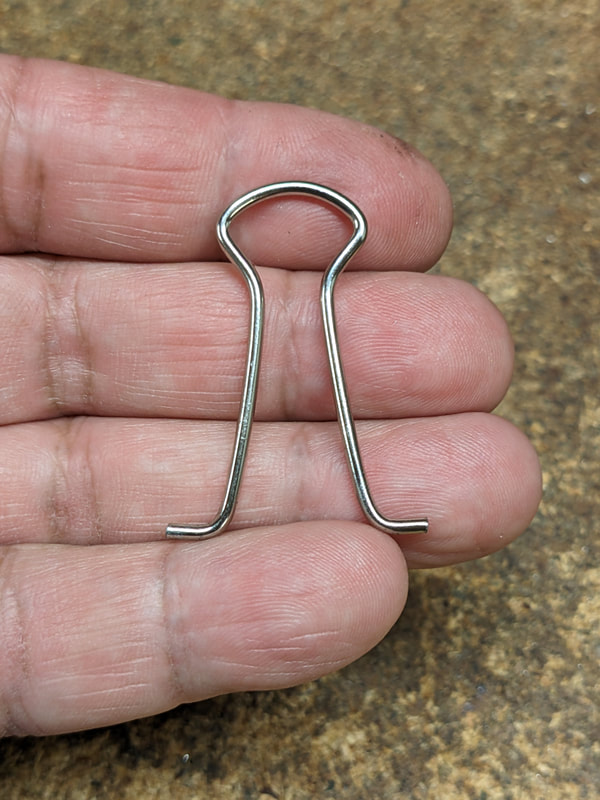
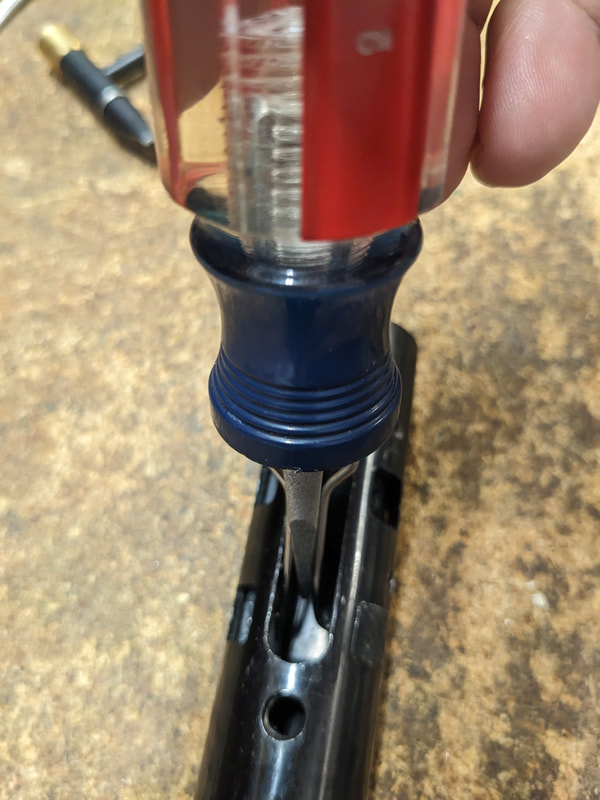
AND, if you choose the right size, and if the little blocks are not damaged, they push BOTH blocks out at the same time, but we are getting ahead of ourselves.
Let's start at the beginning of the disassembly.
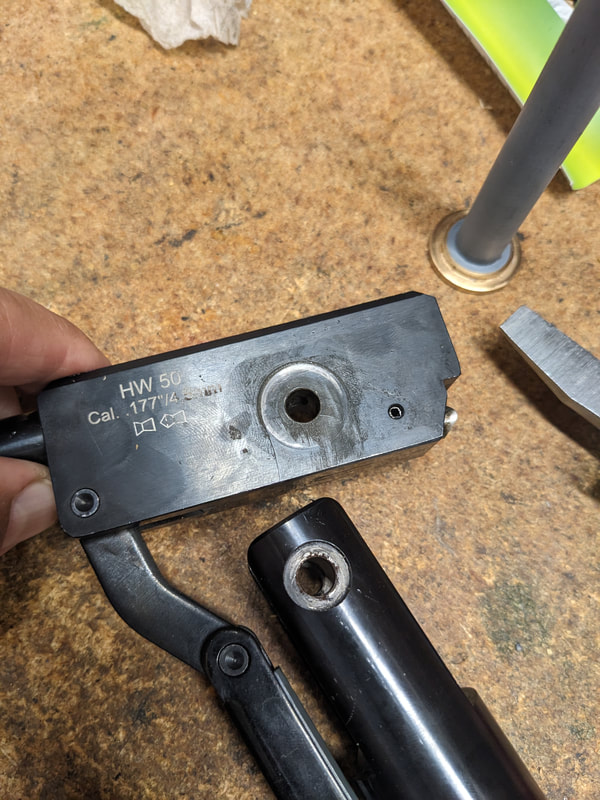
First of all, with a quality gun, ALWAYS look for the best fitting screw driver you have for EACH slot.
Especially because European slots are "thinner" than American slots AND are parallel; and so, sometimes you NEED to MAKE a special screwdriver for specific brands/models of guns.
IDEALLY, gunsmithing screwdrivers have hollow ground blades, meaning that the "blade" that enters the slot should have PARALLEL sides. Something that is not common in SAE screwdrivers.
Most modern airguns are adopting industrial socket standards, like Allen; even Torx are not unheard of.
BUT HW is a traditionalist, and so, slotted screws you will get and the best screwdriver needs to be found/made.
For THIS case it was not too difficult; on one hand the gun had been disassembled previously and it showed, the slots were a bit "chewed", but that gave us a chance to "chase" a bit the slots, so that they fit perfectly a SAE screwdriver:
Let's start at the beginning of the disassembly.
First of all, with a quality gun, ALWAYS look for the best fitting screw driver you have for EACH slot.
Especially because European slots are "thinner" than American slots AND are parallel; and so, sometimes you NEED to MAKE a special screwdriver for specific brands/models of guns.
IDEALLY, gunsmithing screwdrivers have hollow ground blades, meaning that the "blade" that enters the slot should have PARALLEL sides. Something that is not common in SAE screwdrivers.
Most modern airguns are adopting industrial socket standards, like Allen; even Torx are not unheard of.
BUT HW is a traditionalist, and so, slotted screws you will get and the best screwdriver needs to be found/made.
For THIS case it was not too difficult; on one hand the gun had been disassembled previously and it showed, the slots were a bit "chewed", but that gave us a chance to "chase" a bit the slots, so that they fit perfectly a SAE screwdriver:
For reference and informational purposes ONLY, this is Craftsman 9 41586 + WF / 5/16".
IF the gun had arrived to me in pristine condition, I would have ground the tip to make the sides parallel, but in this case it made more sense to use the screwdriver's tip to "iron out" all the burrs and ensure a positive grip and drive.
At the price of these drivers, it really makes no sense not to customize the driver to the screws of a new gun.
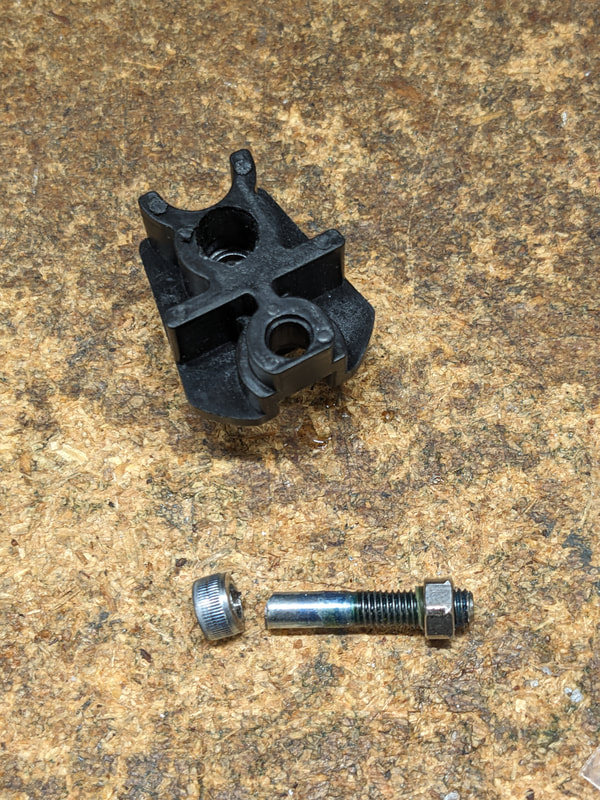
Once the stock screws are removed, the trigger guard can be removed:
IF the gun had arrived to me in pristine condition, I would have ground the tip to make the sides parallel, but in this case it made more sense to use the screwdriver's tip to "iron out" all the burrs and ensure a positive grip and drive.
At the price of these drivers, it really makes no sense not to customize the driver to the screws of a new gun.
Once the stock screws are removed, the trigger guard can be removed:
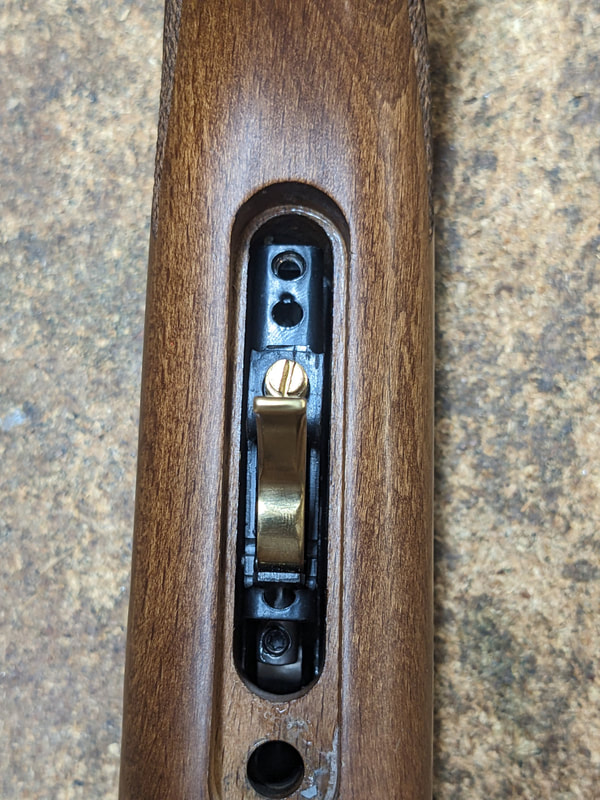
IMHO, the inletting could be a bit tighter, as the shelf that supports the guard, while enough for any reasonable torque applied to the REAR trigger guard/trigger block screw, it does seem a little "slim".
It would be fairly easy to cut a square box for the trigger block, there are tools that do that; alternatively, a much smaller tool could be used to cut a "rounded corners square hole", but either would imply changes in the tooling / CNC process and undoubtedly would add cost to the gun.
Now, no one in his/her right mind would put 45 in-lbs of torque into that rear screw, but here comes another problem: That screw is about 2mm's too long. If you tighten it enough to prevent "play" (which would bring vibrations and inconsistencies), then the trigger mechanism will not latch.
It MAY be that different stocks require different lengths and therefore ALL the guns get the same screw, That's fine as a "value engineering" but if this is your model, just take a file and remove between 1 and 2 mm's of length and be done with it.
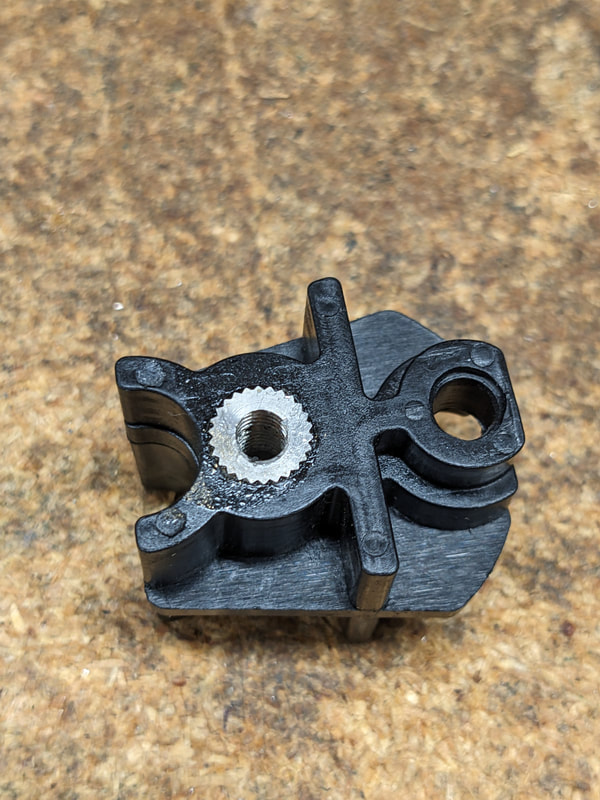
So, stock removed, you have access to the mechanisms:
It would be fairly easy to cut a square box for the trigger block, there are tools that do that; alternatively, a much smaller tool could be used to cut a "rounded corners square hole", but either would imply changes in the tooling / CNC process and undoubtedly would add cost to the gun.
Now, no one in his/her right mind would put 45 in-lbs of torque into that rear screw, but here comes another problem: That screw is about 2mm's too long. If you tighten it enough to prevent "play" (which would bring vibrations and inconsistencies), then the trigger mechanism will not latch.
It MAY be that different stocks require different lengths and therefore ALL the guns get the same screw, That's fine as a "value engineering" but if this is your model, just take a file and remove between 1 and 2 mm's of length and be done with it.
So, stock removed, you have access to the mechanisms:
This gun has no "cocking shoe", which means that extra care needs to be put on the fit of the spring to the ID of the piston, and the piston to the ID of the tube., but more on that later, let's keep on disassembling "Private HW50".
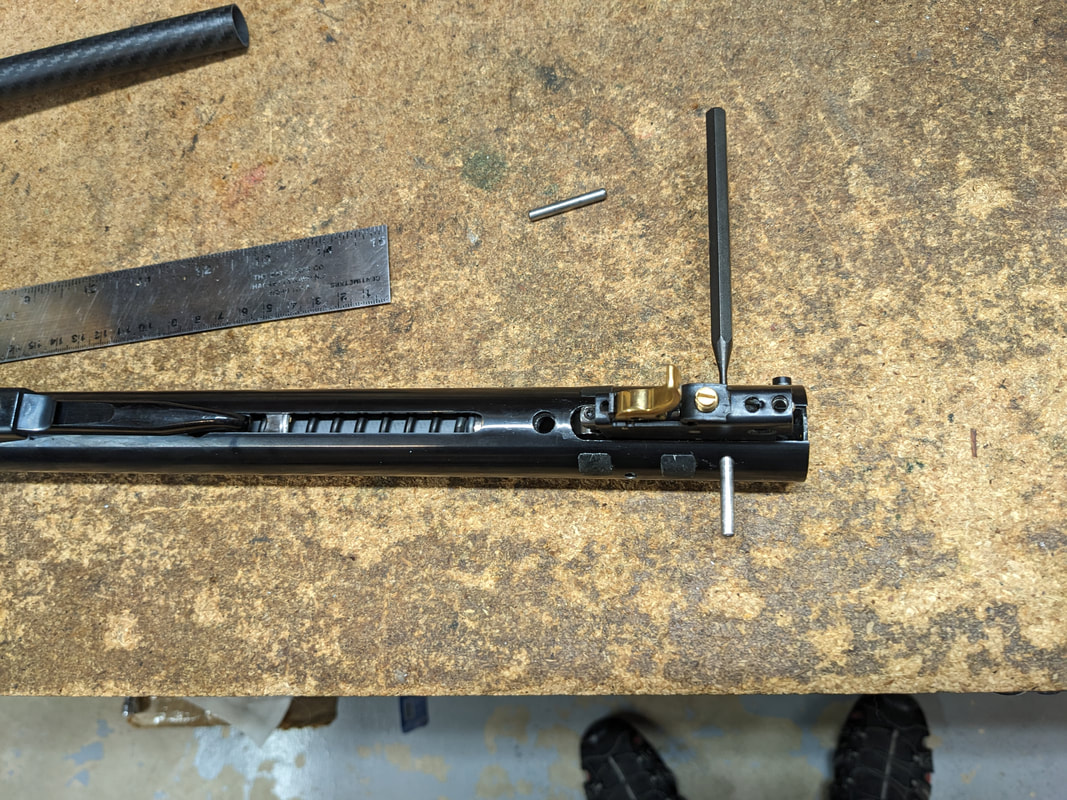
First thing is to push out the trigger block pins, yes, you need to do this first!
You start with the REAR PIN:
First thing is to push out the trigger block pins, yes, you need to do this first!
You start with the REAR PIN:
This allows you to hold the safety AND raise the rear end of the trigger block.
When you raise the rear end the safety will, literally, shoot out under spring pressure, but since you are holding it, you will not loose any pieces.
Now, you remove the FRONT pin:
When you raise the rear end the safety will, literally, shoot out under spring pressure, but since you are holding it, you will not loose any pieces.
Now, you remove the FRONT pin:
POP Quiz!
If you only follow the pictures, you will get it wrong, hope you are reading carefully the text.
;-)
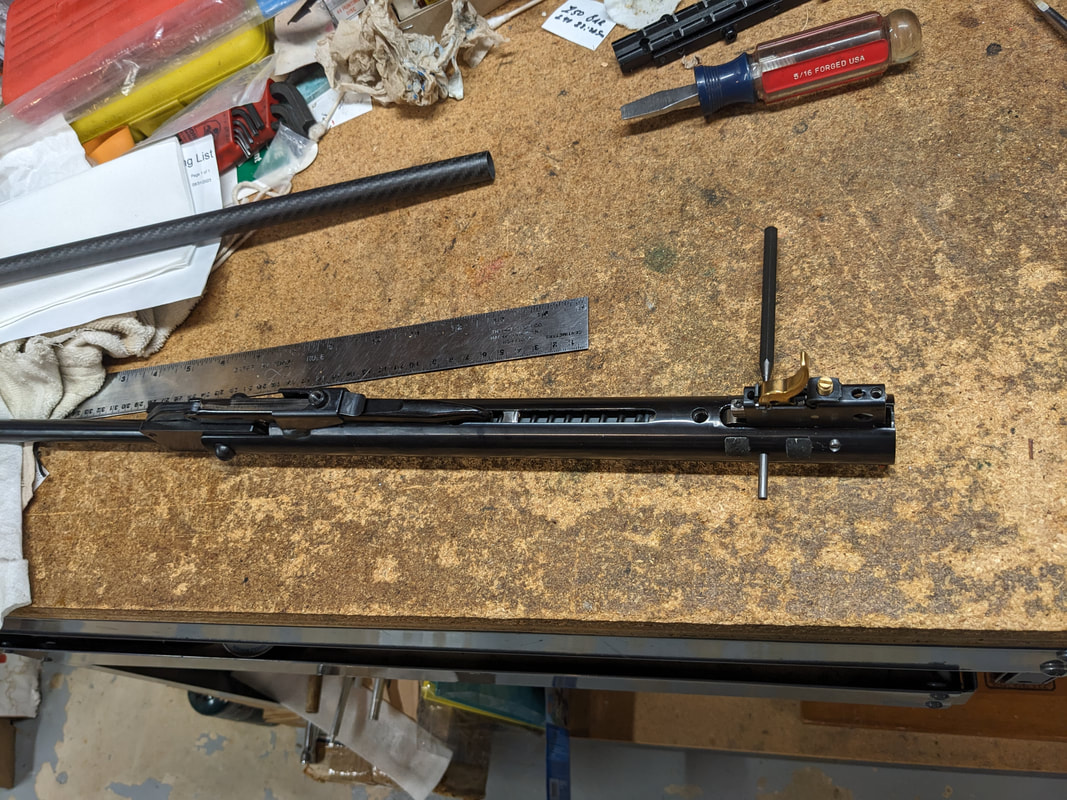
With the pins removed, you can lift the trigger guard by the REAR section and remove it from the gun.
At this point in time you still do not need a spring compressor.:
If you only follow the pictures, you will get it wrong, hope you are reading carefully the text.
;-)
With the pins removed, you can lift the trigger guard by the REAR section and remove it from the gun.
At this point in time you still do not need a spring compressor.:

Once the trigger is removed, cock it:
It will make life so much easier upon assembly.
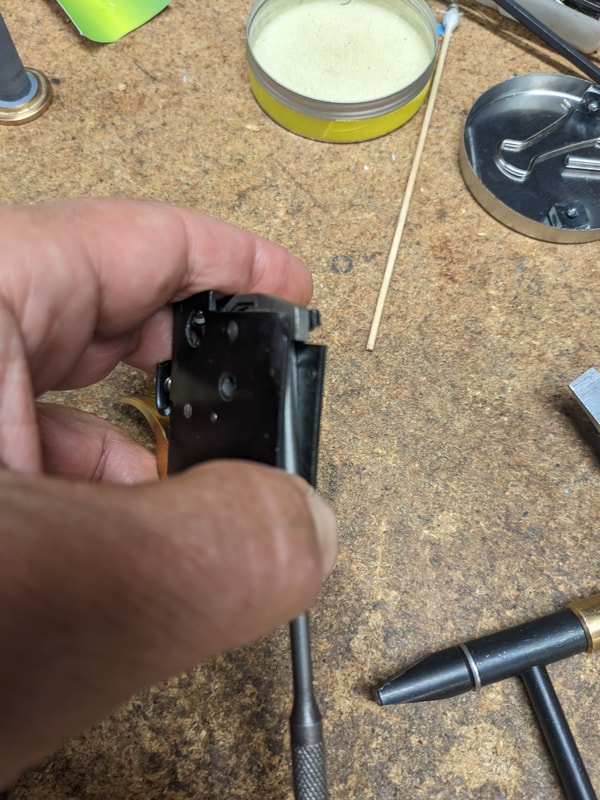
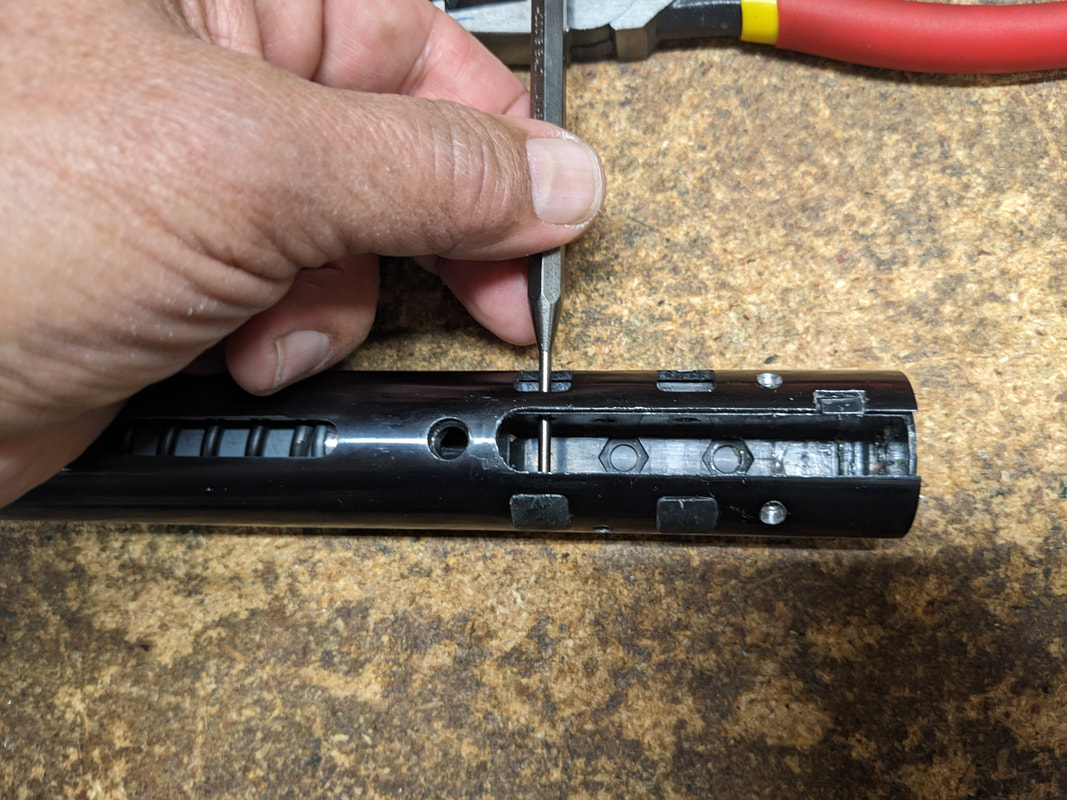
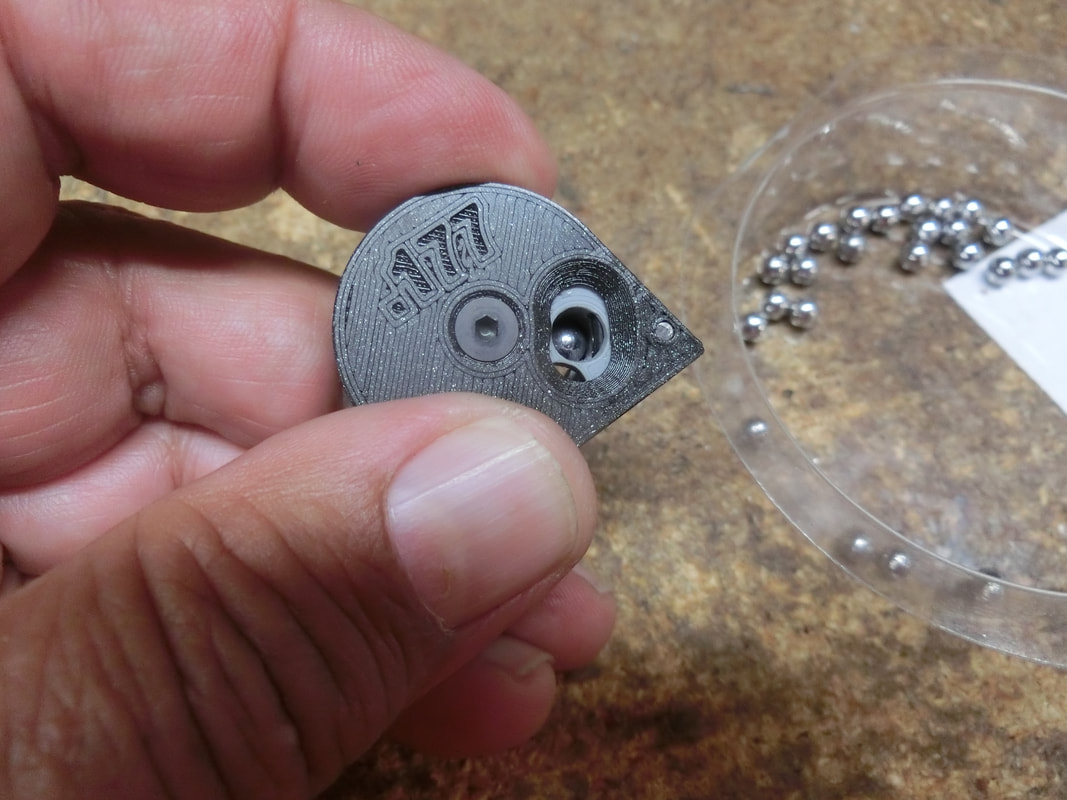
And now you can use our "secret weapon" to push the locking blocks out:
And now you can use our "secret weapon" to push the locking blocks out:
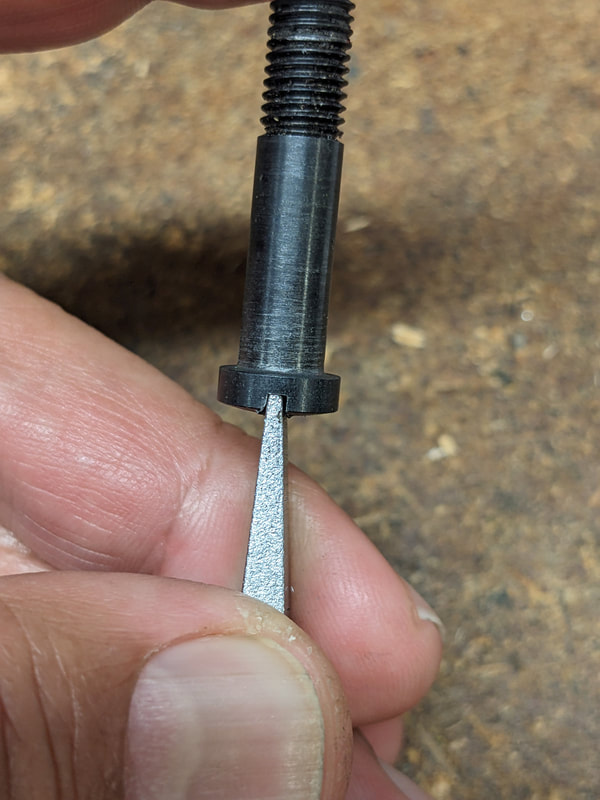
If some of the blocks resist this pressure, then aid yourself with your screwdriver:
Depending on how "rough" the locking blocks are, you may opt to sand them down a bit, or not, that is up to you.
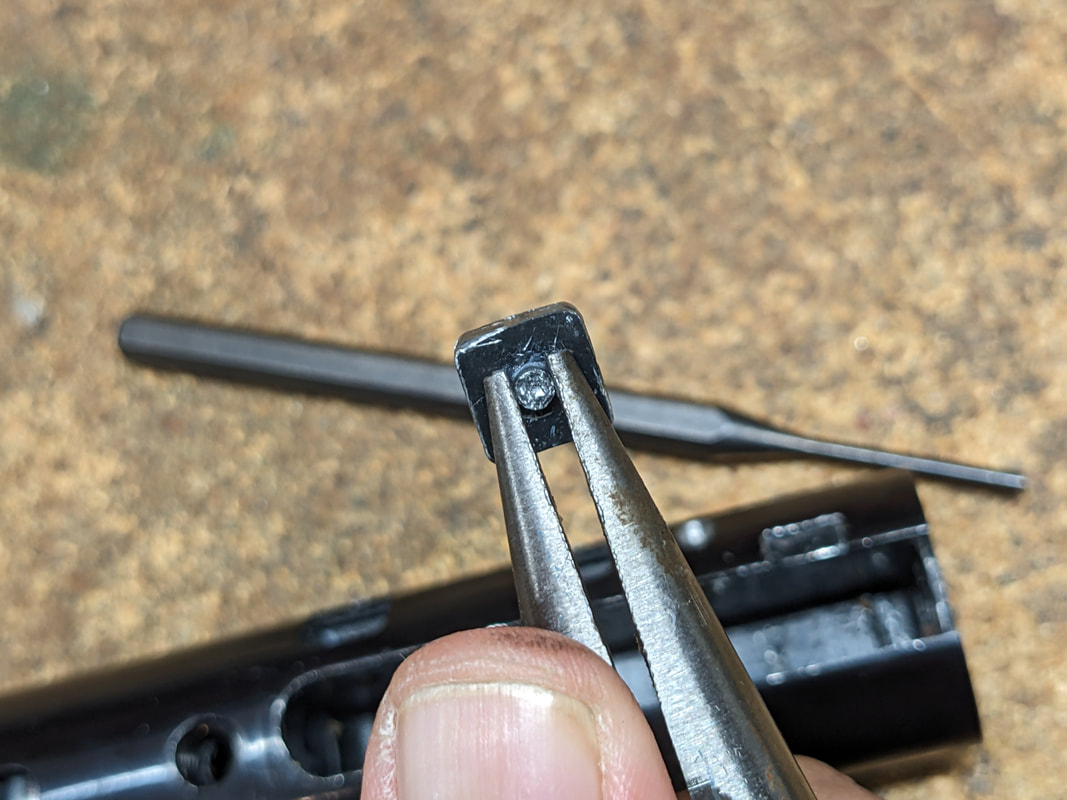
It may be that, at first, some of the little blocks will not come out at all, even under screwdriver's aid.
In that case, as long as ONE of them comes out, you can use a slimmer drift punch to drive it out:
In that case, as long as ONE of them comes out, you can use a slimmer drift punch to drive it out:
Now we are ready to head to the spring compressor, and before anyone says anything, if you don't want to use a spring compressor, be my guest.
Using a spring compressor is the SAFE (for both, the GUN and YOU) way.
If you do not want to be safe, or have little regard for YOUR gun, then "it's your party and you cry if you want to"; just reserve your opinions to yourself.
To do it easily and properly, you need to have some sort of "thrust bearing" between the rifle and the end of the spring compressor:
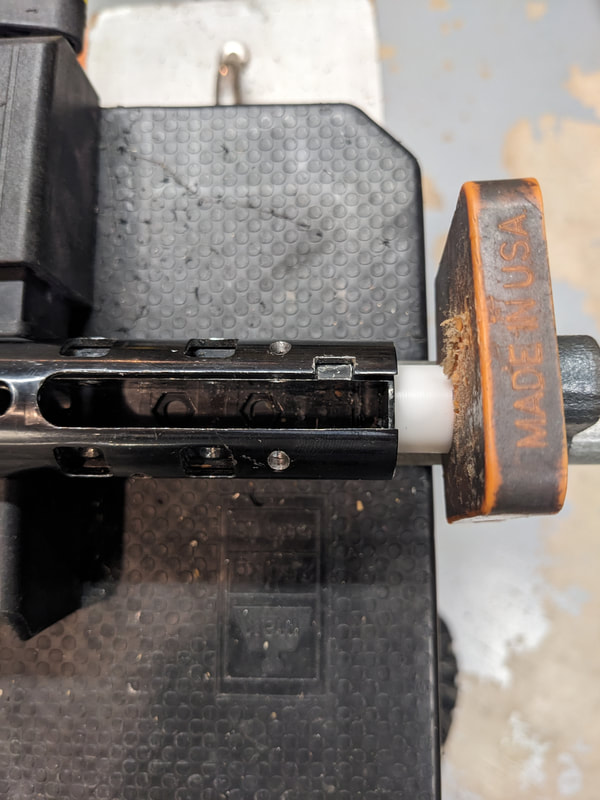
I have all sorts of bits and pieces, and so, this is just the stub of a Teflon bar. It will not mar the rifle's finish and it will allow the rear plug to rotate with little friction.
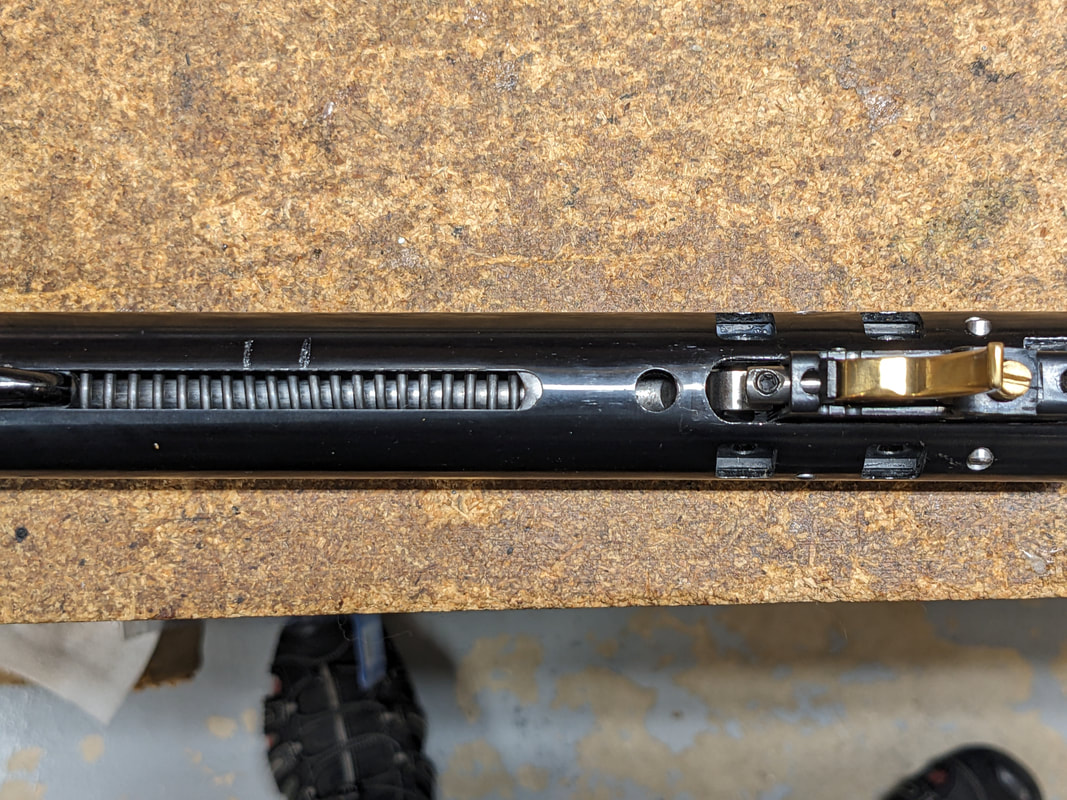
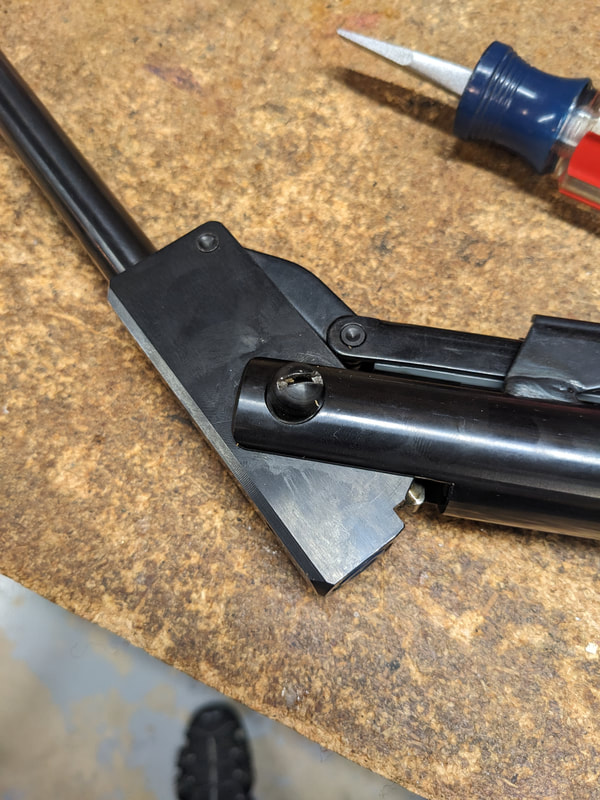
In this gun, the "thrust" of the spring against the piston is contained by that "locking lug" in the closing piece that gets rotated into place when assembling, and rotated out of "lock" to disassemble.
So a LITTLE pressure into this piece from the spring compressor (just to make sure there is no contact between the "face" of the locking lug and the mechanisms tube), and the pieces can be rotated "out of battery":
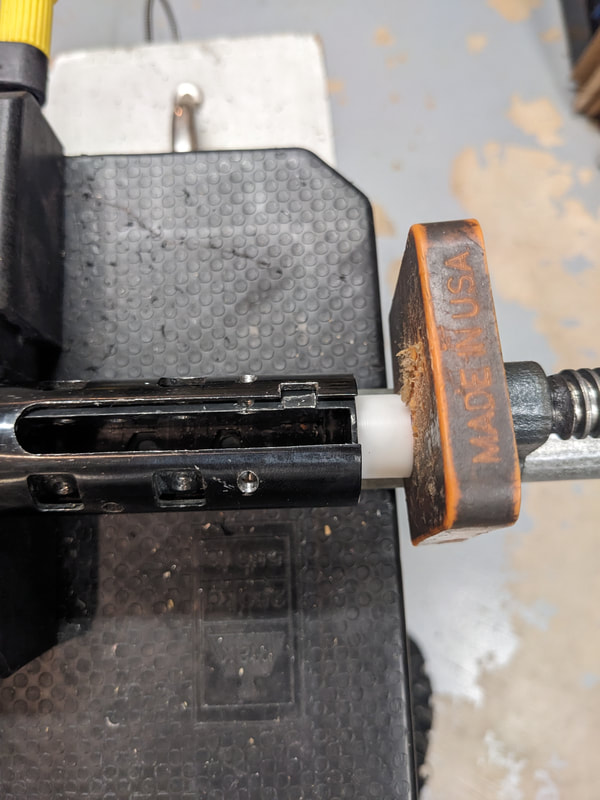
Once completely rotated "out of battery" then the closing piece can begin to slide out:

In here, it must be said that for some of the spring/guide combinations used here, which require a somewaht substantial pre-load, it was beneficial to rotate the TWO parts into each other, rifle AND closing piece.
For disassembly, this may also apply.
In any case, once the piece has begun to slide, it can then be slid out completely:
For disassembly, this may also apply.
In any case, once the piece has begun to slide, it can then be slid out completely:
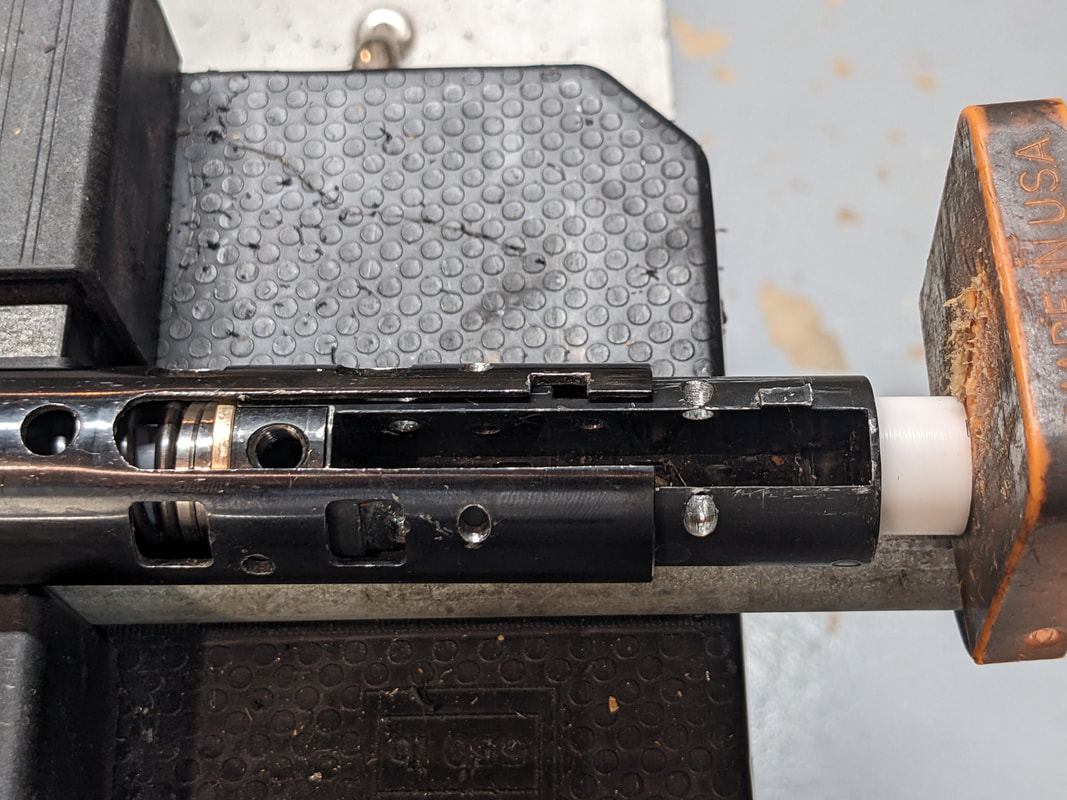
As long as you are only changing a spring, this is as far as you need to go.
At this point in time, you swap the old for the new spring, assemble in reverse order, and you're done!
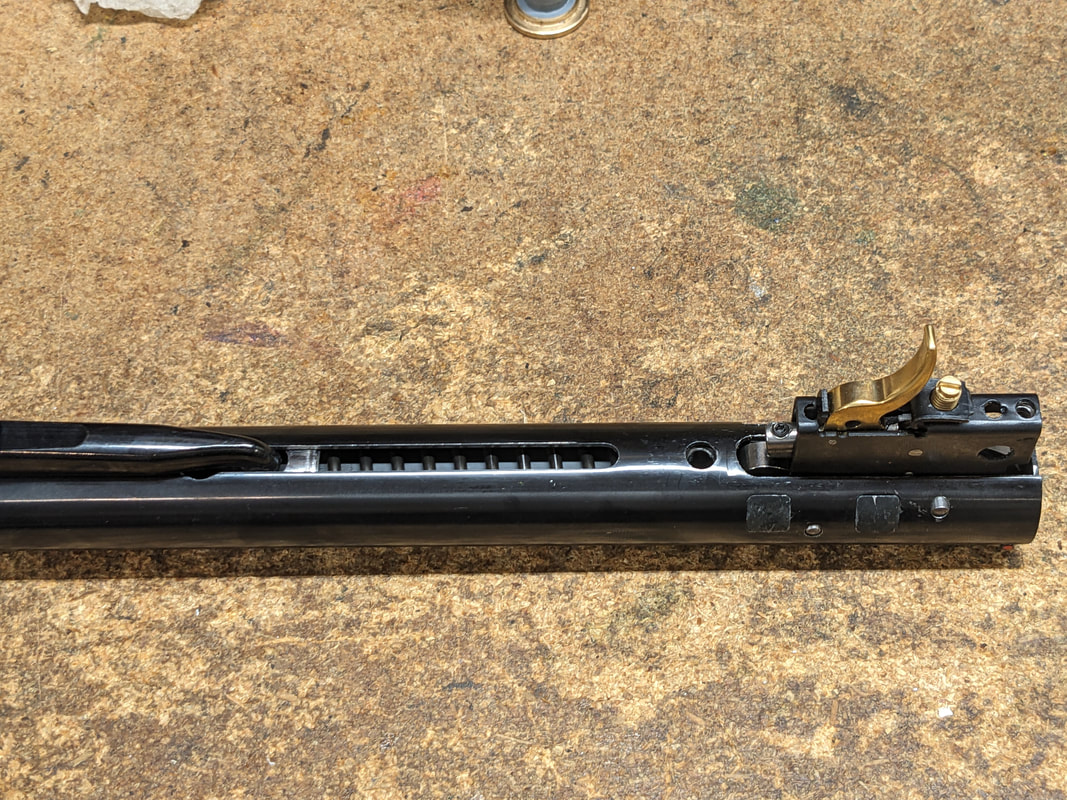
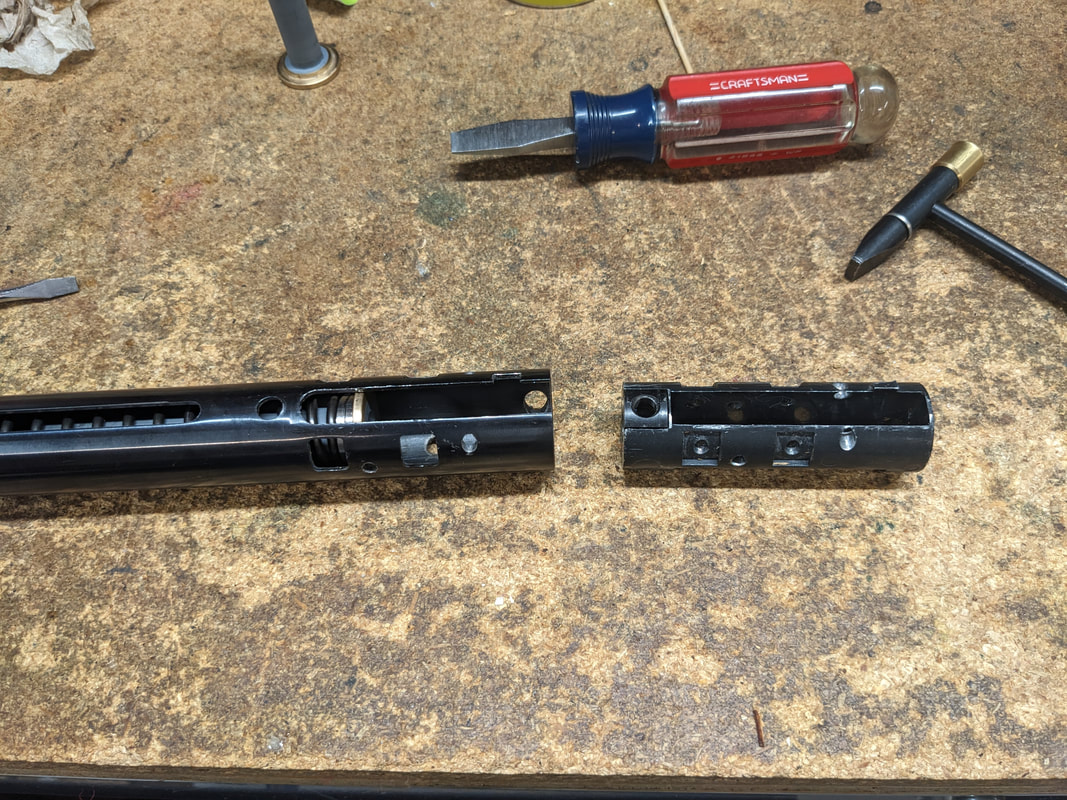
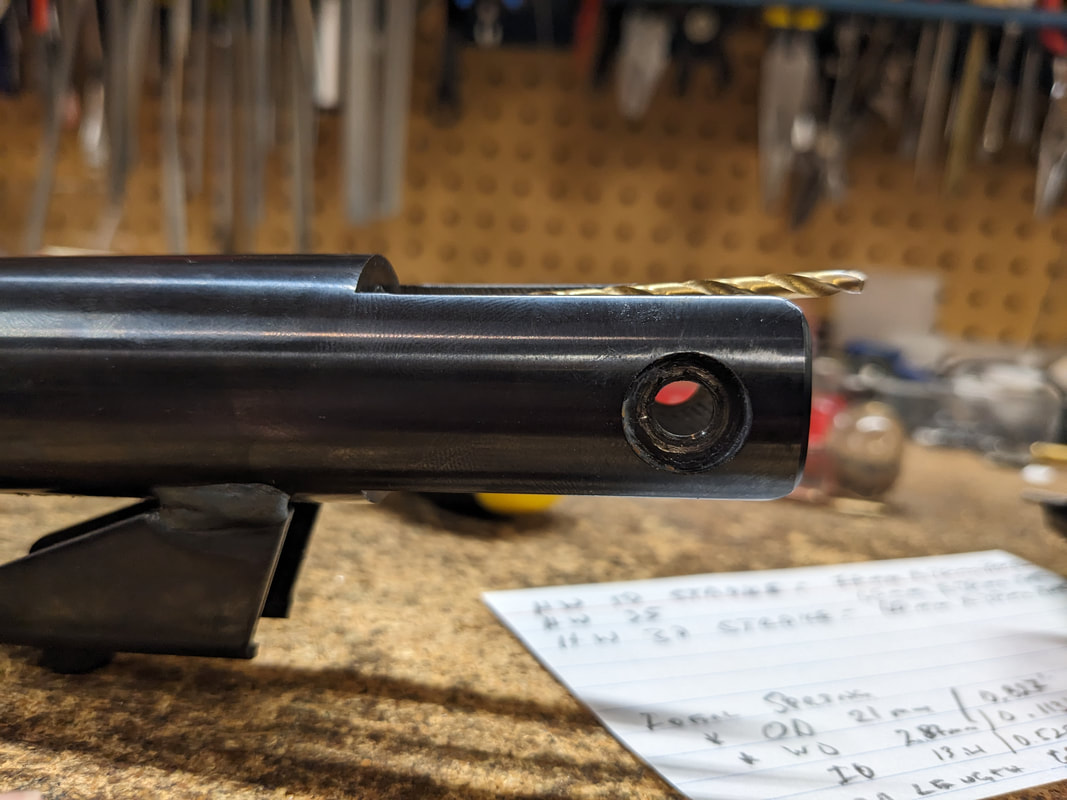
However, if you want to change the piston seal, or the piston itself, you will need to further disassemble the rifle, and you start by disassembling the hinge pin in the forks, which requires to break the barrel to remove tension from the hinge/forks interfase:
At this point in time, you swap the old for the new spring, assemble in reverse order, and you're done!
However, if you want to change the piston seal, or the piston itself, you will need to further disassemble the rifle, and you start by disassembling the hinge pin in the forks, which requires to break the barrel to remove tension from the hinge/forks interfase:
Start by the "nut" on the right side of the gun, again, ensure that you select the best possible screwdriver for the job, if you do not have an ideal one, make it.
Once the "nut has been removed, you can remove the split washer underneath it :
Once the "nut has been removed, you can remove the split washer underneath it :
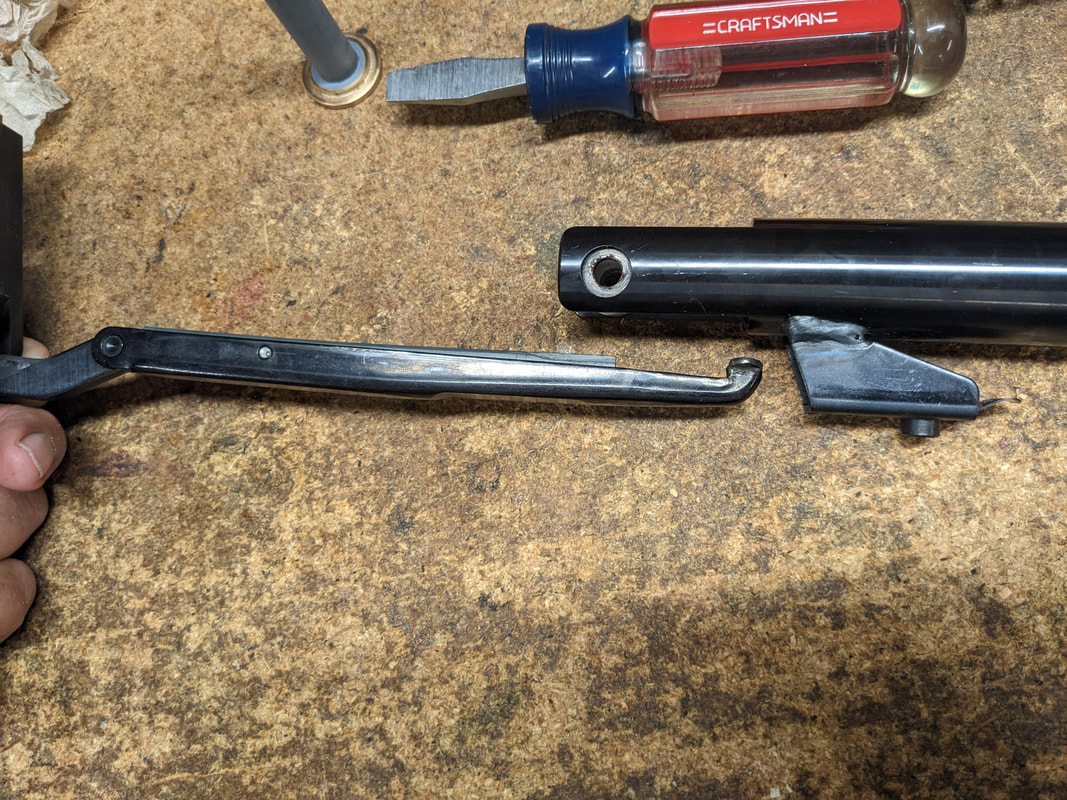
A magnet is useful in these cases and once the split washer is removed, you can turn over the rifle, unscrew and take out the hinge-pin/screw from the left side:
Once the hinge-pin/screw has been removed, you can "wiggle out" the barrel block being careful not to loose the very thin washers that the factory put in there.
Once the barrel block and the forks have been "divorced" then the cocking lever can come out of its recess:
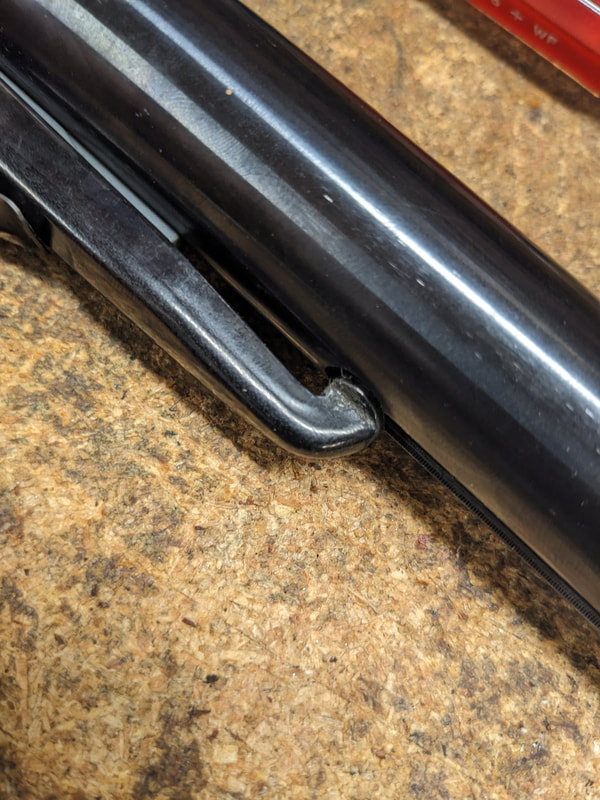
And once the cocking lever has come out, the piston can slide to the rear, while the barrel assembly can slide to the front:
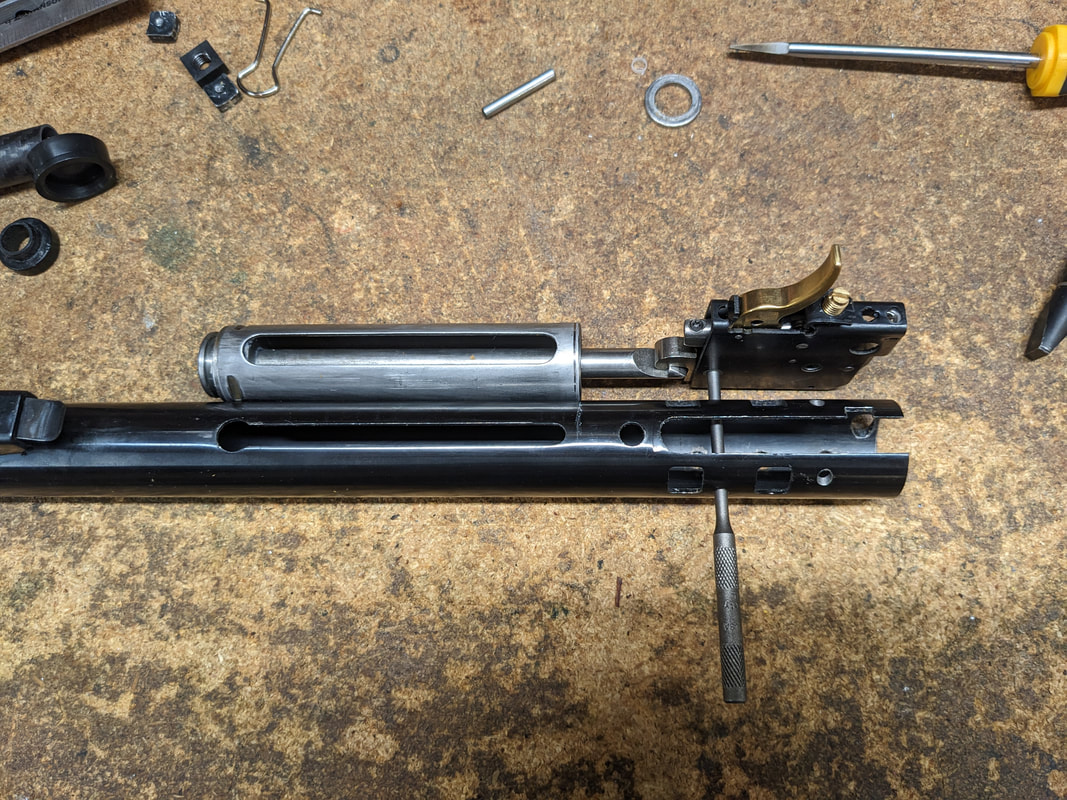
With the piston out, serious measurements can take place and the planning for the modification starts taking shape:
If you ever get the piston out of your HW50, do look at the inside of the compression chamber. If it looks like this:
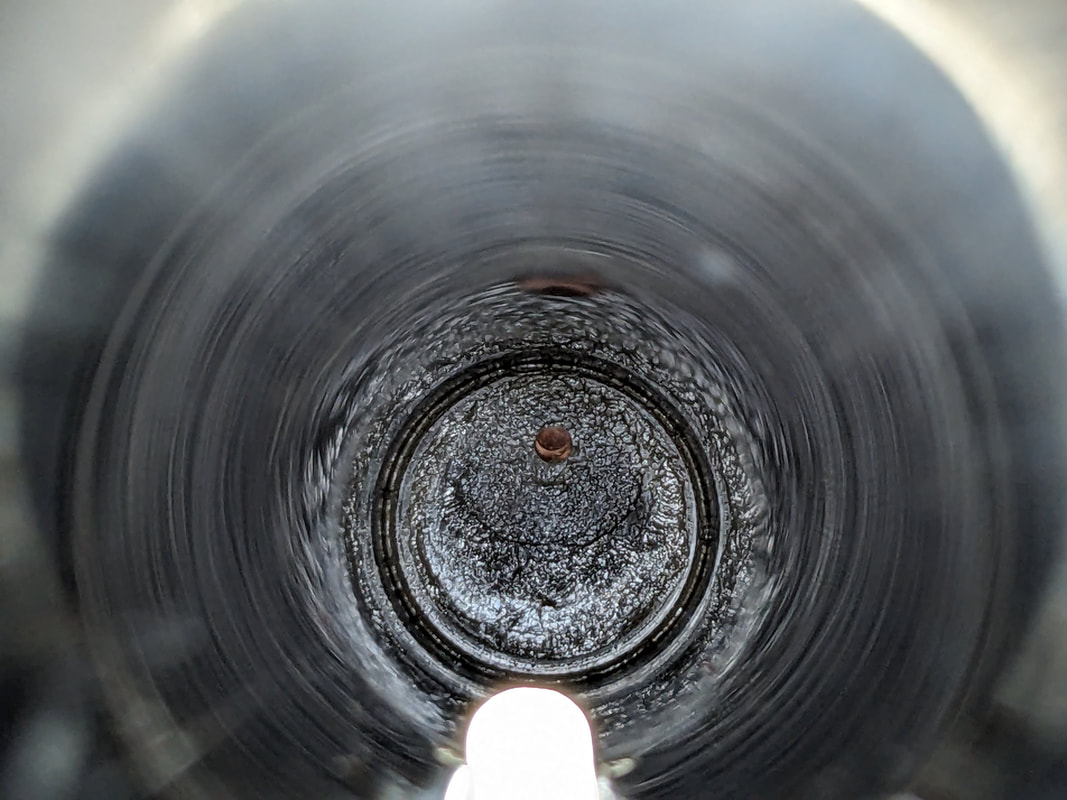
It needs a DEEP cleaning, LOL!
Plug the TP with a small wooden dowel, spray with "Gumout" Carb cleaner, cover the rear, stand vertically, and let it sit overnight. Then scrub with a long wooden dowel wrapped in paper/cloth and clean again.
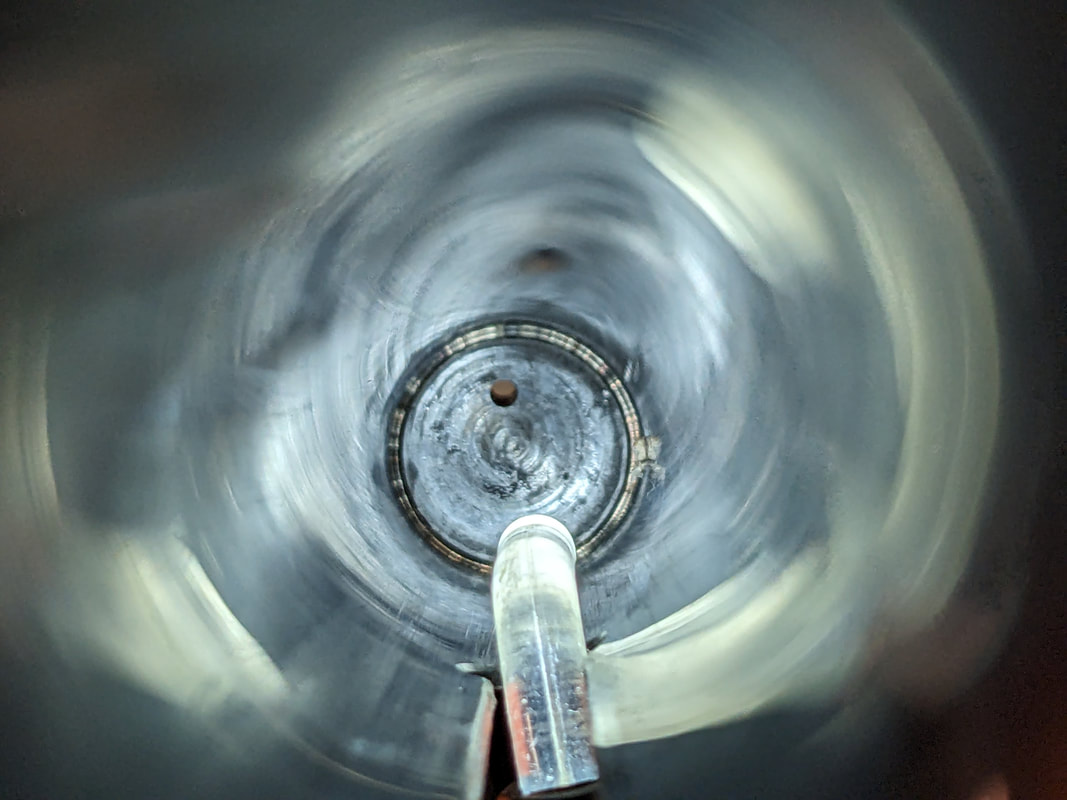
Then clean with acetone or lacquer thinner (that also is made up of acetone), till you get something like this:
Plug the TP with a small wooden dowel, spray with "Gumout" Carb cleaner, cover the rear, stand vertically, and let it sit overnight. Then scrub with a long wooden dowel wrapped in paper/cloth and clean again.
Then clean with acetone or lacquer thinner (that also is made up of acetone), till you get something like this:
The "tune"
Using the metric punch pin as a "position holder" (3rd picture above) we can clearly see that the piston has ample room for improvement.
The Vortek seal at the top left (black one) is the same for the 95 as it is for the 50, which is peculiar, but that's what it is. The OEM seal is even taller. There's 0.4 mm's between the two, but that is what makes the rifle have (in HW's own words) "a stroke of about 71 mm's".
We also measured the TP and it is not too long.
One peculiarity is that, while not completely horizontal between compression chamber and barrel, the inclination of the transfer port is somewhat shallow:
Barely 20°, which means that the origin of the air flow from the compression chamber into the barrel's breech is at the top of the piston, not at the center.
And this may be the cause of an asymmetrical wear/galling of the piston, but we'll talk about that later.
And this may be the cause of an asymmetrical wear/galling of the piston, but we'll talk about that later.
We ran a rather long and exhaustive series of tests with "Private HW50"
We had FIVE springs, two guides, two top hats, and two sealing technologies (and three different ORing Materials).
We did NOT run all the possible 120 different tests, but we did run a fair number, enough to have a good "grasp" of what makes these little rifles "tick".
I MUST emphasize that NONE of these tests were run as "conventional" tests. ALL test were restricted to the "pop" gun (as per Cardew's definitions), with NO dieseling allowed to contribute to the energy output.
A true "Boot Camp" for the "recruit".
Just to list the springs we tested (later cut down to max allowable length for THIS piston/gun combination):
Maccari XLD 120-775/30
Vortek 118-780/30
Vortek 118-745/30
Vortek 113-780/30
Titan XS #7 127-793/30
Energies yielded as a "pop-gun" with Vortek piston seal:
-The Maccari XLD spring 120-775 yielded on a first test:
10.7 ft-lbs.- JSB/7.33
10.5 ft-lbs.- JSB/8.44
- The Vortek spring 113-780 yielded:
9.0 ft-lbs.- JSB/7.33
8.7 ft-lbs.- JSB/8.44
-The Vortek spring 118-745 yielded:
9.4 ft-lbs.- JSB/7.33
9.0 ft-lbs.- JSB/8.44
At this point in time, it became clear that the swept volume was not enough to reach much higher energy levels
We should also note the incredible versatility of these little rifles. With a 0.113" WD spring they can be perfectly setup for any young/small framed shooter with little upper body strength and still yield around 8 ft-lbs
With "stronger" WD's it becomes a respectable performer that will be perfectly legal under UK law.
Since the owner wanted to compete in FT, a minimum of 11 ft-lbs was deemed logical.
Yes, it is true that many championships have been won at 10.5 ft-lbs, but these are champion shooters that have extraordinary abilities in wind-gauging and range-finding; for "mere mortals" a minimum of 11 ft-lbs is a logical starting point.
AND, you need to remember that this is a breakbarrel rifle.
Also, a new batch of JSB/7.89 arrived and so I decided to include them.
The "Mod"
In order to achieve a larger swept volume we decided to convert the piston to an ORing head piston and allow the maximum stroke / volume possible.
Once all the "travels" had been checked, it became clear that we could go as high as a 77 mm's stroke with no secondary effects on the cocking lever, or the piston's channel.
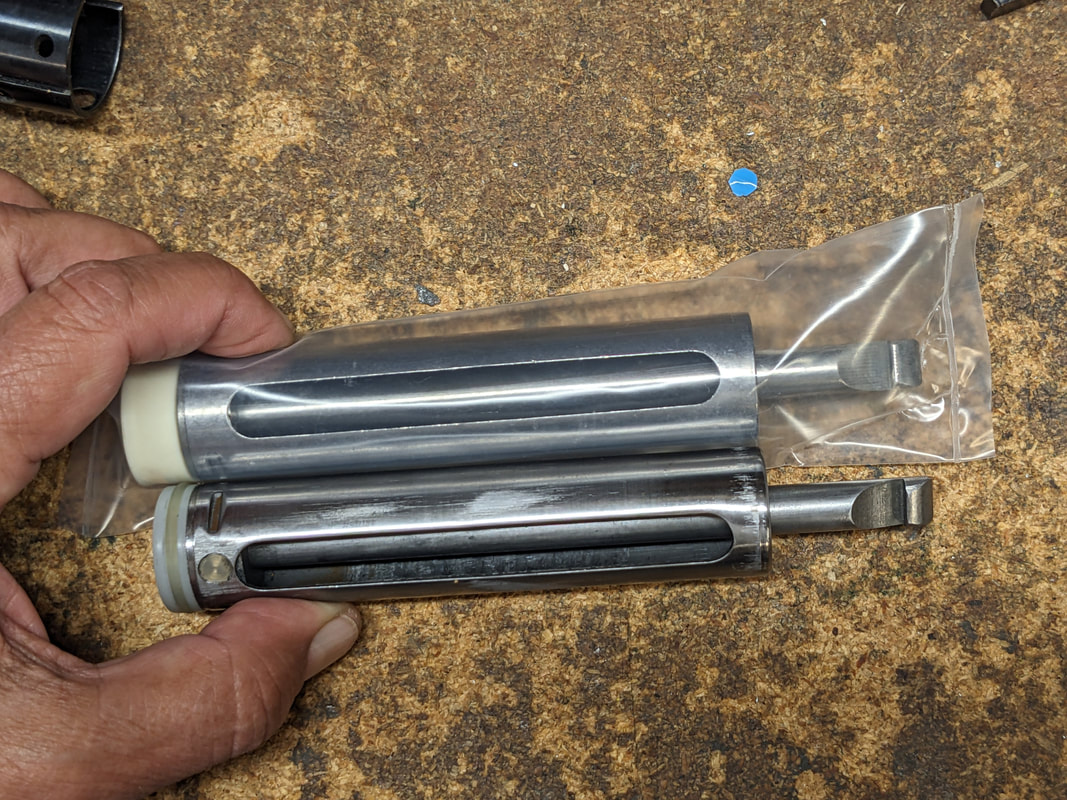
We ordered a new piston, just in case we needed it and it is pictured below side by side with an ORing head piston. IF the modification, for any reason, is not desired, we can swap back to the OEM piston without any problems, as no other part of the gun was modified.
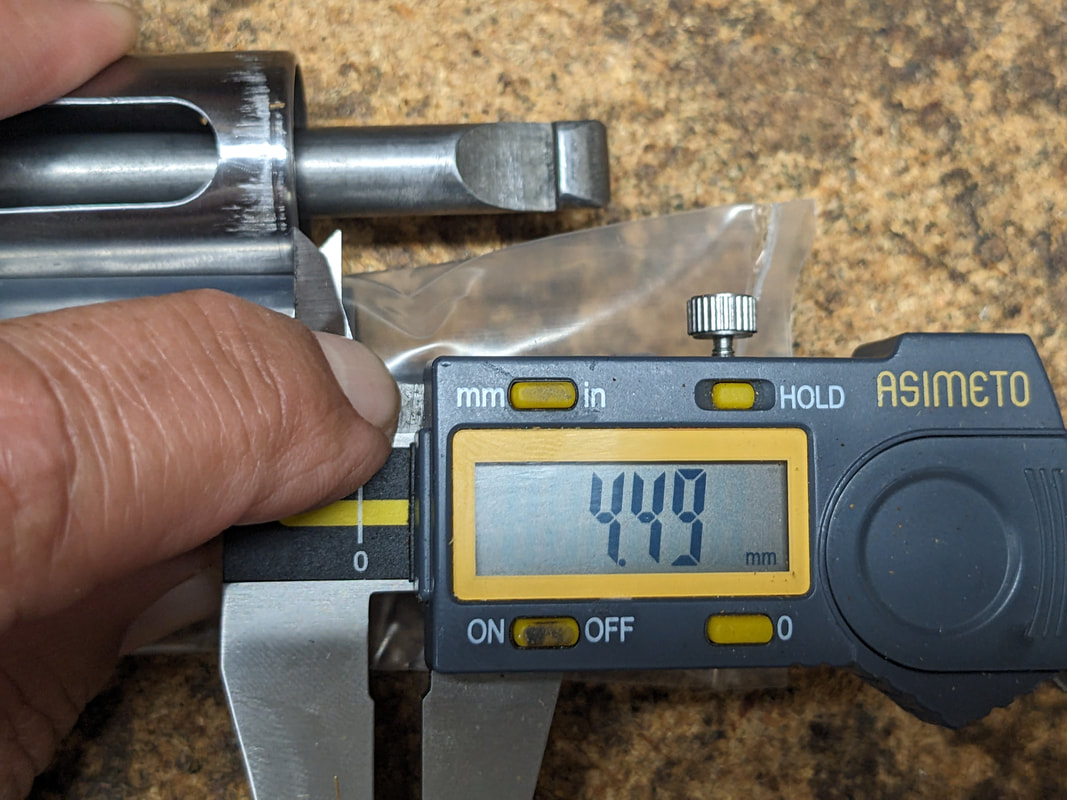
The difference between the total length of the OEM piston and the CCA O'Ring piston is 4.5 mm's so the rifle is not completely "maxed out". I distrust things that are maxed out. But that is just me.
In reverse of my usual tunes that involve short stroking a larger gun, this is the "long-stroking" of a smaller gun.
Once all the "travels" had been checked, it became clear that we could go as high as a 77 mm's stroke with no secondary effects on the cocking lever, or the piston's channel.
We ordered a new piston, just in case we needed it and it is pictured below side by side with an ORing head piston. IF the modification, for any reason, is not desired, we can swap back to the OEM piston without any problems, as no other part of the gun was modified.
The difference between the total length of the OEM piston and the CCA O'Ring piston is 4.5 mm's so the rifle is not completely "maxed out". I distrust things that are maxed out. But that is just me.
In reverse of my usual tunes that involve short stroking a larger gun, this is the "long-stroking" of a smaller gun.
Going from the Vortek seal to the ORing head piston, the added stroke added 39 fps / 0.4 ft-lbs to the yield of the gun with the 7.9 grs pellet.
The CCA O'Ring head piston can take any ORing of the specified size. However, it has been our experience that some ORing materials are better than others for each manufacturer. Meaning that the "harmony" between one material and the compression chamber it is working in depend on a number of factors; among them: steel, uniformity and finish. Differences in output can be substantial; as an example, between the worst and the best materials, the MV's varied between 750's and 790's (5.4%) using the same pellets, spring, guide, and tophat.
Having determined which material was the best for this case, we proceeded to center ourselves in the 7.89 grs. pellet, as it seemed to draw out the best characteristics of "Private HW50": best shot cycle, and best energy.
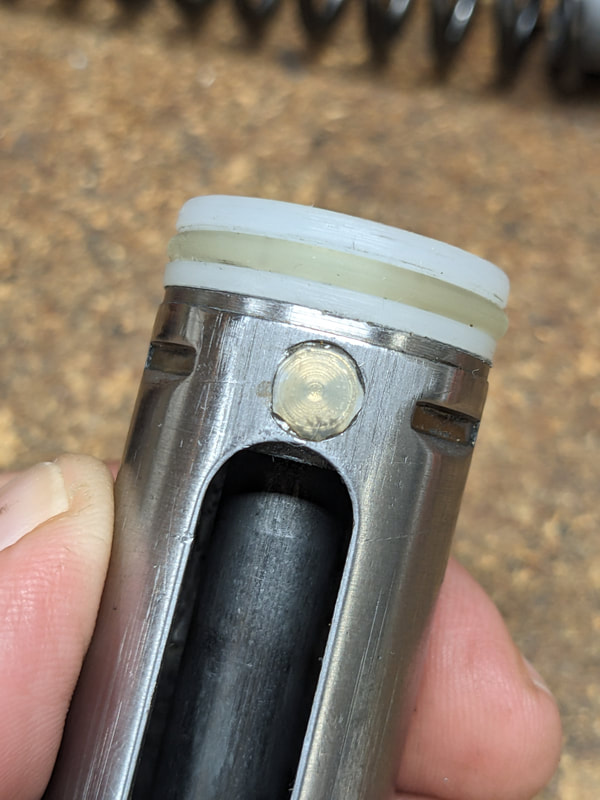
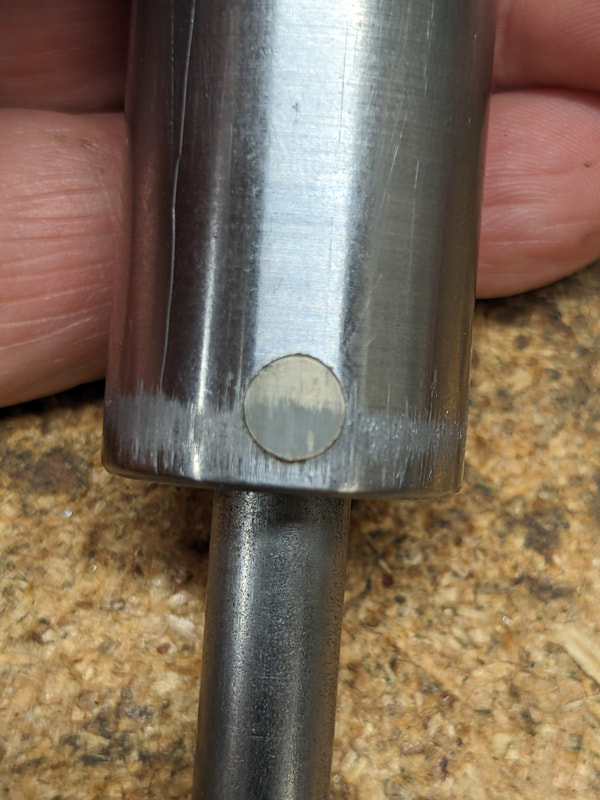
One thing we noted was that the little rifle tended to "gall" the front lower section of the piston and the high rear section of the piston (the asymmetrical wear described above), this started happening with the Vortek seal, so we installed buttons that stopped the process.
Just to clarify, this is not the same "galling" that has been described as happening on the OUTSIDE of the action via an excessively spaced "linear bearing" in the cocking lever.
The CCA O'Ring head piston can take any ORing of the specified size. However, it has been our experience that some ORing materials are better than others for each manufacturer. Meaning that the "harmony" between one material and the compression chamber it is working in depend on a number of factors; among them: steel, uniformity and finish. Differences in output can be substantial; as an example, between the worst and the best materials, the MV's varied between 750's and 790's (5.4%) using the same pellets, spring, guide, and tophat.
Having determined which material was the best for this case, we proceeded to center ourselves in the 7.89 grs. pellet, as it seemed to draw out the best characteristics of "Private HW50": best shot cycle, and best energy.
One thing we noted was that the little rifle tended to "gall" the front lower section of the piston and the high rear section of the piston (the asymmetrical wear described above), this started happening with the Vortek seal, so we installed buttons that stopped the process.
Just to clarify, this is not the same "galling" that has been described as happening on the OUTSIDE of the action via an excessively spaced "linear bearing" in the cocking lever.
Upon re-test with the 7.9 grs. pellets, we discovered that the Maccari spring had lost 30 fps on the first 100 shots, and was now yielding 10.4 ft-lbs
We spaced it up using one and then two washers that are 2.3 mm's thick (main reason why I do not want to start maxed out), but the power output did not increase at all for the 1 washer test, remaining at 10.4 ft-lbs.
And increasing only slightly to 10.6 ft-lbs for the two washers test.
It is clear then that, for the spring in question, the compression chamber had reached the maximum output possible.
Once we re-installed the Titan XS #7 spring, output came out at 10.8 - 10.9 ft-lbs
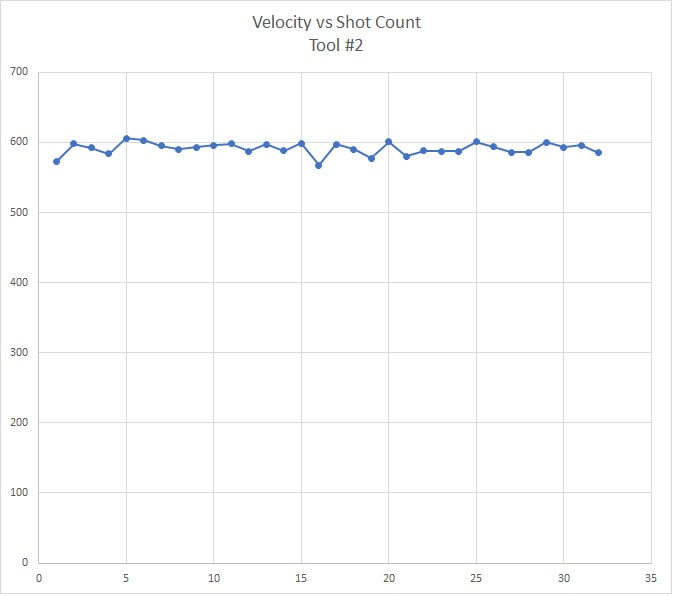
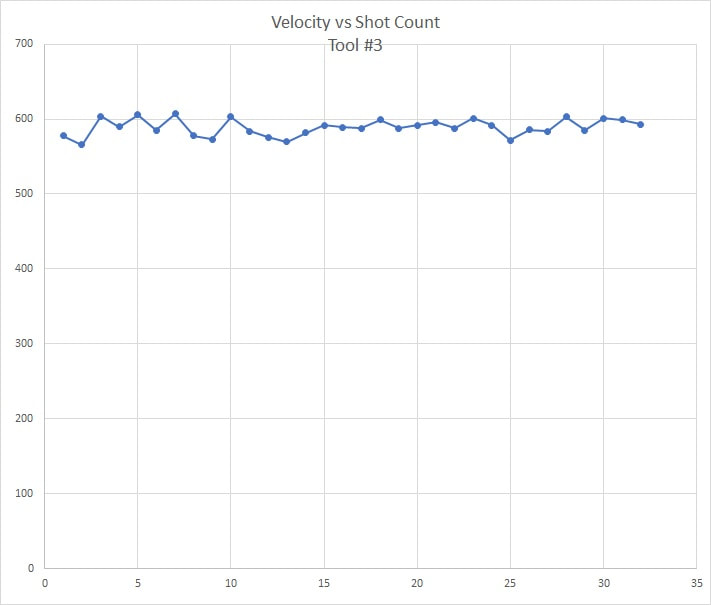
And so, we concentrated now on learning what was the best lube for this barrel.
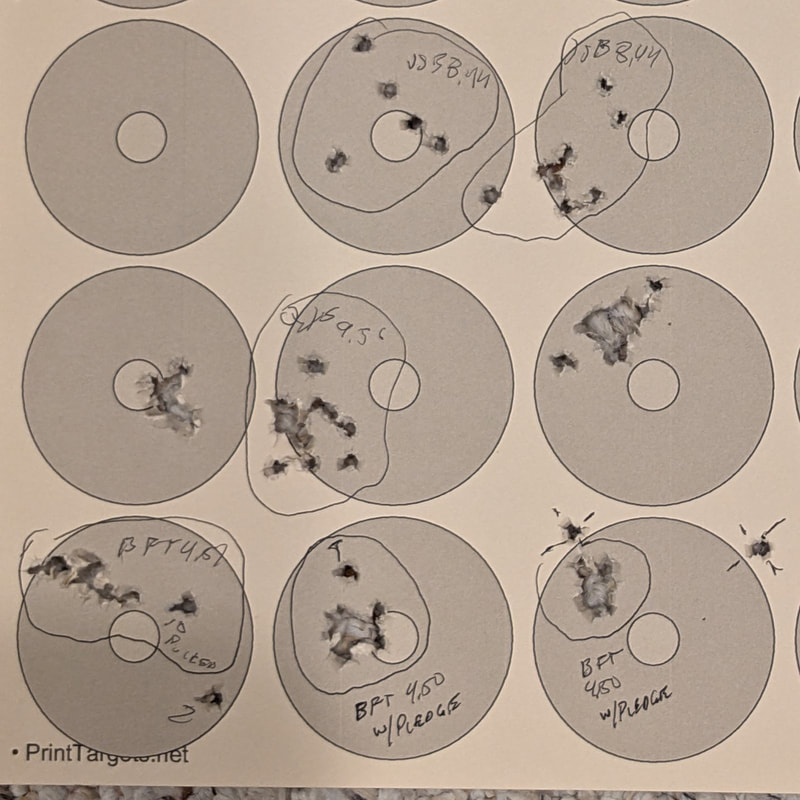
For that, we tested in 20 shot strings, the performance of the 7.89 grs. JSB Exact lubed with T-9 and with baked Pledge.
Here is a scatter chart of MV's. Do note that the origin of the chart is 500 fps, that origin was chosen to be able to discern the small variances in MV with a 0 fps origin, the variances are invisible.
We spaced it up using one and then two washers that are 2.3 mm's thick (main reason why I do not want to start maxed out), but the power output did not increase at all for the 1 washer test, remaining at 10.4 ft-lbs.
And increasing only slightly to 10.6 ft-lbs for the two washers test.
It is clear then that, for the spring in question, the compression chamber had reached the maximum output possible.
Once we re-installed the Titan XS #7 spring, output came out at 10.8 - 10.9 ft-lbs
And so, we concentrated now on learning what was the best lube for this barrel.
For that, we tested in 20 shot strings, the performance of the 7.89 grs. JSB Exact lubed with T-9 and with baked Pledge.
Here is a scatter chart of MV's. Do note that the origin of the chart is 500 fps, that origin was chosen to be able to discern the small variances in MV with a 0 fps origin, the variances are invisible.
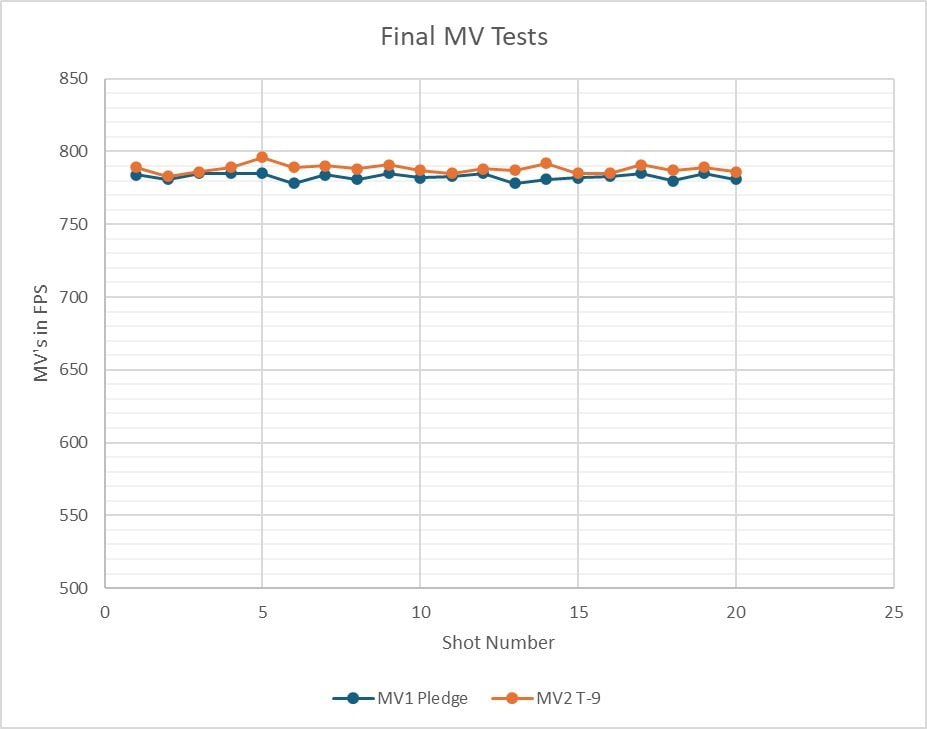
The statistics themselves are interesting:

As you can see, the lubricant used on the pellets had somewhat of an effect on the performance.
At 788.2 average fps for the 7.89 grs. pellet yields 10.9 ft-lbs which is real close to the objective.
With an ES of 13, BUT a SsD of 3, it tells us that there were some "rogue" pellets in the tin that pushed the ES, but were unable to spoil the sample Std Dev. beyond the 3 fps. (an advantage of the 20 shot strings). Do remember that in a proper "normal" distribution, the ES is ABOUT 3 times the sd.
For statistical sakes we use the Sample standard deviation, that penalizes even further the number.
And, it could also be a question of the whole system "settling down".
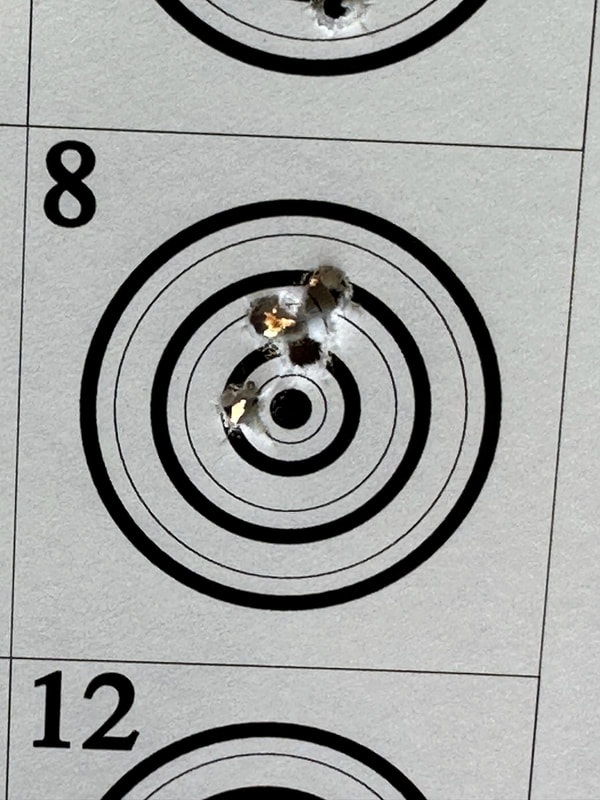
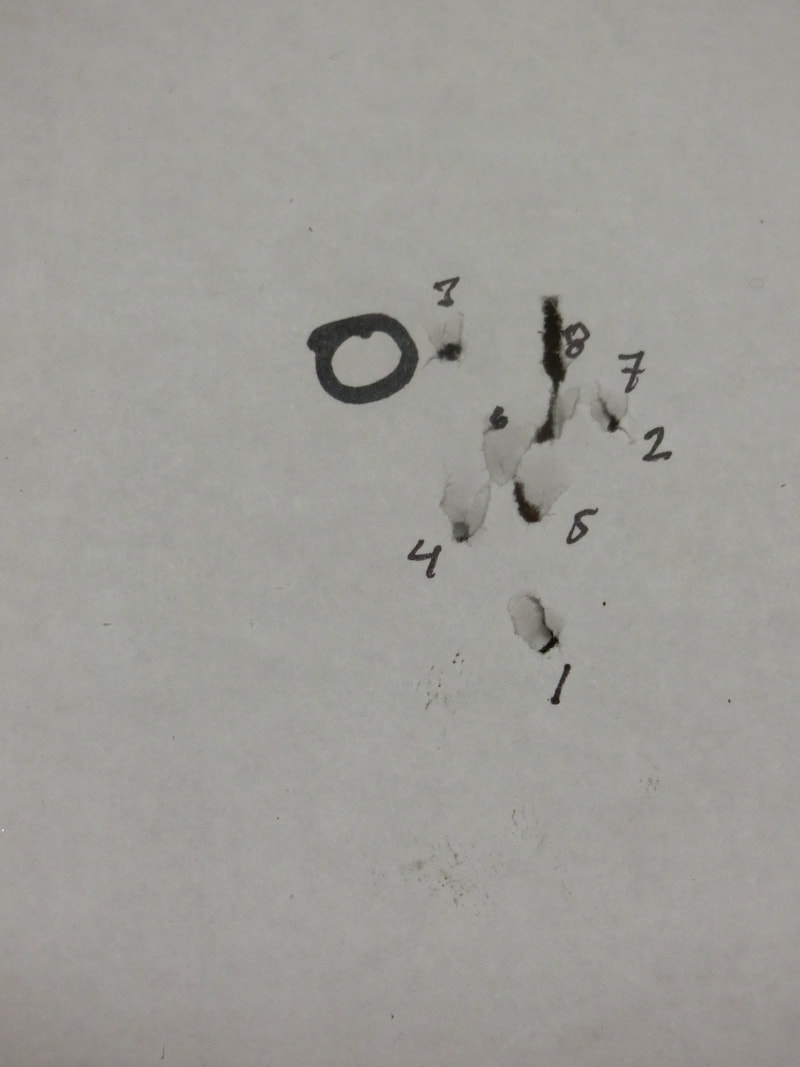
We'll see what happens in the second part of this "Boot Camp" when we test for accuracy
So, keep well, shoot straight, and stay tuned!
HM
At 788.2 average fps for the 7.89 grs. pellet yields 10.9 ft-lbs which is real close to the objective.
With an ES of 13, BUT a SsD of 3, it tells us that there were some "rogue" pellets in the tin that pushed the ES, but were unable to spoil the sample Std Dev. beyond the 3 fps. (an advantage of the 20 shot strings). Do remember that in a proper "normal" distribution, the ES is ABOUT 3 times the sd.
For statistical sakes we use the Sample standard deviation, that penalizes even further the number.
And, it could also be a question of the whole system "settling down".
We'll see what happens in the second part of this "Boot Camp" when we test for accuracy
So, keep well, shoot straight, and stay tuned!
HM


 RSS Feed