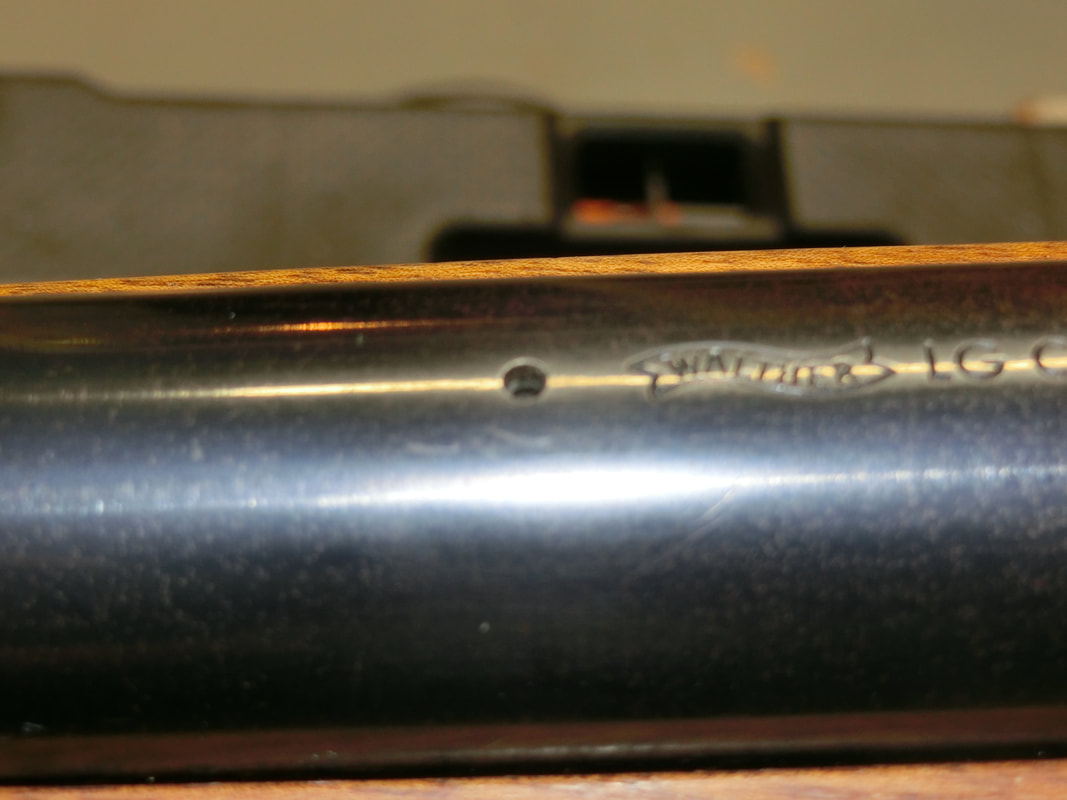
Bringing back to life a Walther LG55
Doubtlessly, among the spring-piston airguns of the middle of the past century, the Walther line of "LG" rifles (LuftGewehr) must stand among the "Great Ladies".
We often forget that, until 1950, Germany was forbidden to produce rifles by the occupying Allies.
Walther was one of the first companies to resume activities in 1950, by 1951 they already were marketing their model 51, development continued for a few years along the same lines, achieving the final design and production of the LG55 in 1955.
The successor to the LG55 would be the "LGV" that was, for many, the epitome of the recoiling match springer.
After the LGV, Walther would opt for the Single Stroke Pneumatic (LGR), while DIANA went on to develop the "Giss System" guns (truly recoil-less) entering the market in 1963 with the model 60.
According to Walther, the LG55 was in production between 1955 and 1968
Now, in those days, the "Tyrolean" style stock had not yet been outlawed in competitions, and so quite a number of airguns from the three large brands of those times are so stocked.
Our adventure began back in November when, out of the blue, someone contacted me about repairing an "older German Target gun". As you can imagine, in my mind, that could mean almost anything, so we started exchanging EMails.
As the details came through it was obvious it was not a DIANA airgun and, so, I was very candid in telling the prospective customer that those jobs were as much a risk for the gunsmith as they were for the gun owner.
In the end, we achieved a consensus of how to work and with some links we found on the internet, he was able to locate a replacement spring and piston seal.
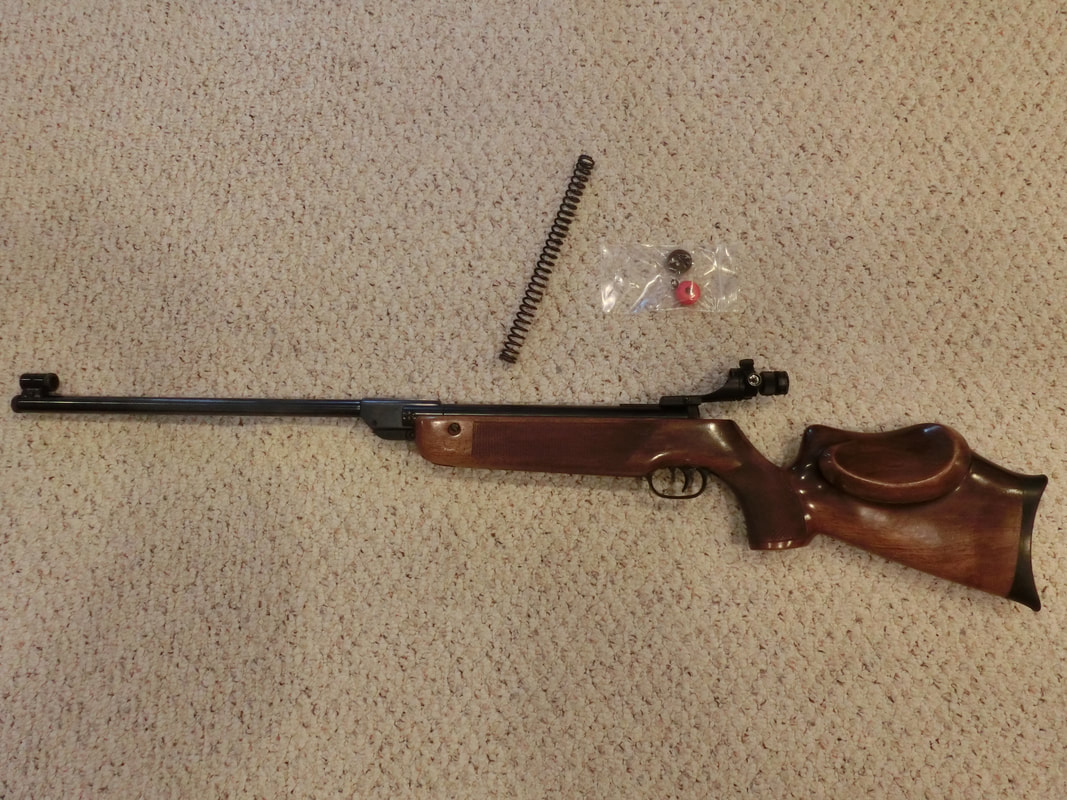
After a very nice (and socially distant) visit, he dropped off a rather nice (and hefty) Walther LG55, plus the spare parts he had been able to acquire.
We often forget that, until 1950, Germany was forbidden to produce rifles by the occupying Allies.
Walther was one of the first companies to resume activities in 1950, by 1951 they already were marketing their model 51, development continued for a few years along the same lines, achieving the final design and production of the LG55 in 1955.
The successor to the LG55 would be the "LGV" that was, for many, the epitome of the recoiling match springer.
After the LGV, Walther would opt for the Single Stroke Pneumatic (LGR), while DIANA went on to develop the "Giss System" guns (truly recoil-less) entering the market in 1963 with the model 60.
According to Walther, the LG55 was in production between 1955 and 1968
Now, in those days, the "Tyrolean" style stock had not yet been outlawed in competitions, and so quite a number of airguns from the three large brands of those times are so stocked.
Our adventure began back in November when, out of the blue, someone contacted me about repairing an "older German Target gun". As you can imagine, in my mind, that could mean almost anything, so we started exchanging EMails.
As the details came through it was obvious it was not a DIANA airgun and, so, I was very candid in telling the prospective customer that those jobs were as much a risk for the gunsmith as they were for the gun owner.
In the end, we achieved a consensus of how to work and with some links we found on the internet, he was able to locate a replacement spring and piston seal.
After a very nice (and socially distant) visit, he dropped off a rather nice (and hefty) Walther LG55, plus the spare parts he had been able to acquire.
Among the first things that popped into my head was : "That thing cannot shoot"
WHAAAT?? you're going to ask!
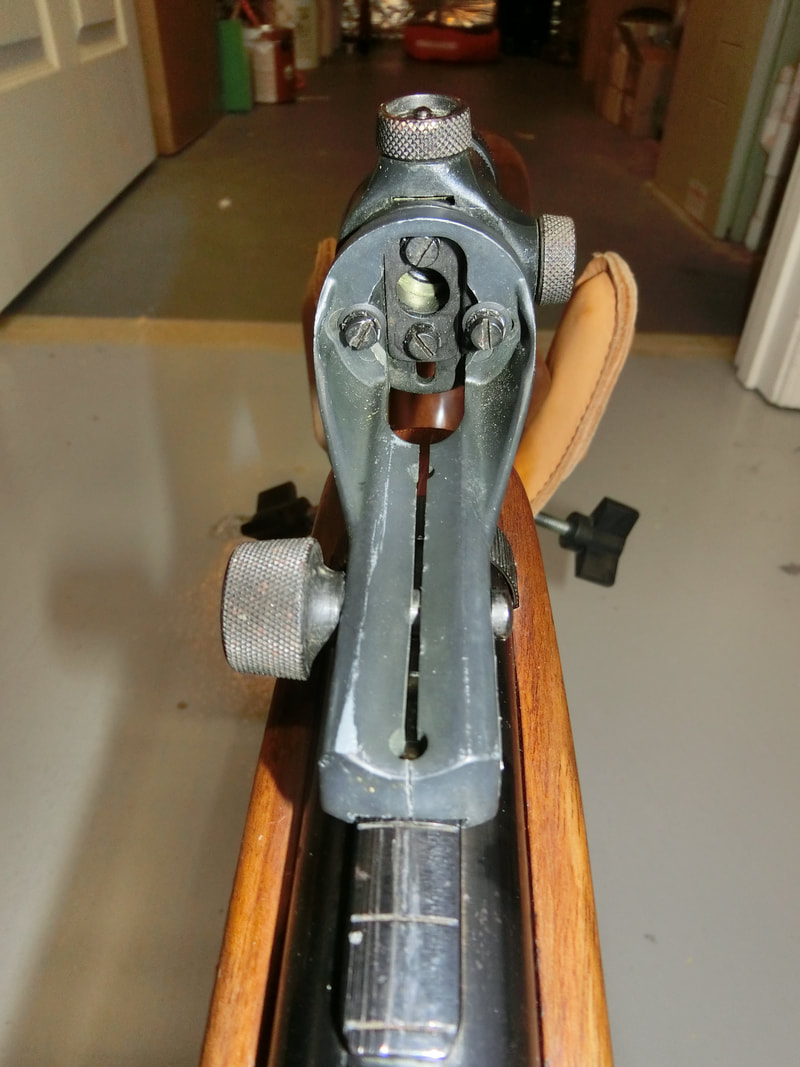
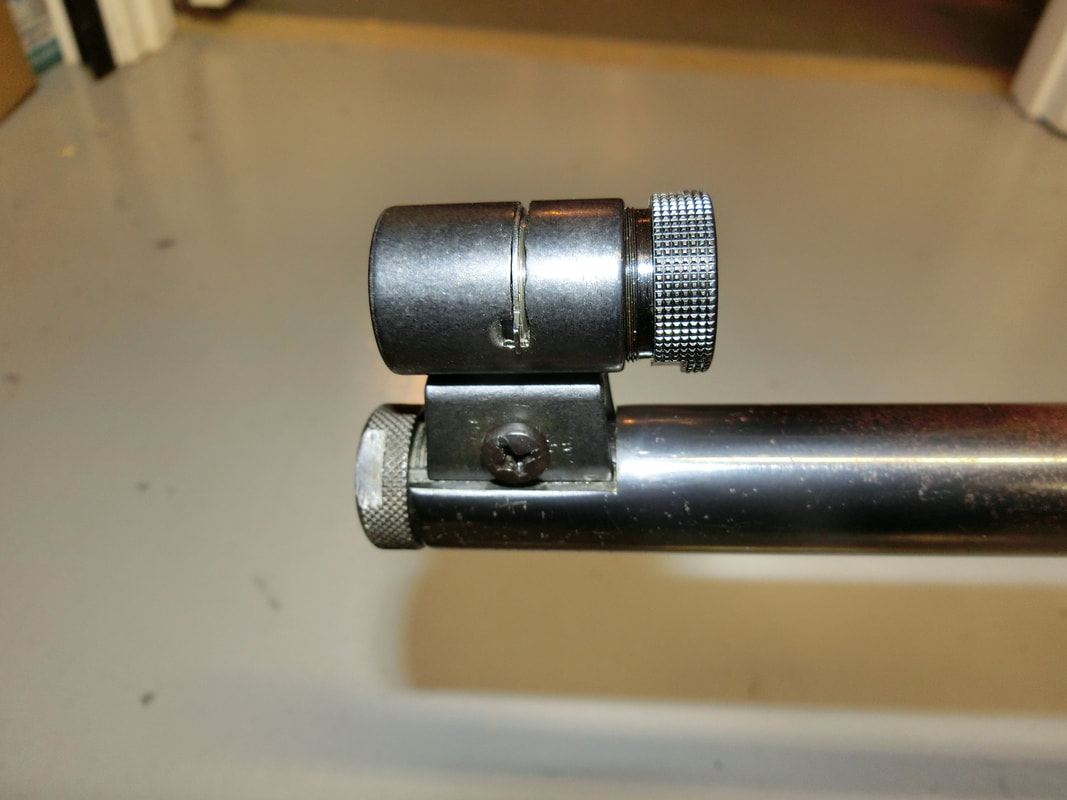
Well, simple, just look at the rear sight: It is "Mounted" onto the rear action closing knurled piece.
And the front sight is WAY TOO LOW!
But the gun was "toast" it would not build up pressure, so it was impossible to test it for a "Benchmark" experience.
The next thing that popped into my mind was: "This beauty must have shot thousands upon thousands of rounds". Boy was I going to be proven WRONG (yes, with capitals).
There was no information about how much the gun had shot or if it had shot well from the previous owners to the current possessor and, so, without much more to go by I was handed the gun, the baggie of spare parts and a box to contain everything.
Some time passed, as I am real busy, and when time came around to tackle this gun, I decided to take as many pictures as humanly possible, as well as to attempt the job in two stages:
On a first stage, I would try to bring back the gun it was supposed to be, with all the right parts and components. This to experience the REALITY of what a 1950's gun shot like.
On a second stage. we would upgrade the function to more modern standards, ease the maintenance of the gun, and ensure that now it will be properly used, cherished, and passed on. As the heirloom it is (or as the "cultural icon" that the German shooting world thinks it is).
So, let's tackle this!
WHAAAT?? you're going to ask!
Well, simple, just look at the rear sight: It is "Mounted" onto the rear action closing knurled piece.
And the front sight is WAY TOO LOW!
But the gun was "toast" it would not build up pressure, so it was impossible to test it for a "Benchmark" experience.
The next thing that popped into my mind was: "This beauty must have shot thousands upon thousands of rounds". Boy was I going to be proven WRONG (yes, with capitals).
There was no information about how much the gun had shot or if it had shot well from the previous owners to the current possessor and, so, without much more to go by I was handed the gun, the baggie of spare parts and a box to contain everything.
Some time passed, as I am real busy, and when time came around to tackle this gun, I decided to take as many pictures as humanly possible, as well as to attempt the job in two stages:
On a first stage, I would try to bring back the gun it was supposed to be, with all the right parts and components. This to experience the REALITY of what a 1950's gun shot like.
On a second stage. we would upgrade the function to more modern standards, ease the maintenance of the gun, and ensure that now it will be properly used, cherished, and passed on. As the heirloom it is (or as the "cultural icon" that the German shooting world thinks it is).
So, let's tackle this!
First Stage.- what the LG55 was designed to be
We kicked off the repair with a huge problem:
The rear sight would not budge.
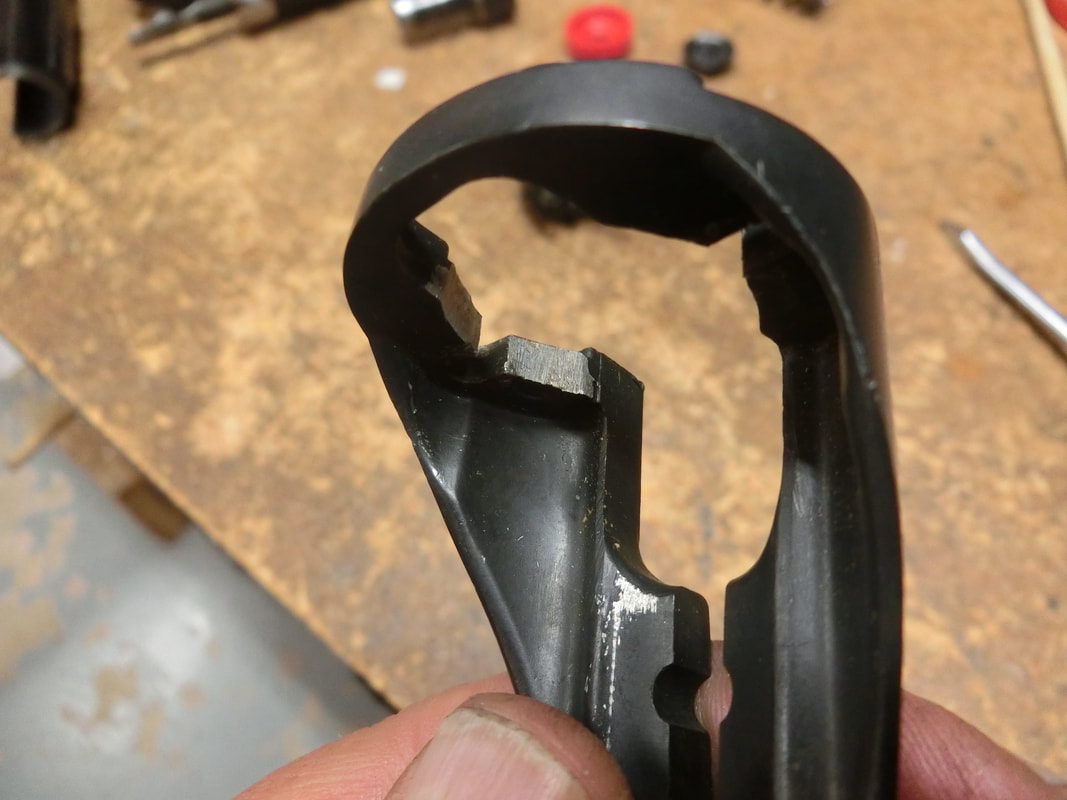
As noted above the rear sight had been "mounted" onto the knurled screw-in action closing cover. When trying to remove the sight, it broke!
Close inspection revealed a badly abused sight. Clearly the owners had serious troubles trying to sight in the rifle and they had filed and removed material from several places.
The rear sight would not budge.
As noted above the rear sight had been "mounted" onto the knurled screw-in action closing cover. When trying to remove the sight, it broke!
Close inspection revealed a badly abused sight. Clearly the owners had serious troubles trying to sight in the rifle and they had filed and removed material from several places.

So, this is when I started thinking that the relationship between this gun and its first owner must have been a love-hate one.
The other thing that was discovered is that the sights were NOT designed to be so far back.
There are round "cross-troughs" at the top of the action where the single tightening knob's enlarged stem goes in and affixes the rear sight to the action, and there is NO way to get it mounted onto the rear closing cover.
This sight was mounted with a hammer!
Anyway, in the end, the sight came off (do note that the sight is designed to come off by sliding up front), it was repaired and it is now working well.
Oversized washers were used to take up the space of the filing the first owner had done, and the tightening knob was re-set with the E-Clip properly retaining the screw in place.
After this, I conferred with my customer and he graciously accepted the problem while at the same time asking if I had any way to procure another rear sight.
That rear sight has been ordered and has been in transit from Germany for the last 4 weeks.
Still, life had to go on and so the spring had to come out.
That rear sight has been ordered and has been in transit from Germany for the last 4 weeks.
Still, life had to go on and so the spring had to come out.
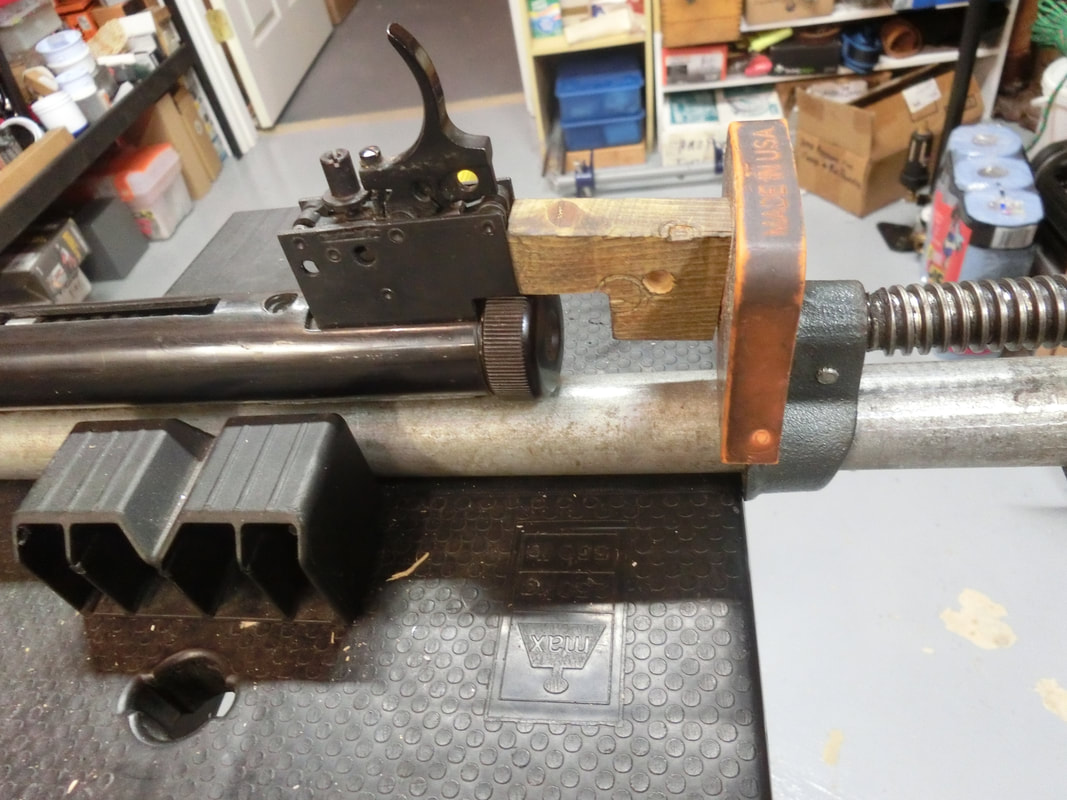
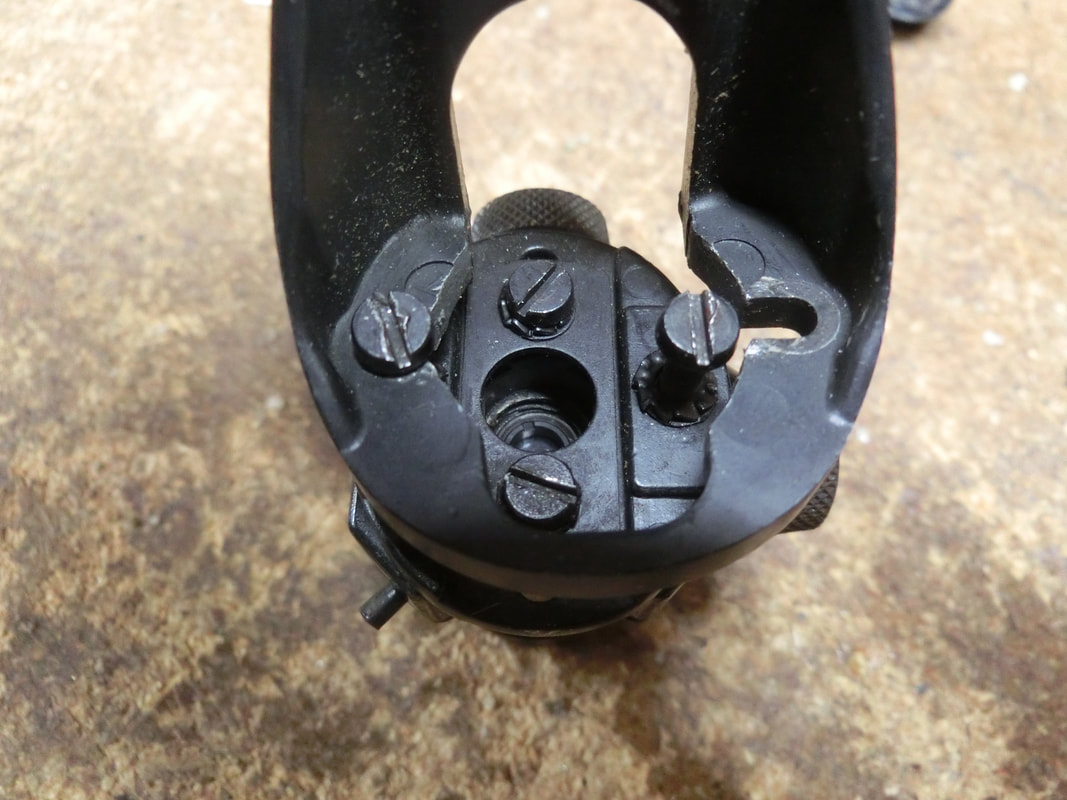
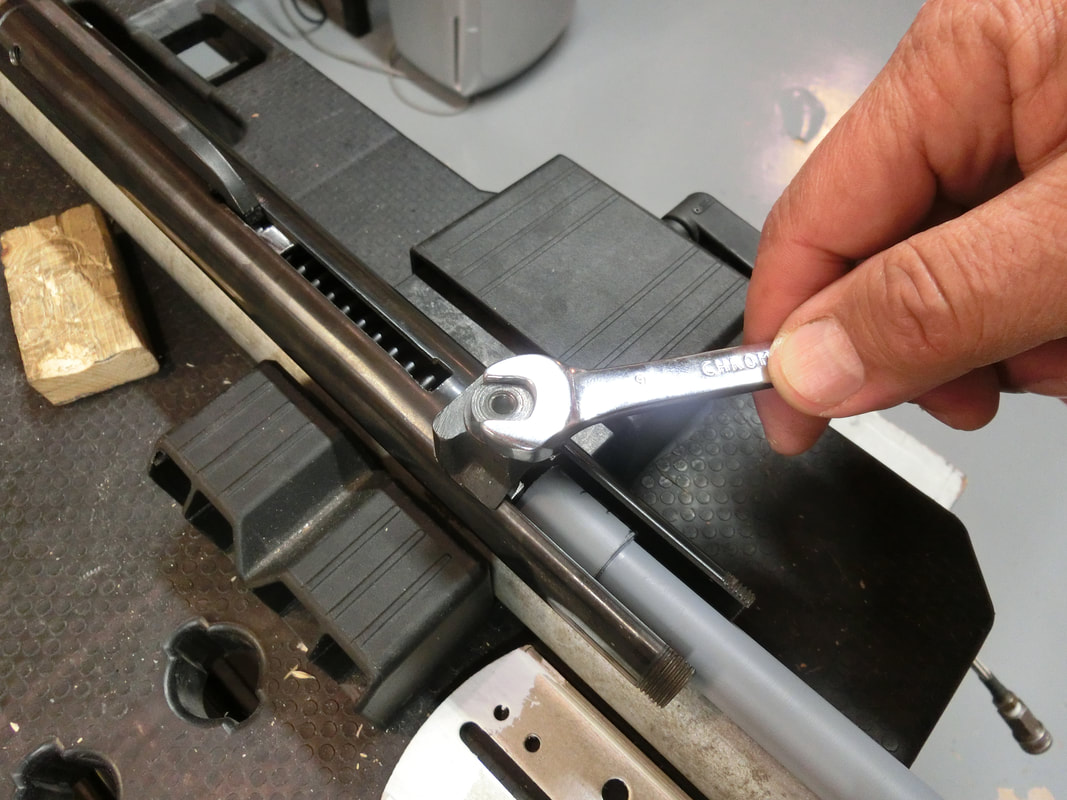
The first thing we did was to remove the knurled closing knob.
SLIGHT pressure from the spring compressor allowed an easy and orderly removal with any sort of wrench or tool.
SLIGHT pressure from the spring compressor allowed an easy and orderly removal with any sort of wrench or tool.
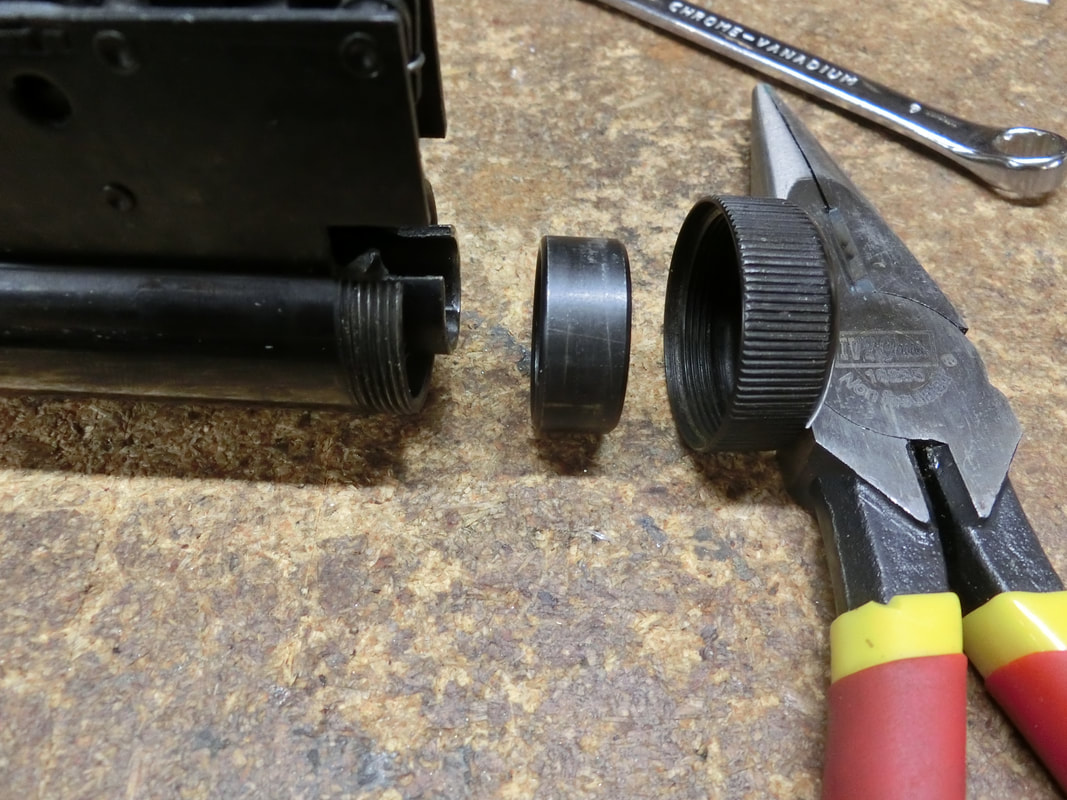
The needle nose pliers are there just to support the knurled screw-in cover and the spacer
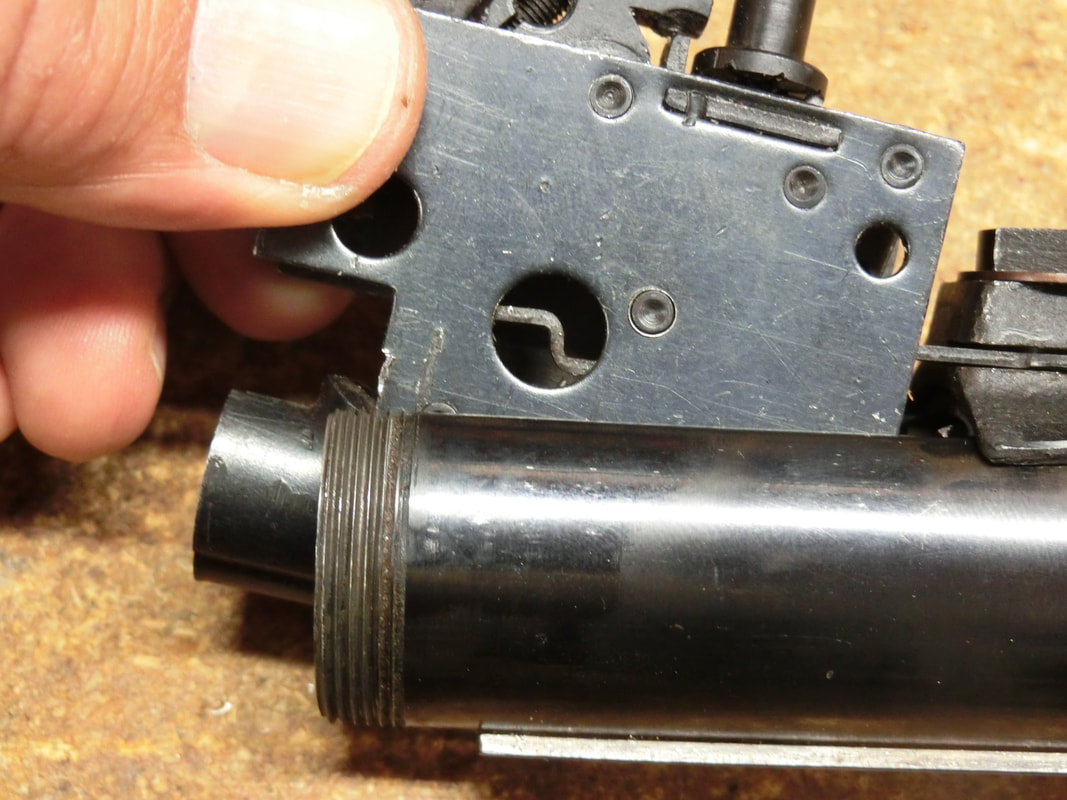
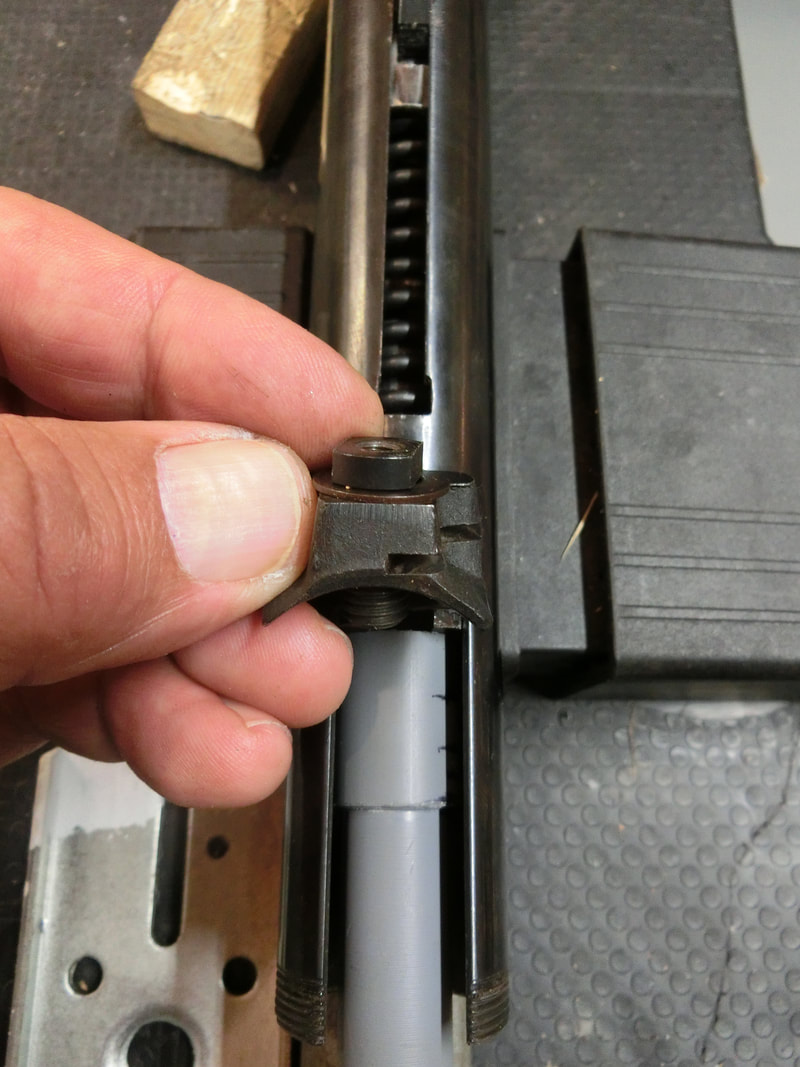
What you see is the trigger block's rear.
What you see is the trigger block's rear.
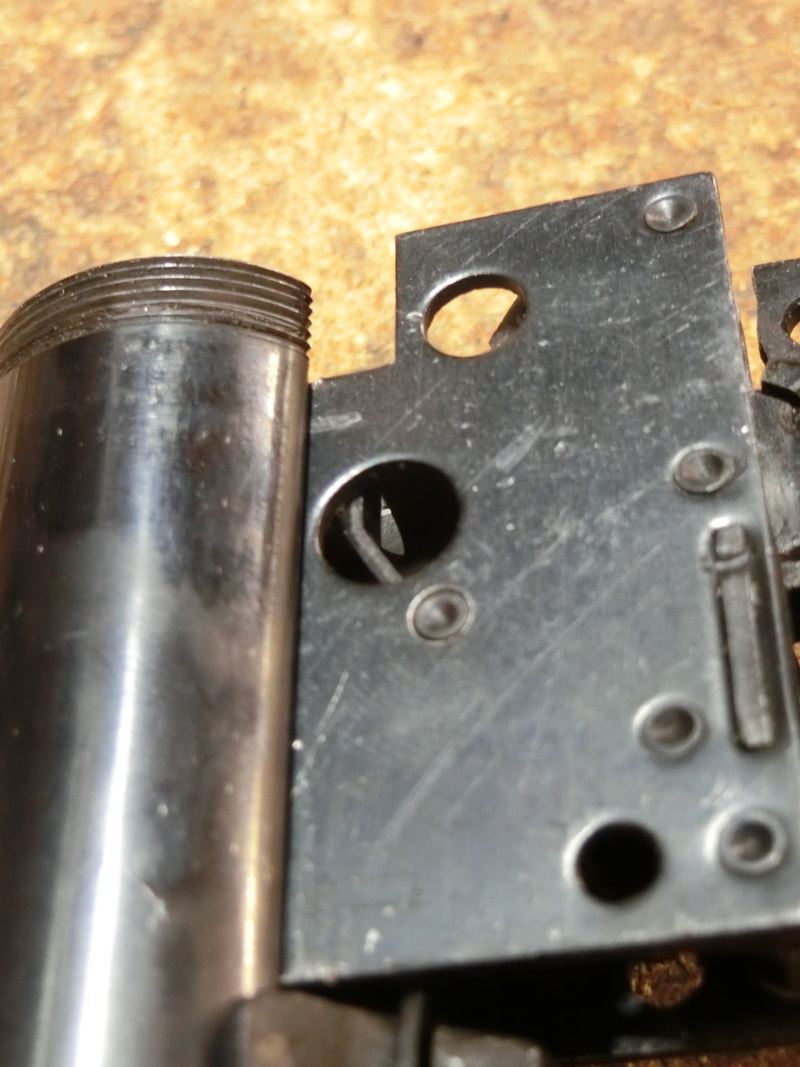
The trigger block is a unitized piece that has strategically located holes. One of them in particular allows you to see the "anti-bear trap" transfer bar and how it hooks from behind into the trigger obstruction release.
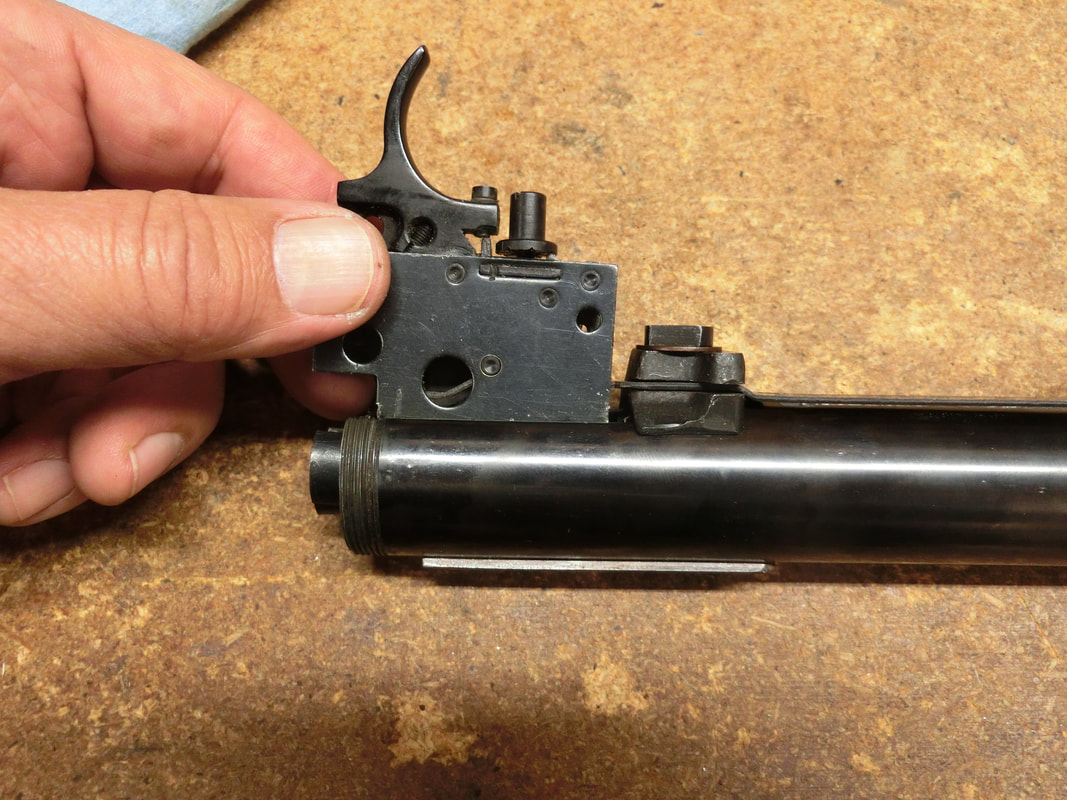
Turning the rifle around (for right handed persons), allows the trigger unit to be lifted up to the rear and slid out:
And that frees the transfer bar:
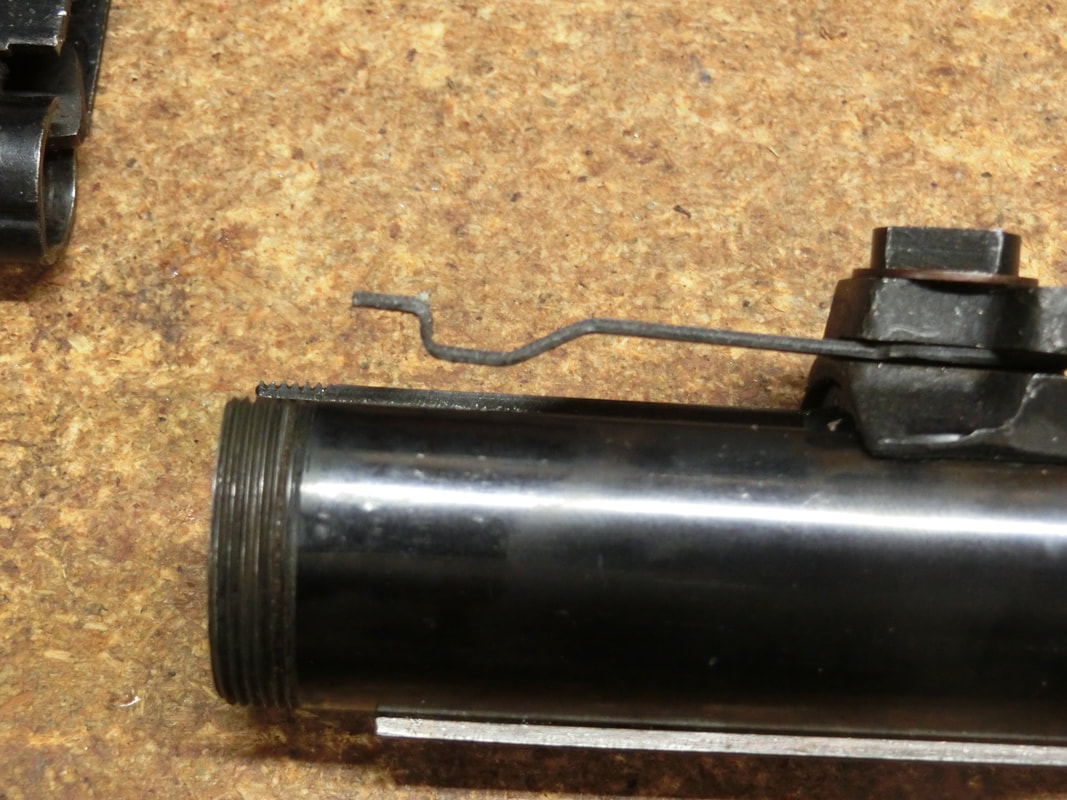
We can now remove the transfer bar:
It is fairly easy at this point to raise the cocking linkage and remove the transfer bar completely.
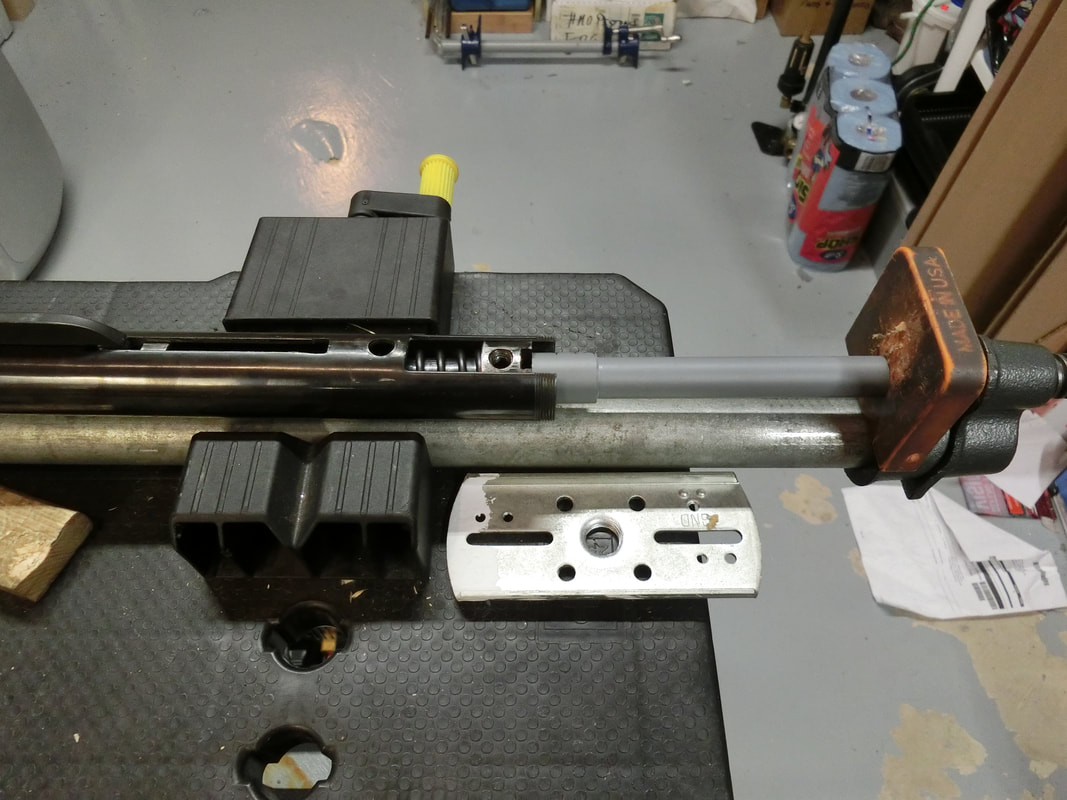
This allows us now to put pressure into the mainspring so that the spring holding nut can be released:
This allows us now to put pressure into the mainspring so that the spring holding nut can be released:
To do this properly we created an extension that houses the rear "horseshoe" of the trigger housing and prevents any slippage.
Once pressure is taken off, the holding nut can be loosened:
Proper size for this wrench is 11/32"s
Once the nut is loosened, the block can come off. Do note the side towards which the transfer bar slot is oriented.
And now we can release the spring retaining block
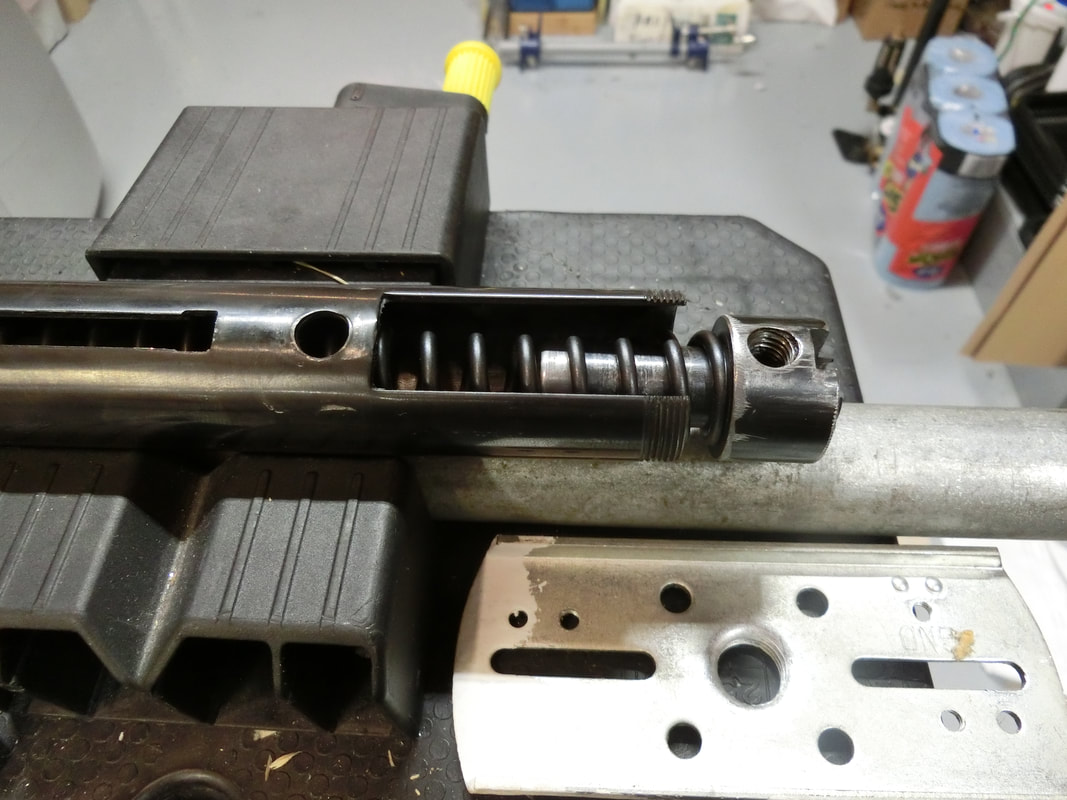
Which has a fair amount of pre-load.
I was surprised at the very good state of the spring, specially for an airgun that does not truly have a fully guided spring.
I was surprised at the very good state of the spring, specially for an airgun that does not truly have a fully guided spring.
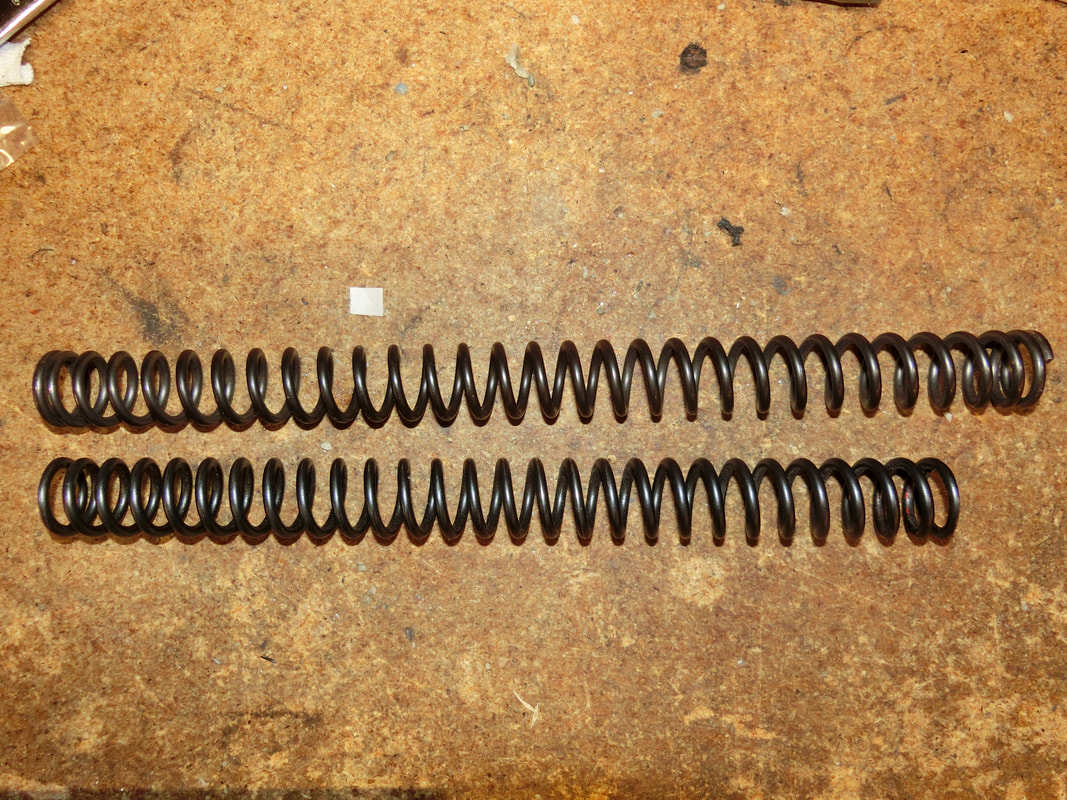
On top is the JM replacement spring
On the bottom is the OEM spring.
The level of "finish" in the spring was absolutely amazing. Clearly not an outsourced part.
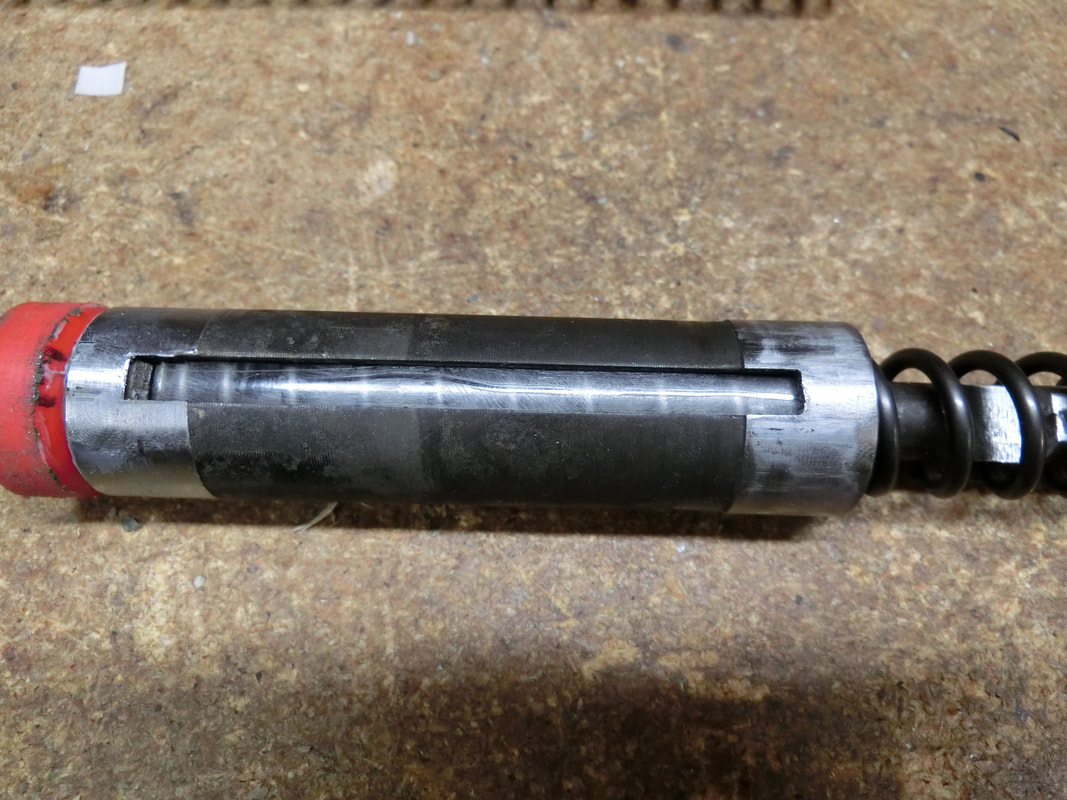
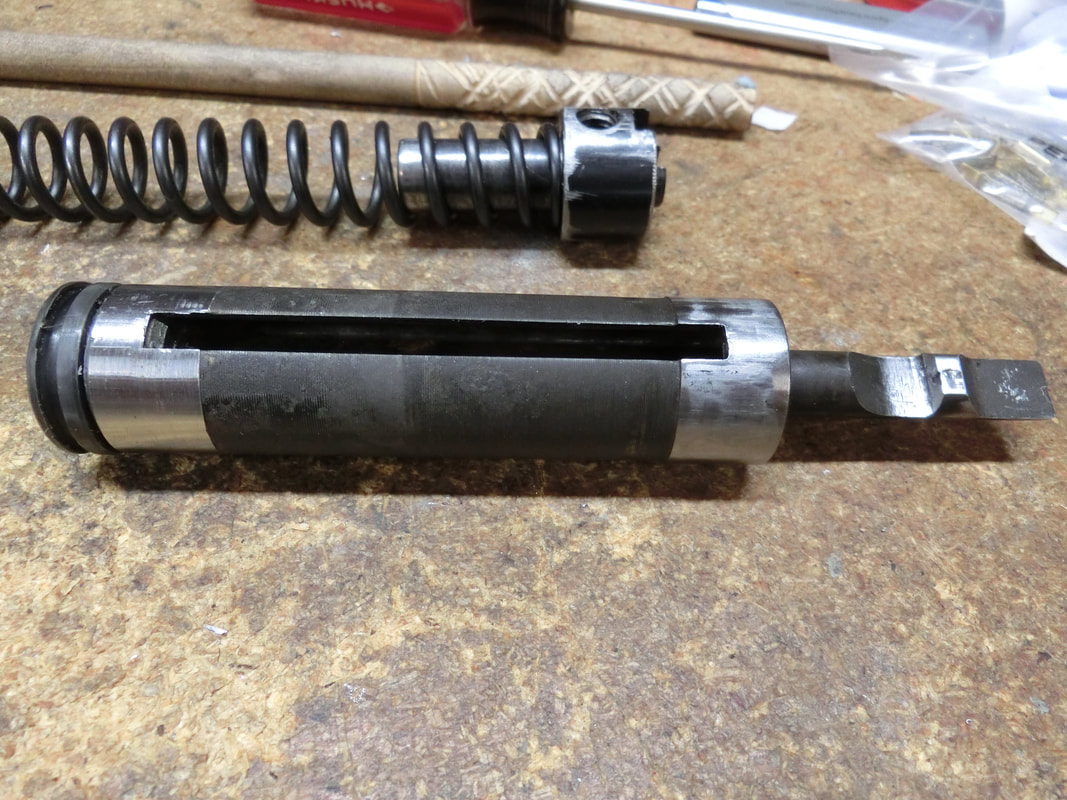
Now, we can extract the piston and see what we are facing.
On the bottom is the OEM spring.
The level of "finish" in the spring was absolutely amazing. Clearly not an outsourced part.
Now, we can extract the piston and see what we are facing.
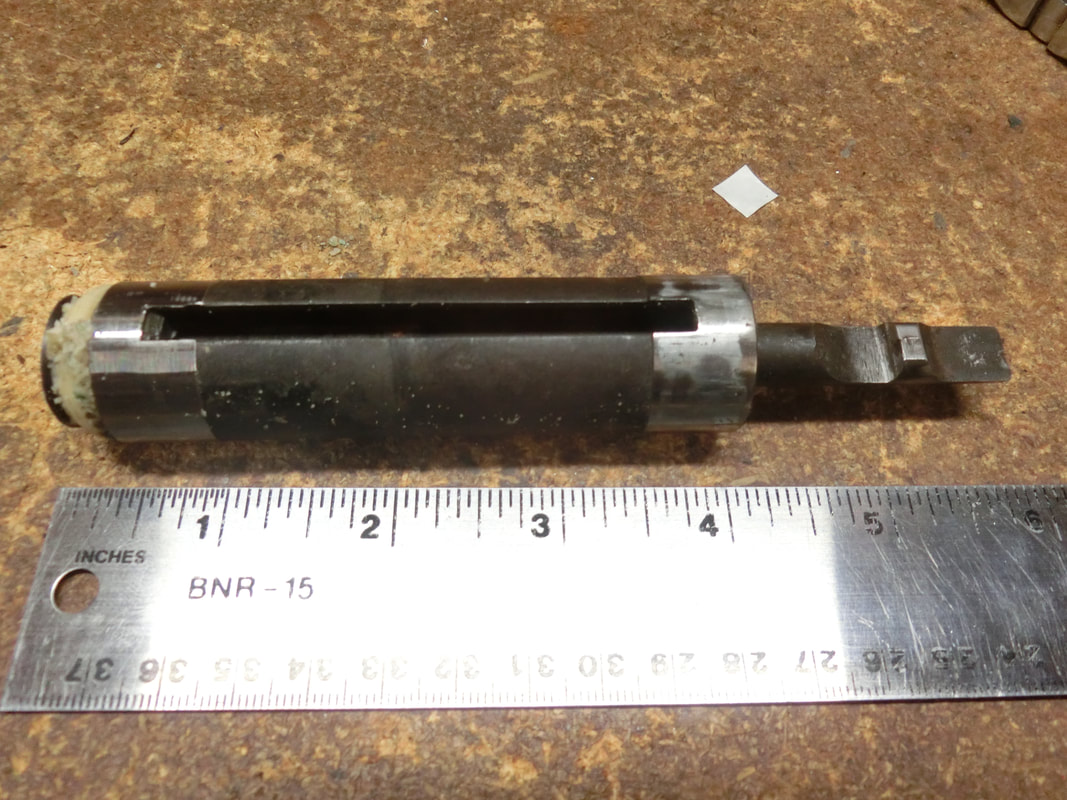
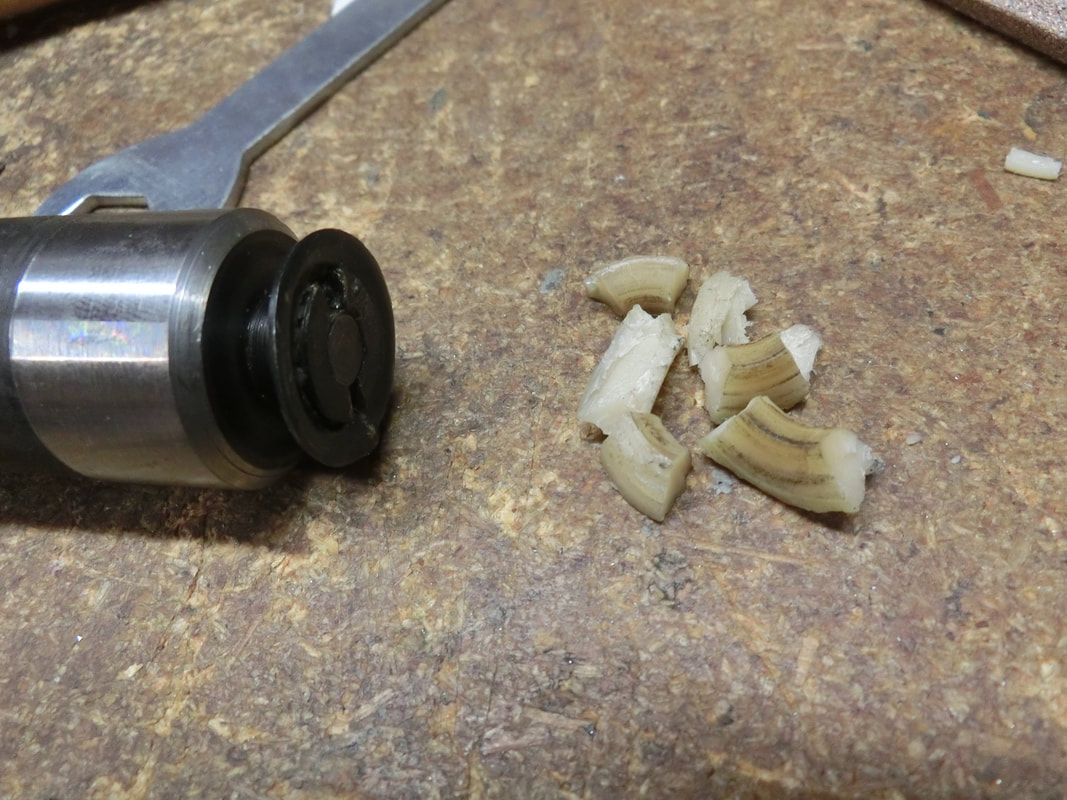
Obviously the seal was "toast", but the DEGREE to which the old synthetic polymer had degraded was quite astonishing.
USUALLY, seals from these times "crumble" in the sense that once the plasticizer in the polymer has evaporated, the whole thing just crumbles to pieces (as in the DIANA GISS guns), but this one was a gooey mess quite unlike anything I had seen.
Now, to be fair to the German gunmakers of that era, we need to remember that 1954-1955 was the year that the plastics were introduced into airgun's seals. Up until that time, leather had played the dominant role.
The introduction without proper testing under duty (endurance tests), as well as without the proper information to the customers produced mixed, but always bad, results.
In the case of Walther, the synthetic seals dissolved with the "normal" habit of oiling the compression chambers.
AND Walther did precious little to prevent this, as the actions STILL kept the oiling holes.
I don't know if the LGV still has these holes, but I am planning on finding out soon.
;-)
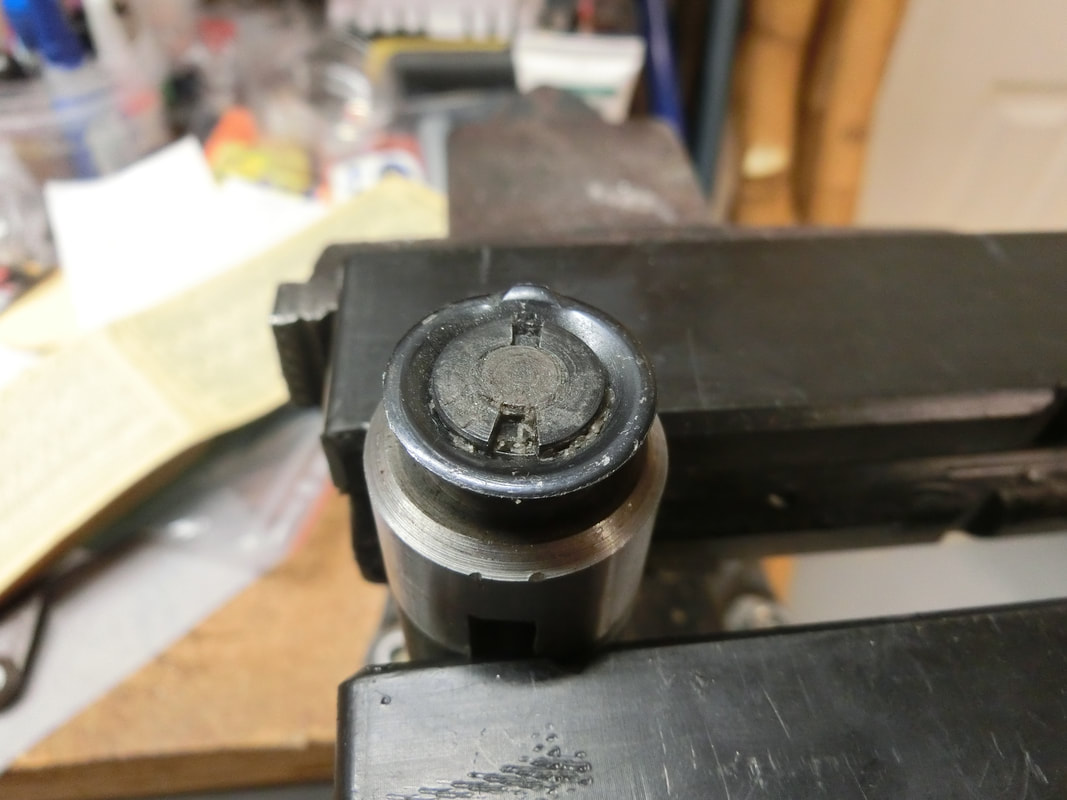
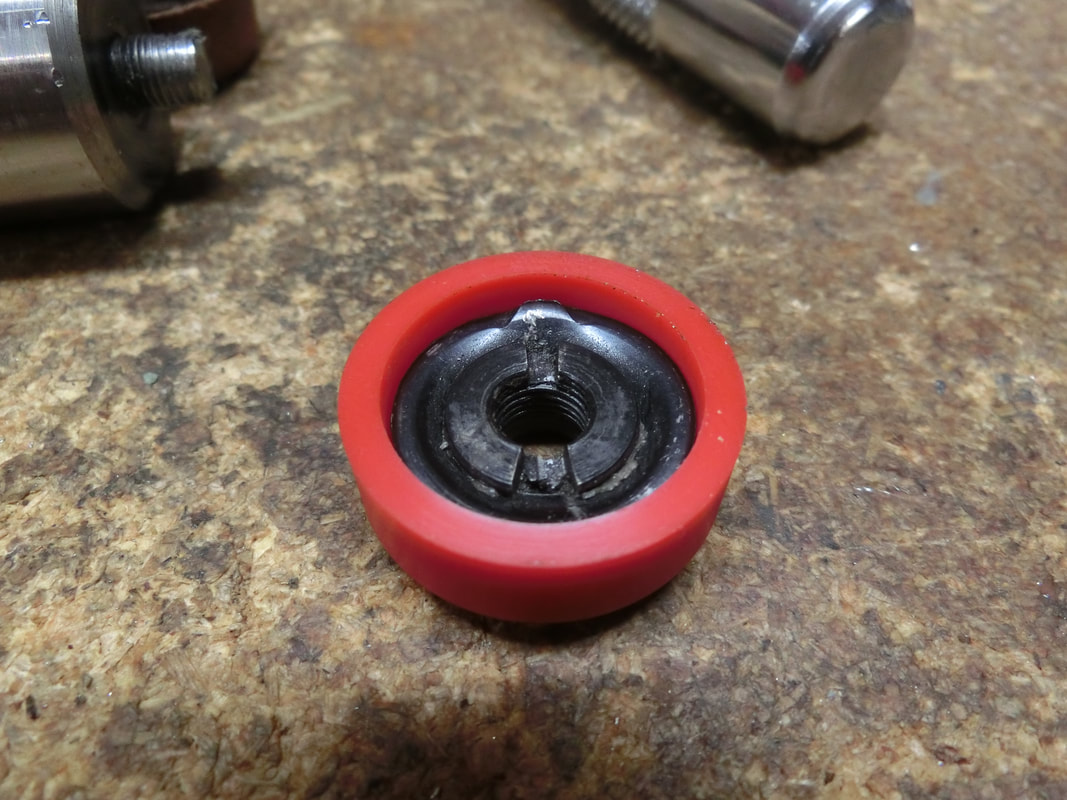
What came out of the compression chamber was a bit depressing:
;-)
What came out of the compression chamber was a bit depressing:

There are four things that really worried me:
a) you can see that the seal holding nut is fractured (we'll see that in some detail later), and this happened at the original assembly.
b) there is a "lump" of the conical washer that has been "extruded" into the transfer port, as the rest of the washer is flattened. but this "lump" is really raised.
c) IF this was a "design trait" then it was really bad design to not use something that "keyed" all the elements in proper alignment AND this extrusion would have been impossible in the OEM mode because of the design of the seal.
d) there is a HUGE dead volume there that, for sure, did not exist when the gun was leather sealed.
After cleaning the debris:
We were faced with the task of getting the nut out. Not a simple one because it was already fractured.
So, we made a special tool for this:
So, we made a special tool for this:
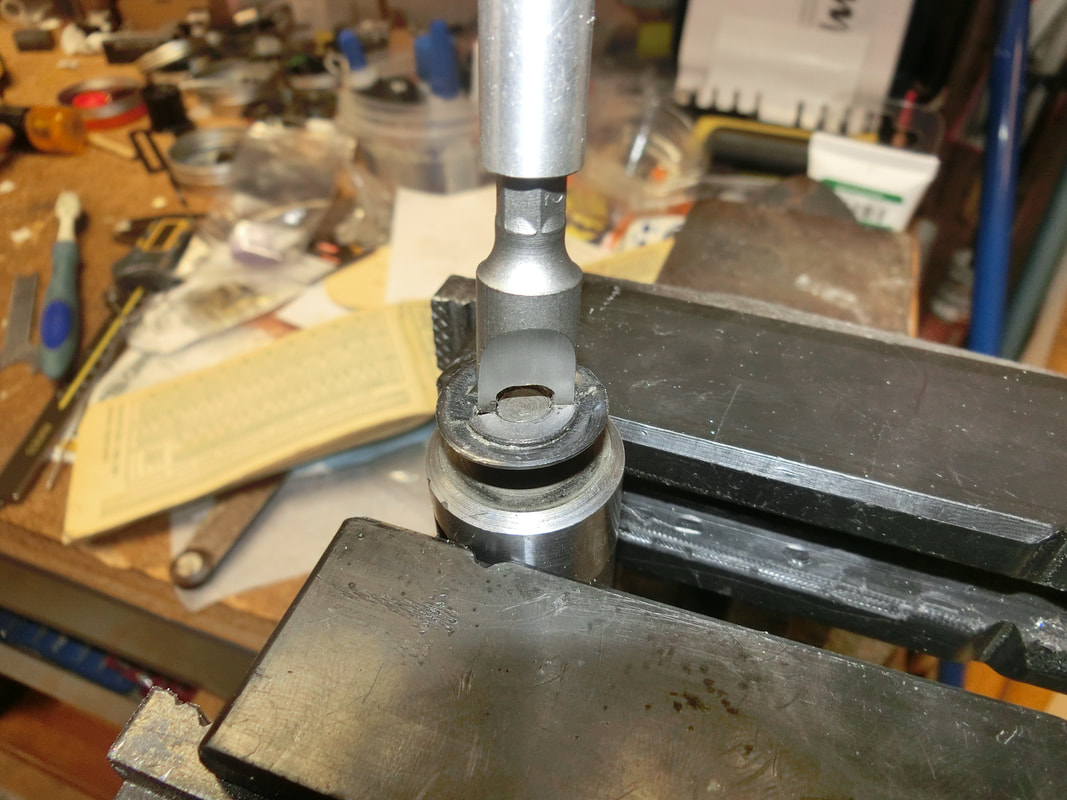
Using an impact driver gently and patiently, the whole nut/washer assembly was tapped out:
And the washer presented into the new seal to see how it would work:
You can see that the seal was deep enough that with a good seal there was no way that bump could have been extruded into the TP.
And the nut?
Well, as we said above, it is cracked.
What you see here is the nut still inserted in the conical washer:
And the nut?
Well, as we said above, it is cracked.
What you see here is the nut still inserted in the conical washer:
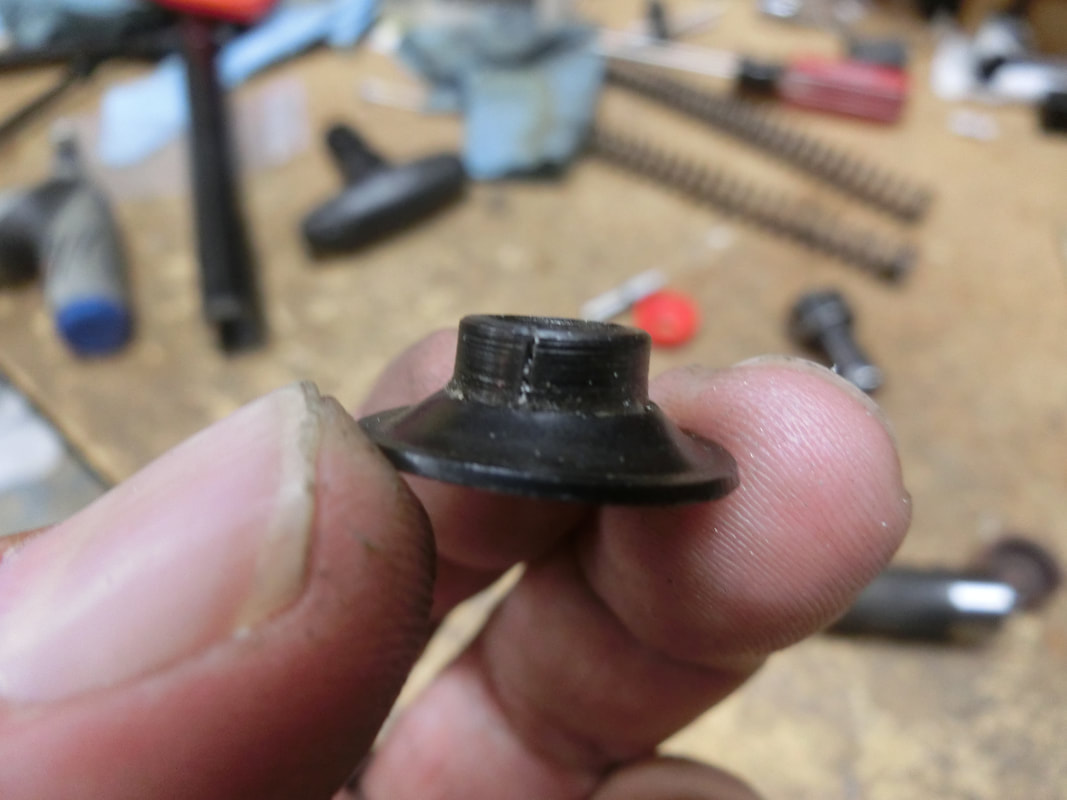
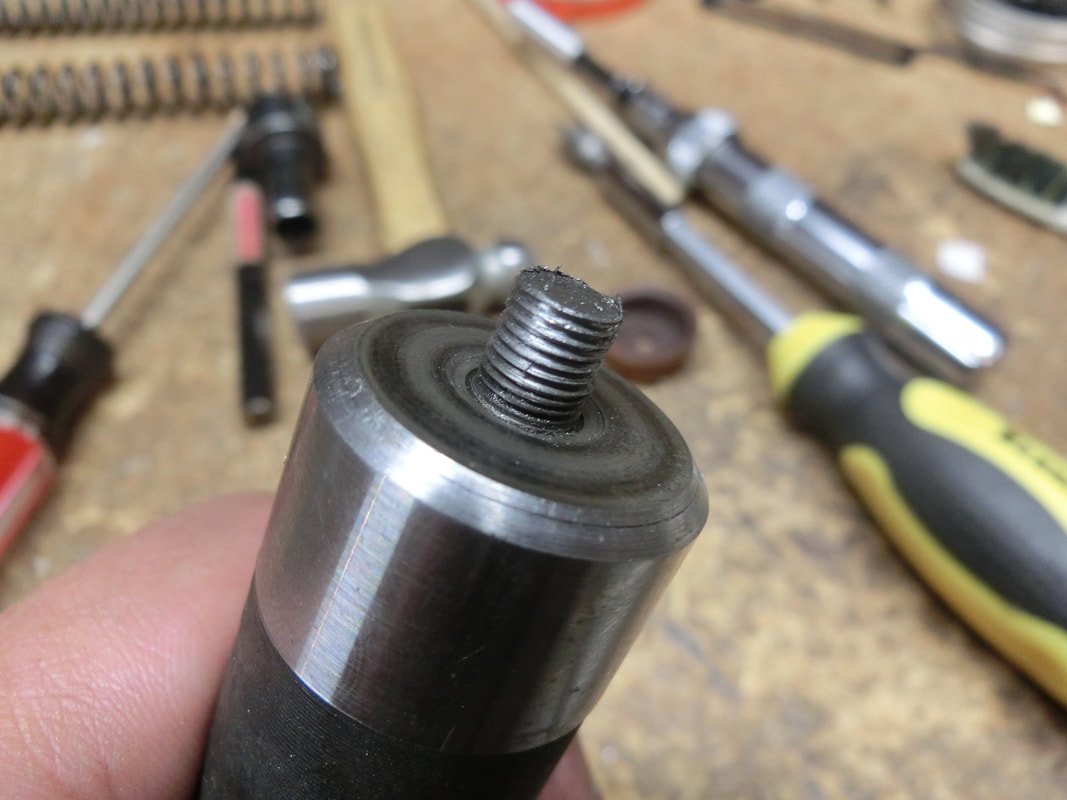
Here we have already extracted the nut from the washer
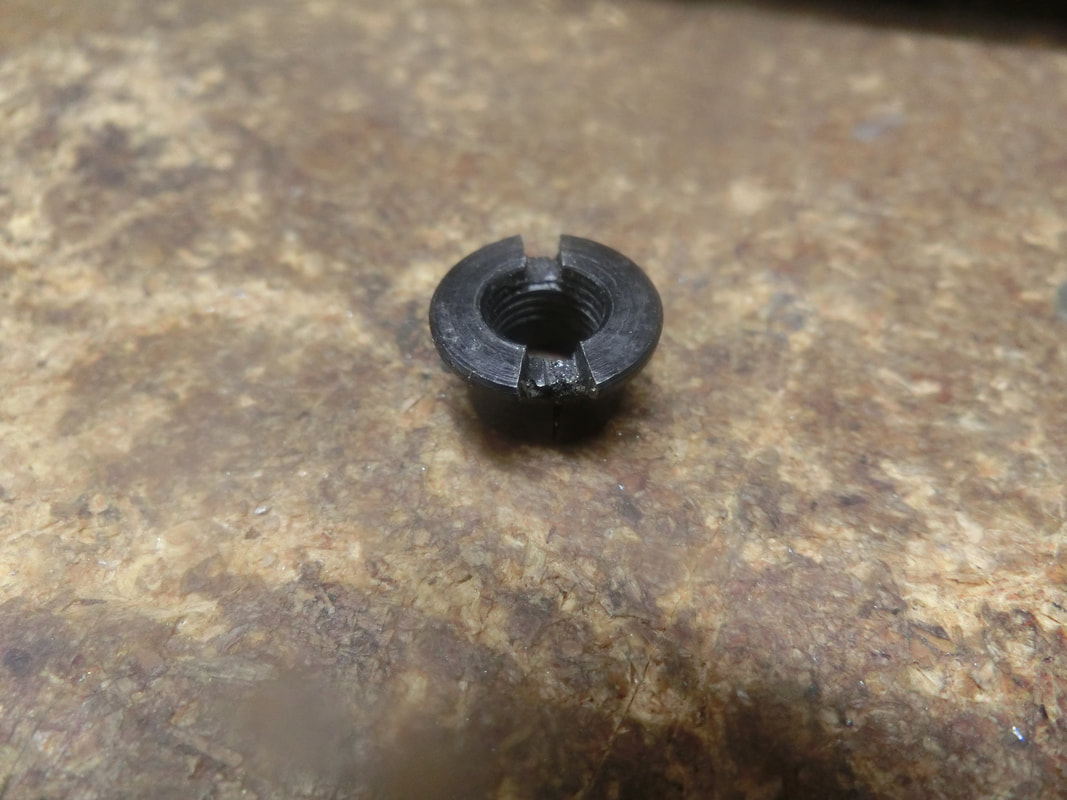
And here is another view:
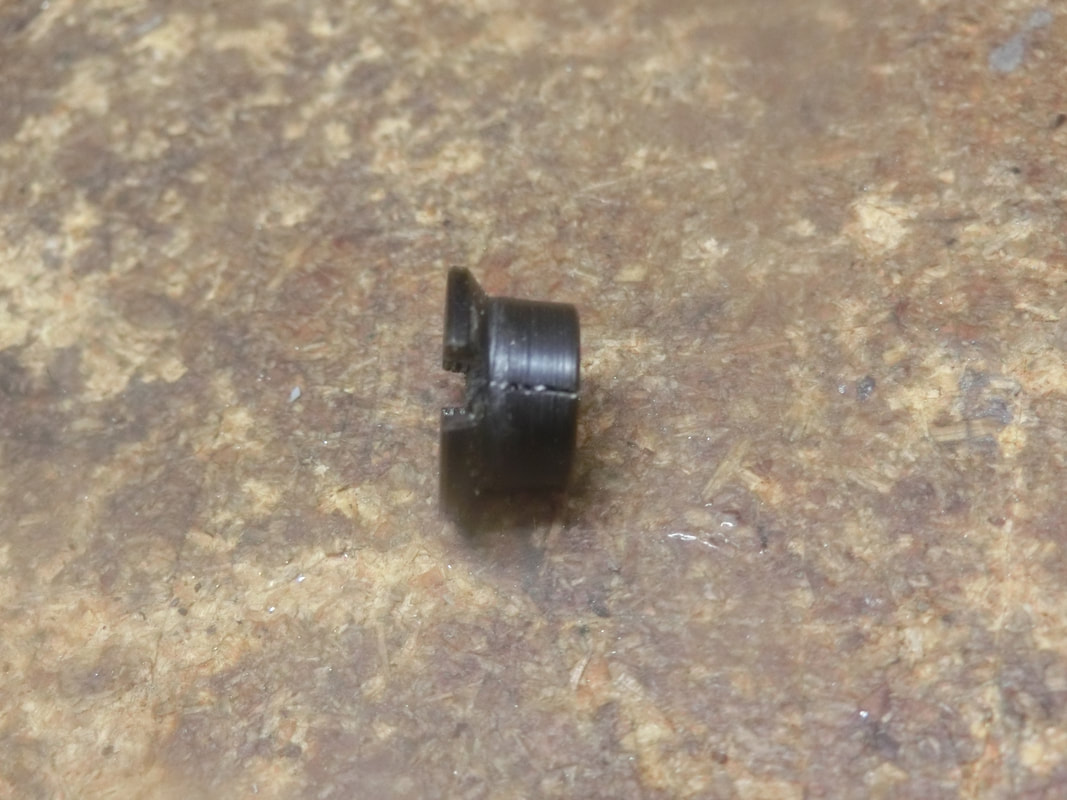
The thread is a peculiar spec, as it seems to have started life as a M7X0.75 thread (fine).
How do we know that the nut fractured during initial assembly? Because the inside of the compression chamber is in very good state, and "shrapnel" such as this would have left a mark if it broke after first use.
So, we flattened the washer into (What I think was the original shape), made and inseerted a liner into the spring cavity, and assembled the piston.
Seal was EXTREMELY tight and so, it had to be sized
The OEM spring was inserted into the cavity and the assembly was just the disassembly process in reverse.
Upon trying to reassemble the gun, I noticed that the screws were not long, and yet they went far into the stock's recesses, when measured, we were alarmed that the thickness of wood remaining between screw and action was VERY thin.
So, we mixed a bit of sawdust with CA and thickened the wall, AND added steel washers at the bottom, to give the OEM screws (that have a serrated undercut) to have some "purchase".
I still think this signals the fact that the gun was taken apart MANY times before.
But at least, the stock now has been "stabilized".

When assembly was done, I tried cocking the gun.
The cocking linkage "jumped" the slot.
Hmmm . . . this needed reassessing.
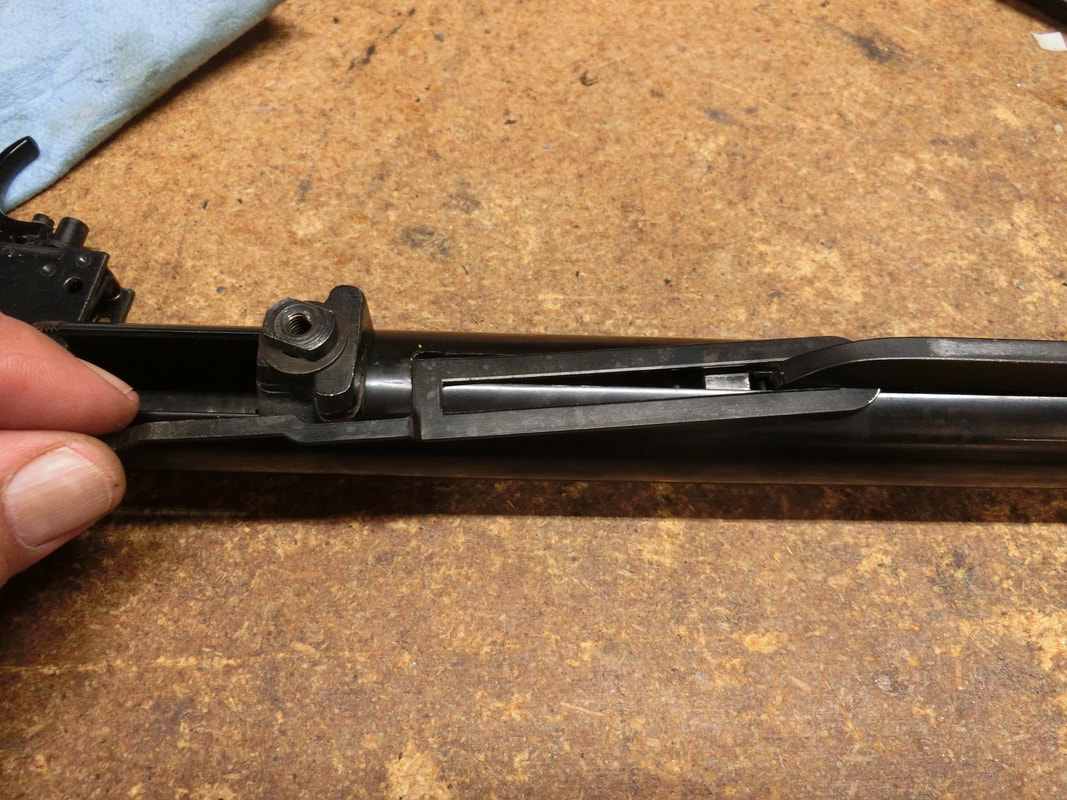
We looked into the channel in the stock and we found that there was a linear bearing that could be adjusted for "push" once the stock was assembled to the action:
The cocking linkage "jumped" the slot.
Hmmm . . . this needed reassessing.
We looked into the channel in the stock and we found that there was a linear bearing that could be adjusted for "push" once the stock was assembled to the action:
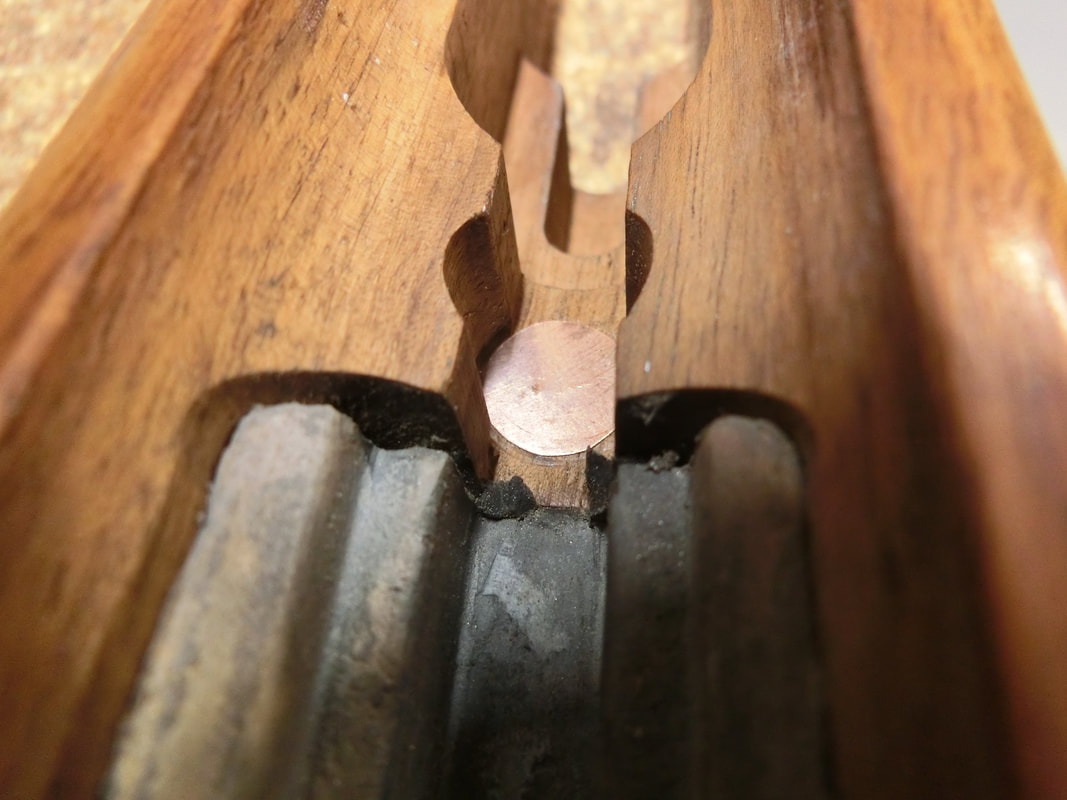
At the bottom of the cavity under the steel bearing, there were two thin discs. What German gunsmiths call "JustierScheibe"
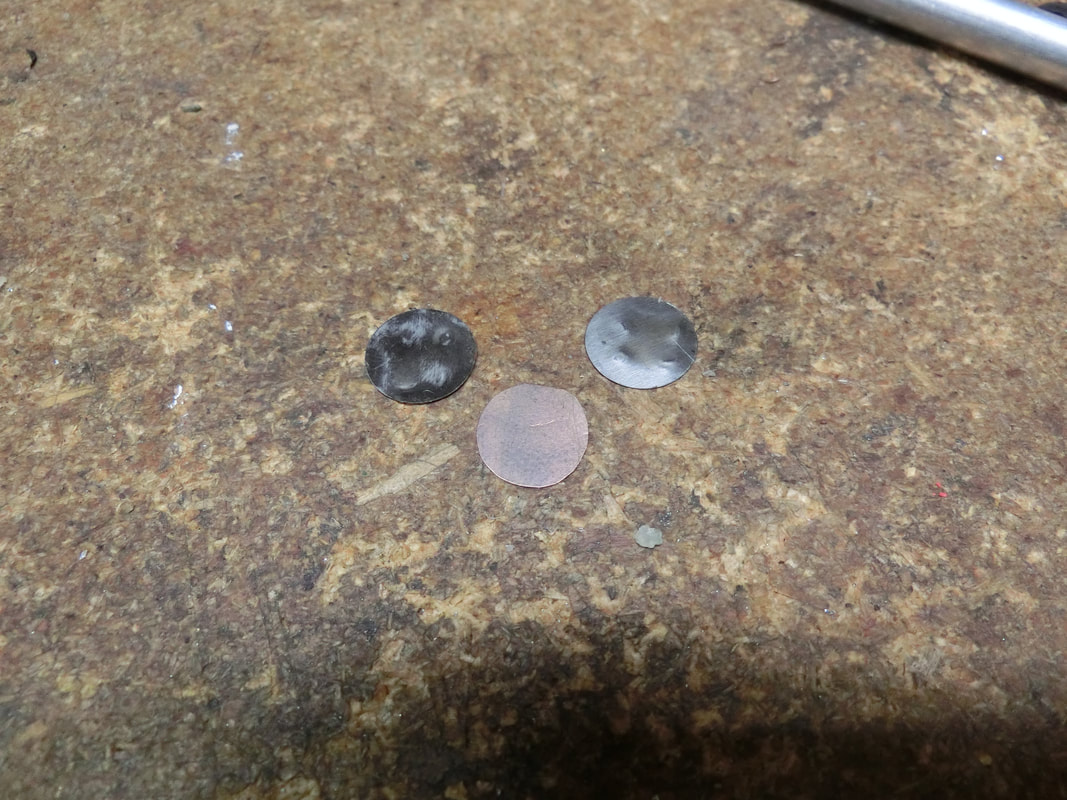
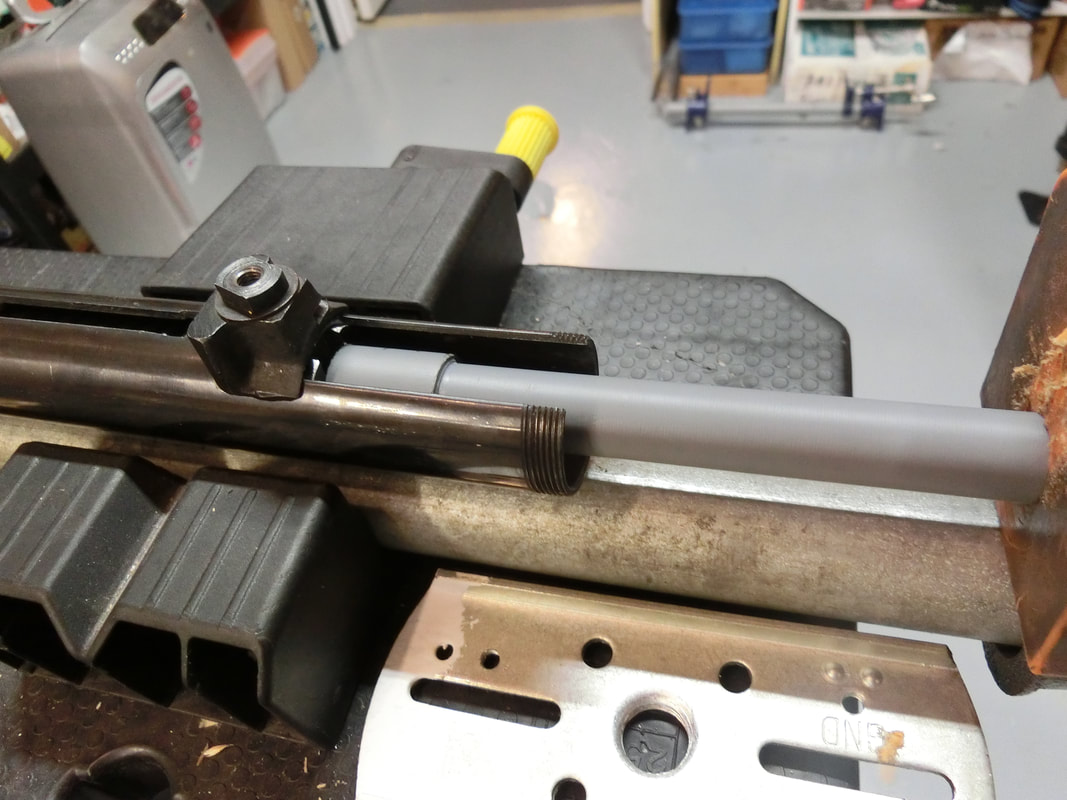
After careful measurement, I decided that the "justification" needed almost doubling, and so I decided to remove one of the steel discs and add a rubbing surface on TOP of the bearing to provide a smooth glide:
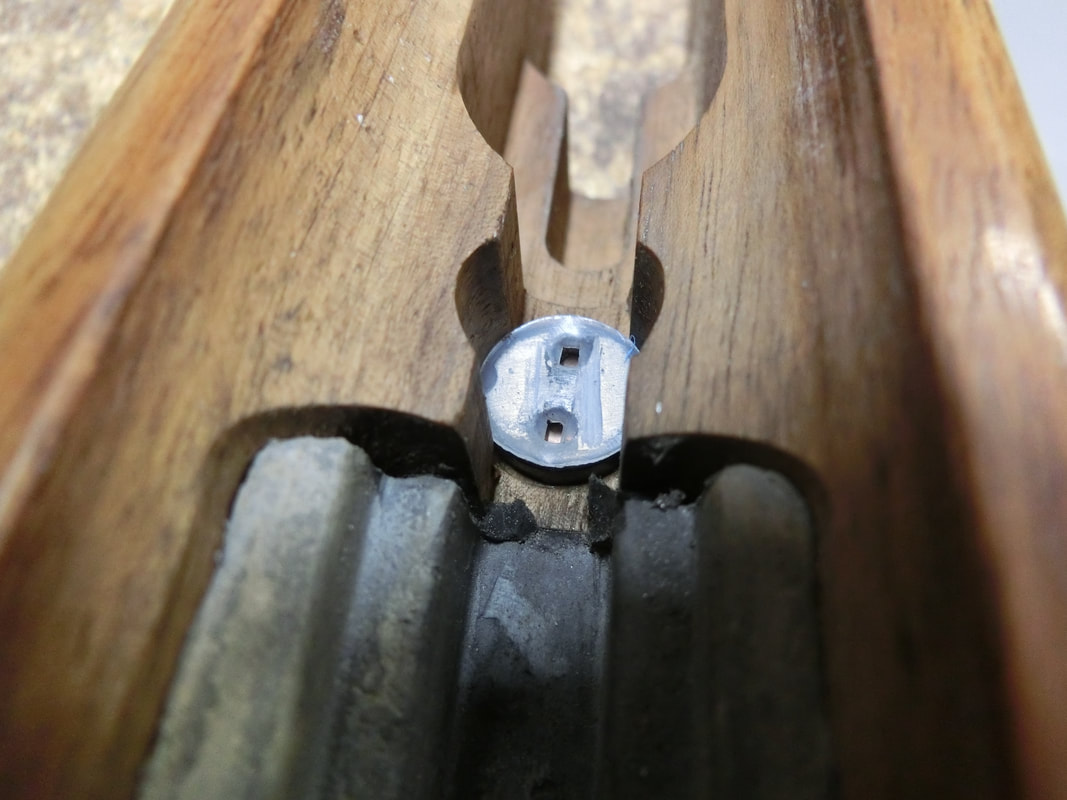
Now the gun was able to be, and stay, cocked.
BTW, to de-cock these guns that have a transfer bar, you need to pull back all the way to the cocking point and then release the trigger, this will allow the sear to drop and the gun can be de-cocked easily. You do NOT need to fire it,
Trigger proved to be a little creepy, so adjustment took place.
And we tested.
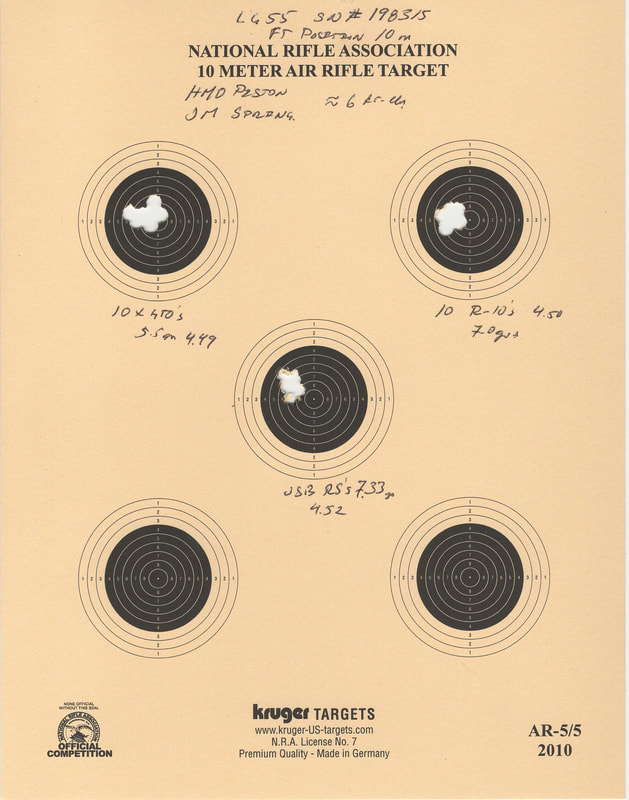
Results were somewhat underwhelming:
MV's ranged between 467 fps to 414 fps.
These guns were supposed to generate about 5.5 ft-lbs (German limit for the "F in Pentagon" denomination that allows anyone over 18 years of age to purchase one. Anything above require a license.
Hmmm, OK, so we expected a 50 years old spring with "Thousands of rounds fired" to be a little tired, so we opened the gun and changed the spring for the ARH spring.
And we chronoed:
467 fps to 414 fps.
Cocking was a little heavier, and absolutely no gain?
Hmmmm something must be wrong here.
Actually, there isn't.
The power limit comes from the "ventilation" of the compression chamber that worked initially as oiling ports. It now limits the stroke of the rifle and therefore the "swept volume" is rather poor.
When the guns were leather sealed, the oil in the leather undoubtedly provided SOME energy to add to the shot cycle, but I am sure that these guns would not generate more than 500 fps with the light pellets of yesteryear, such as the Hobby and the MeisterKugeln.
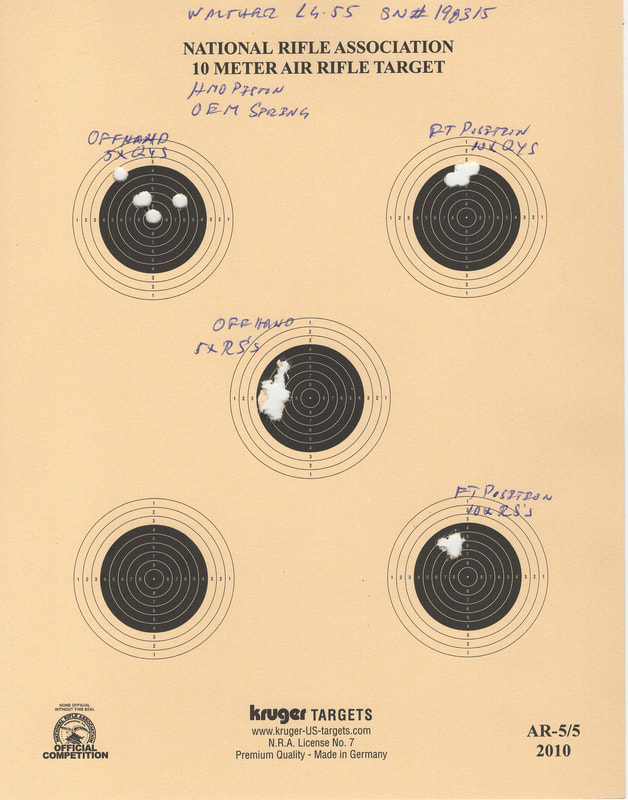
Accuracy was not bad, but upon trying to shoot offhand, it became PAINFULLY obvious that the first impression I had was correct. You had to really stick your face into the stock to be able to see both sights and still hit the target.
It was SO UNCOMFORTABLE, that I decided to stop the First Stage here and pass on to the second.
BTW, to de-cock these guns that have a transfer bar, you need to pull back all the way to the cocking point and then release the trigger, this will allow the sear to drop and the gun can be de-cocked easily. You do NOT need to fire it,
Trigger proved to be a little creepy, so adjustment took place.
And we tested.
Results were somewhat underwhelming:
MV's ranged between 467 fps to 414 fps.
These guns were supposed to generate about 5.5 ft-lbs (German limit for the "F in Pentagon" denomination that allows anyone over 18 years of age to purchase one. Anything above require a license.
Hmmm, OK, so we expected a 50 years old spring with "Thousands of rounds fired" to be a little tired, so we opened the gun and changed the spring for the ARH spring.
And we chronoed:
467 fps to 414 fps.
Cocking was a little heavier, and absolutely no gain?
Hmmmm something must be wrong here.
Actually, there isn't.
The power limit comes from the "ventilation" of the compression chamber that worked initially as oiling ports. It now limits the stroke of the rifle and therefore the "swept volume" is rather poor.
When the guns were leather sealed, the oil in the leather undoubtedly provided SOME energy to add to the shot cycle, but I am sure that these guns would not generate more than 500 fps with the light pellets of yesteryear, such as the Hobby and the MeisterKugeln.
Accuracy was not bad, but upon trying to shoot offhand, it became PAINFULLY obvious that the first impression I had was correct. You had to really stick your face into the stock to be able to see both sights and still hit the target.
It was SO UNCOMFORTABLE, that I decided to stop the First Stage here and pass on to the second.
Second Stage.- Let's turn this gun into what it CAN be
This stage started with careful measurements being taken.
There was some room for improvement in the swept volume, but that would require building a completely new piston just to gain 3.25 mm's of stroke.
So that was not cost-effective to the customer.
The obvious solution was to create an HMO piston (Oring sealed) and get rid of the cracked nut, the red seal with a "deep hollow dead space", and the washer.
After some machining, the piston was finished and an ORing was installed.
We reassembled with the ARH spring and chronoed the rifle.
Results were more than gratifying:
MV's ranged from 603 fps to 569 fps. Now, we were cooking!
However, cycle became a bit rough, AND most importantly, the cocking stroke started to honk like a Canada goose!
Another disassembly and careful inspection of the piston's slot and I discovered tool marks and a roughness of finish that we would associate today with a mid-priced gun like Norica, or Cometa.
So, WHERE were all the "Thousand of shots???"
And then it dawned on me:
It was so uncomfortable shooting this gun that there had been NO "Thousands of shots".
The first owner/owners had become so frustrated with the gun that he/they had filed the rear sight to give it more travel, they had pounded the rear sight into the knurled action closing cover because they thought that they were too far from the peep to be accurate; and probably disassembled the gun trying to find something wrong on the inside.
In short, the gun had not been shot. But not because of the users, because there was a BASIC, FATAL, FLAW with the combination of a Tyrolean stock (high cheek piece), the low "Korntunnel", and the somewhat complicated idea that the rear peep had to be installed from the front and that it SHOULD NOT be put all the way to the back.
IF this hypothesis was true, then the OEM spring SHOULD provide a better shot cycle.
Another aspect that was "tale-telling" was that when I disassembled the rifle, the piston's ORing exhibited a very marked dark spot.
That is VERY unusual.
That is VERY unusual.
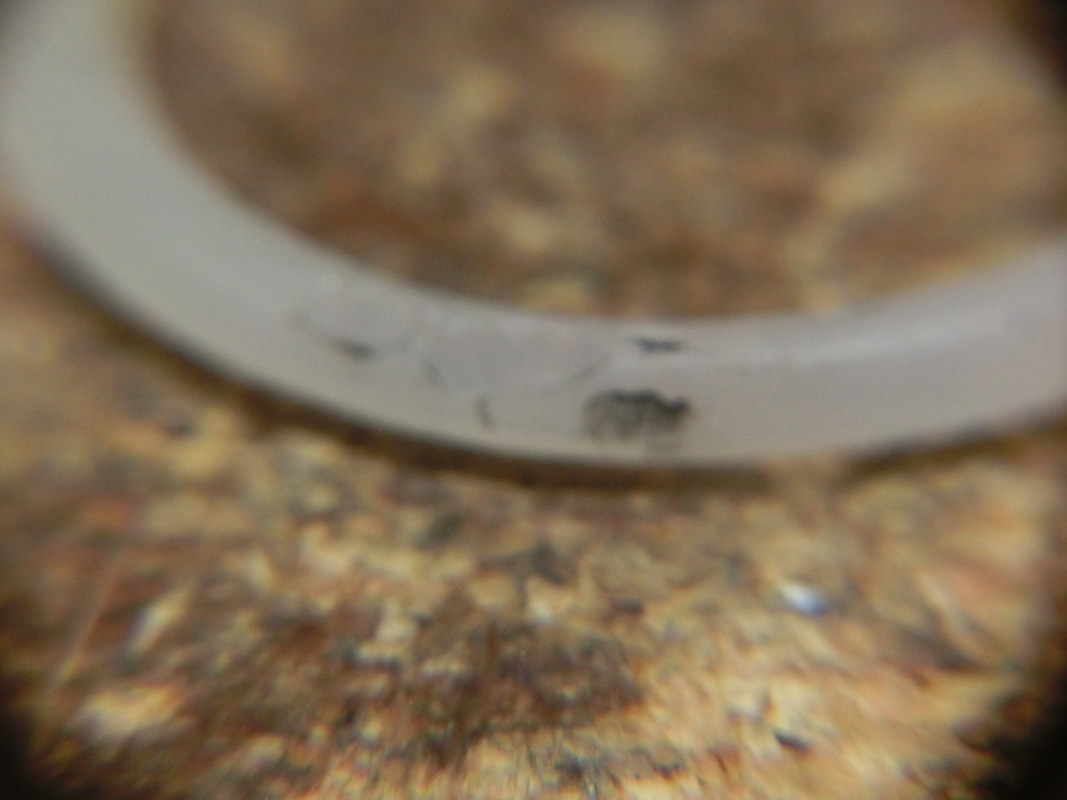
Further research showed that the ORing had been "cut" upon insertion!
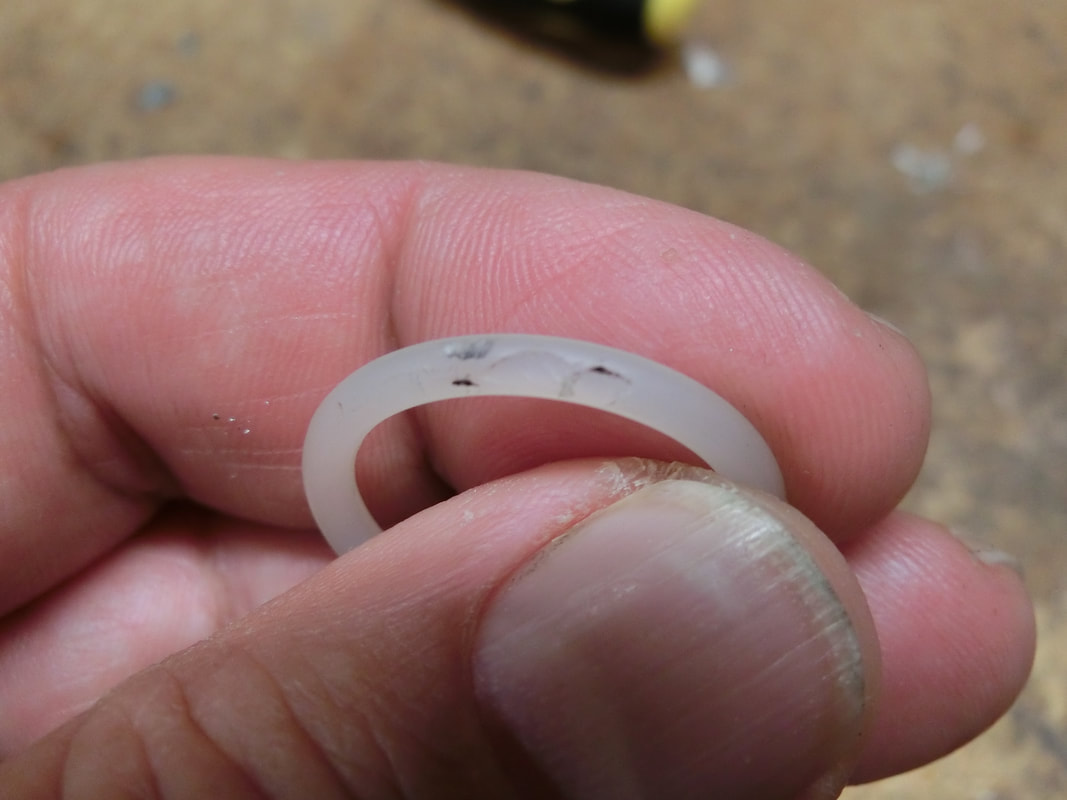
THREE huge gouges (for an ORing), in the seal!
Wherefrom?
And then I remembered that this gun was "new".
So I passed my finger along all the cutouts in the mechanisms tube just to discover burrs and sharp edges.
Again, what we would expect if we bought a mid-priced airgun today.
After extensive de-burring of all the cutouts and polishing of the piston's slot, the gun was reassembled with the OEM spring.
The surprise was that MV's climbed even further to between 622 to 598 fps.
Now we were nearing the 7 ft-lbs level. And with a shot cycle to die for, from cocking to trigger release to follow through. Absolutely impeccable. A small bit of recoil, but nothing that a good shooter cannot master.
I tried again shooting with the OEM setup and though it did give an indication, I knew there had to be a better way.
So, I procured a taller front sight from my parts box:
And now you could shoot to your heart's content!
No more scrounching into the cheek piece.
No more neck ache.
So now, proper accuracy testing could start
No more scrounching into the cheek piece.
No more neck ache.
So now, proper accuracy testing could start
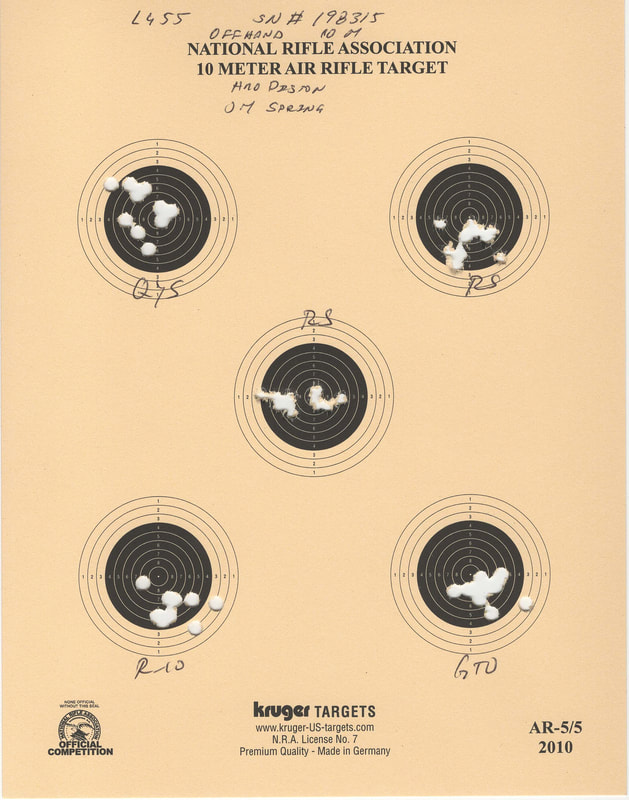
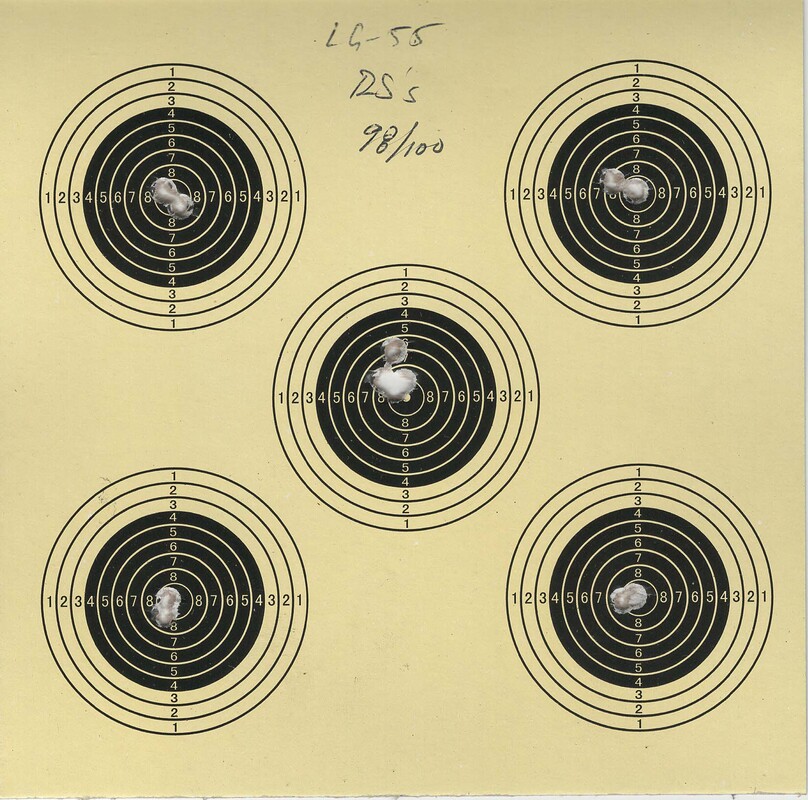
Clearly, we are exceeding the limits of the WC pellets, but the JSB RS's are performing formidably.
Proper sighting in yielded some surprises:
Proper sighting in yielded some surprises:
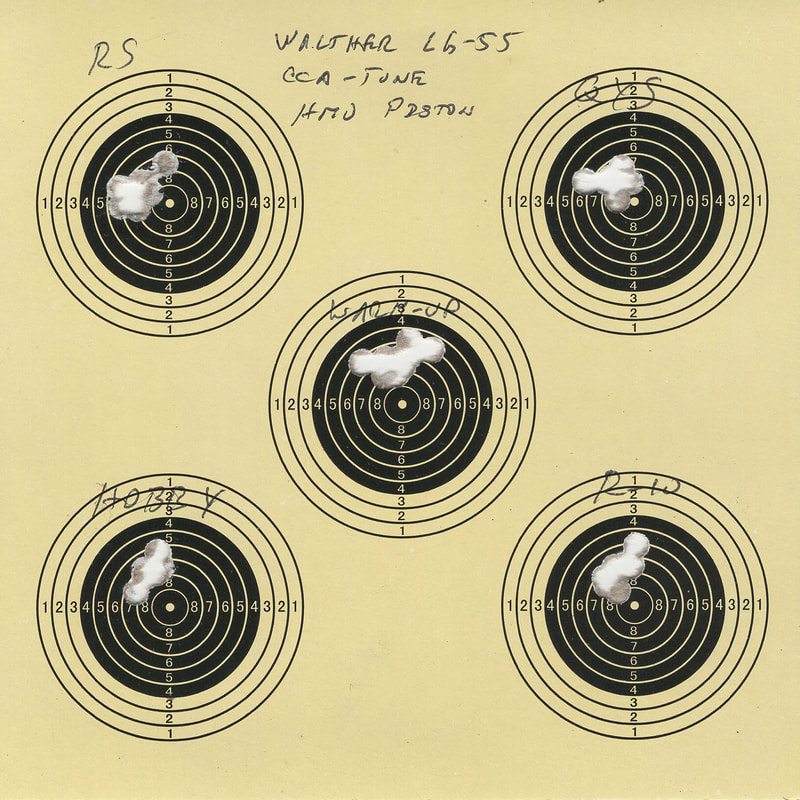
And a proper "card" shoot showed that the gun has definitely Olympic class potential.
Conclusions
It was an extremely interesting "trip through time".
What doomed the rifle in the first place and consigned it to a closet, was what protected the parts and the spring and allowed us a "peep into the past".
It was a great lesson in the sense that what we see as "great guns from the past" are the RESULT of thousands upon thousands of rounds smoothing things out and running things in.
It also tells us that the "Goldfen Age" of airgunning is yet to come.
It was a sobering experience in the sense that the "Old World" craftsmanship that so many wax nostalgically about is just that: Nostalgia. A mirage in the desert. An illusion.
It also tells me that we DO understand bettter today how airguns work. What are positive traits and which ones do not contribute much to performance.
The gun will go back to its home soon.
It's time for the current owner to take possession and own his results at the target.
The gun is capable of fantastic accuracy within the limits imposed by the design.
It is an easy gun to maintain (just keep it clean), and it will be cheap to reseal (ORings are notoriously inexpensive). It also likes best inexpensive pellets (there is a factor of 2 in price between the RS's and the top end target pellets). And so, should afford lots of practice.
It has been a joy working in such a "Grand Dame", to get acquainted with her as a teenager, only to see her develop into a wonderful, refined, serene, lady.
Keep well and shoot straight!
HM
 RSS Feed