Connecticut Custom Airguns
  • Welcome!
  • Hector's Airgun Blog
  • Products and Products Blog
    • One-Off's
    • The "Héctors Special'" scope by Sightron
    • K1050i FT
    • The Hex Louver or "Secret Sunshade"
    • Pellet Path Calculator >
      • Questions, Answers and Comments on P-P Calc
      • Privacy Policy for PP-Calc
    • The Nautilus SideWheel
    • The X-10 TiltMeter
  • Zimmer-Silhouetten
    • Results 2017-2018
    • Results 2016-2017
    • Results 2015-2016
    • Results 2014-2015
    • Results 2013-2014
  • References and Links
  • Contact us
  • Store

Hector's Airgun Blog

Where we discuss, CIVIILY,  anything airgun.

Return Home

The Peculiar "Crosman Tuning Lab" pistol                          ©

2/16/2022

2 Comments

 
In the world of airguns peculiar things happen.
For a while, an enterprising person from Russia sold in EBay components to transform the Crosman 13XX pistols to PCP's.
But suddenly he vanished.
And so, some customers were left with parts but no instructions.
Add to that situation that the customers sometimes buy things "for a later date" and then forget them . . . and we have another peculiar situation.

When someone contacted me about "building" a pistol from parts he had on hand, I became VERY curious.

So, after some communications, it was established that there was precious little of the Crosman left (the Transfer Port, the barrel and the main spring only AAMOF).
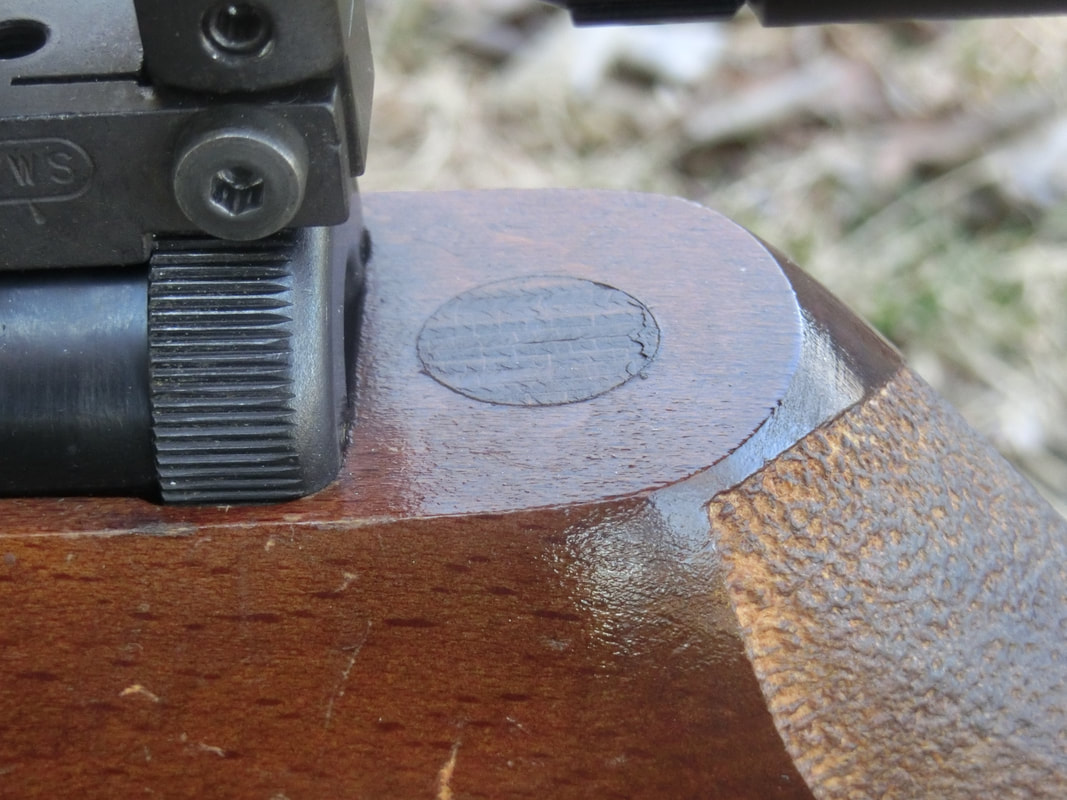
There was a sidecocking bolt action repeating mechanism, there was an air tube with an offset valve/TP, there was a frame with a Match trigger that was supposedly adjustable, and there was a "free flight hammer".
Picture
Hmmmmmmm, curiosity got the best of me and we agreed on an hourly rate and preliminary "budget" and the parts were shipped.

When they arrived, I was looking, literally, at the proverbial "basket case". Lots of parts from the old gun and parts from the new gun without any labelling, order, or concert.
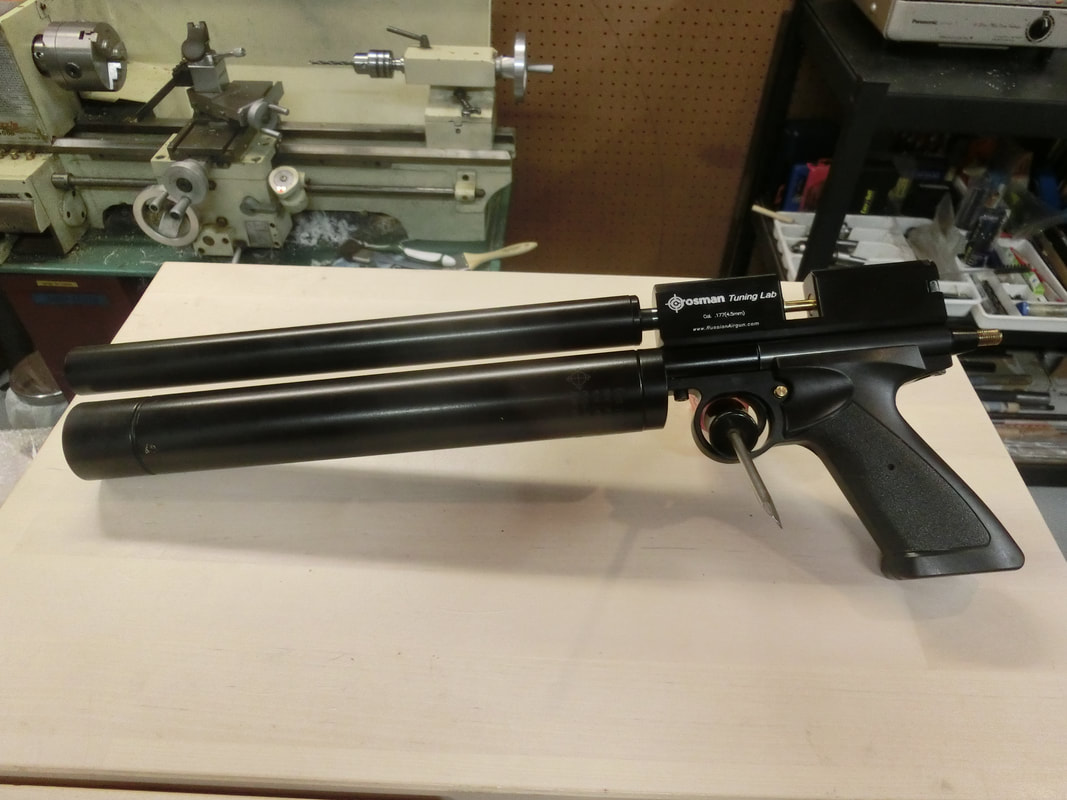
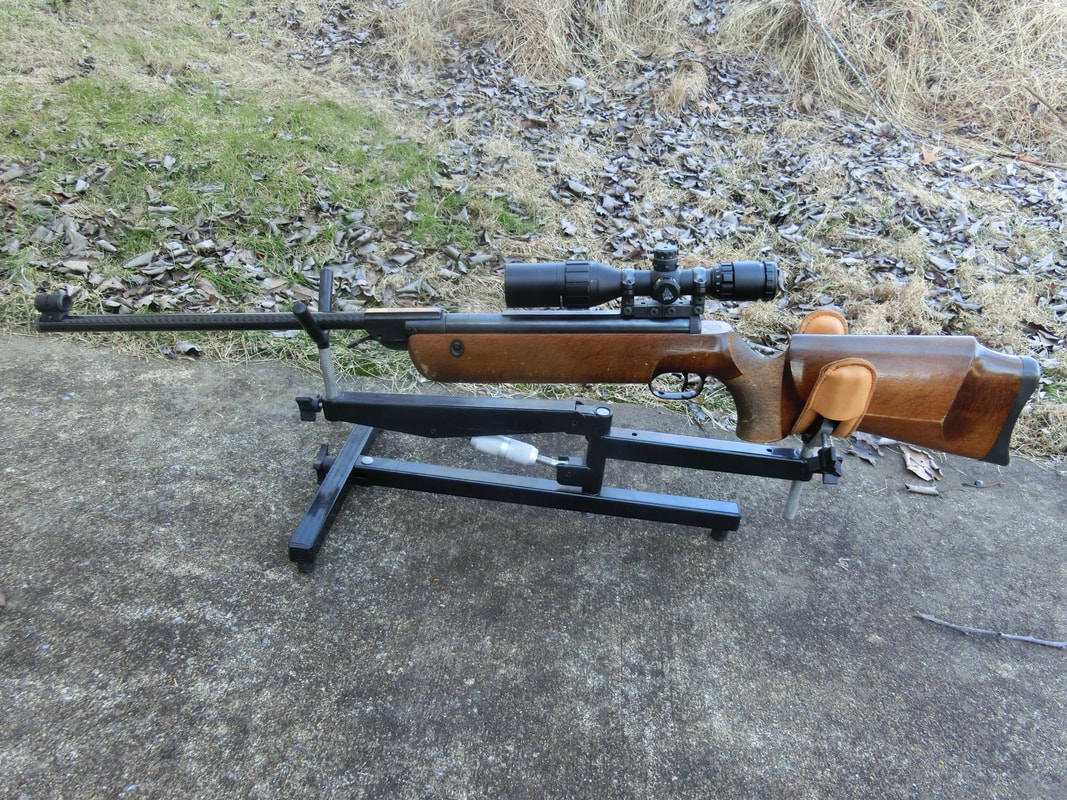
But, as any 5,000 mile trip, everything starts with the first step, and so I started "presenting" all the parts till I got some semblance of a pistol. A VERY BIG pistol.
In my own terms: a "pifle" or a "ristol", something that cannot be holstered, nor carried on the mid-region of ourselves. Not a "sidearm" as understood in most professional circles.

And, so, I started the"build".

As progress was done, I discovered that some parts needed to be modified, and the suggestions from the original EMails exchanged between purveyor and customer were not really to my liking.

So, back to drawing board and some hard decisions needed to be taken.

Through two days of hard thinking and some work, we decided how to do the final build and so the second thing to do was to test the air tank.
I completely disassembled the air tank and cleaned it very well inside and out, then reassembled and tested.
Luckily, there were no leaks. Good on that front!

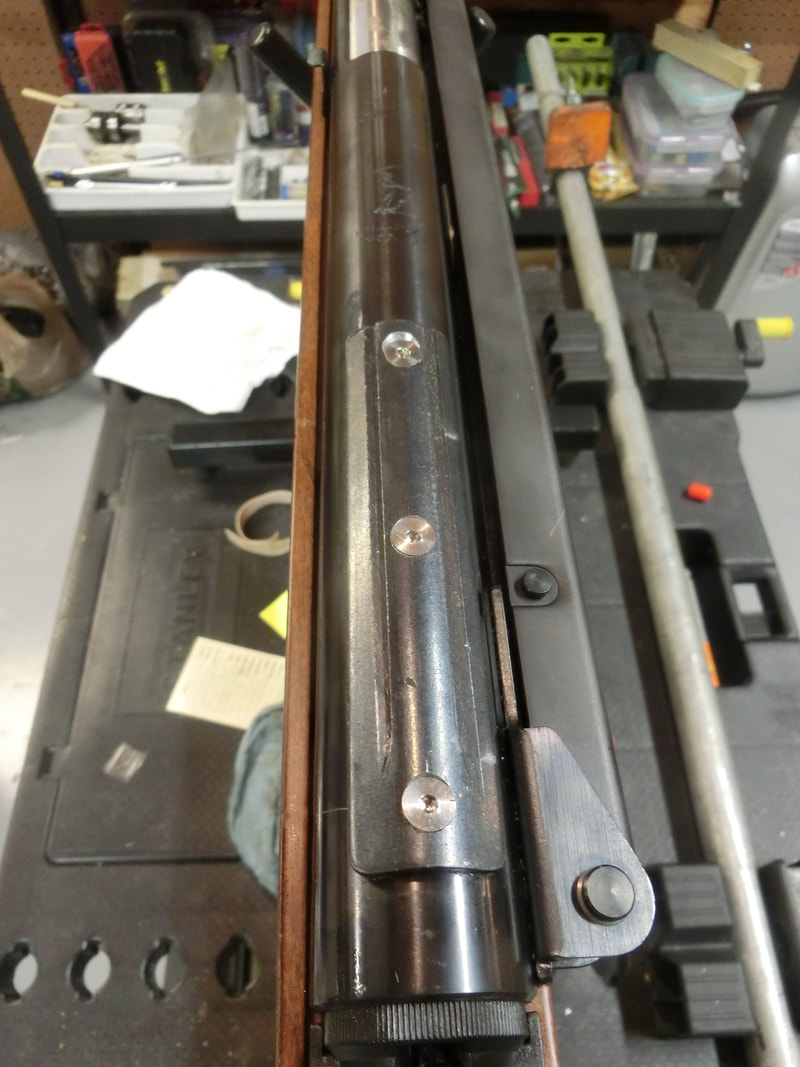
Then came the assembly of the air tank to a "connection tube" that ensured that the action was located in the proper place and that allowed the new frame with the Match trigger to hold the parts together to make one unit.

The end result was not bad, actually quite impressive:
Picture
Picture
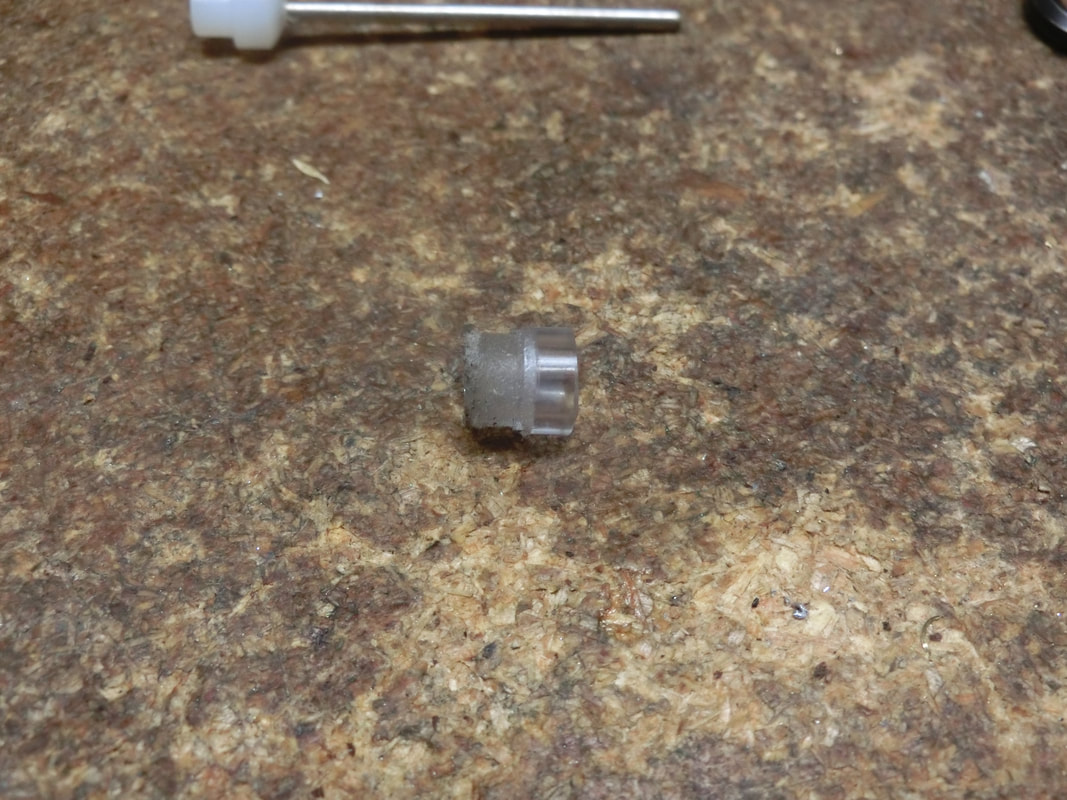
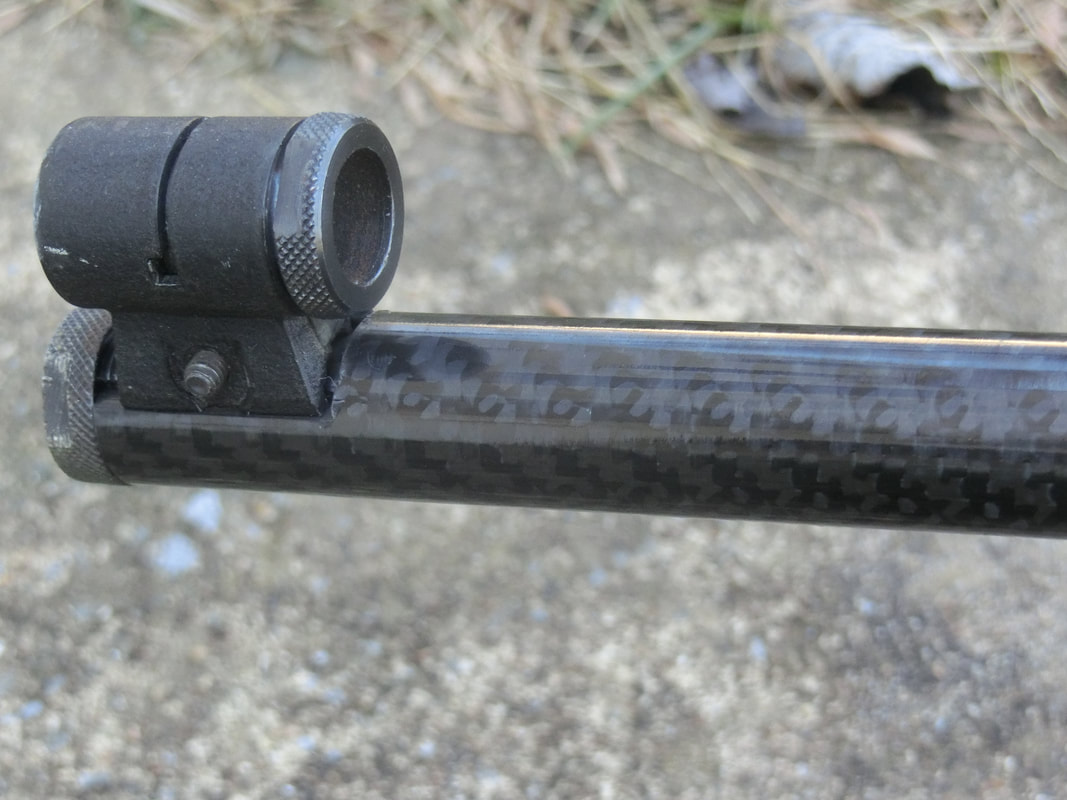
There was no special screw in the kit to attach the connection tube to the action. And the connection tube was thin enough that the OEM Crosman screw was not going to "cut it" if the gun lived to its intended power level, so we borrowed an idea from a scope rail replacement job and used a special super-fine thread metric screw that, for some reason is not as strange as it may sound: M4X0.5
Using a full screw, I turned it down so that it would fit into the cavity of the action but would not protrude into the connecting tube.
Picture
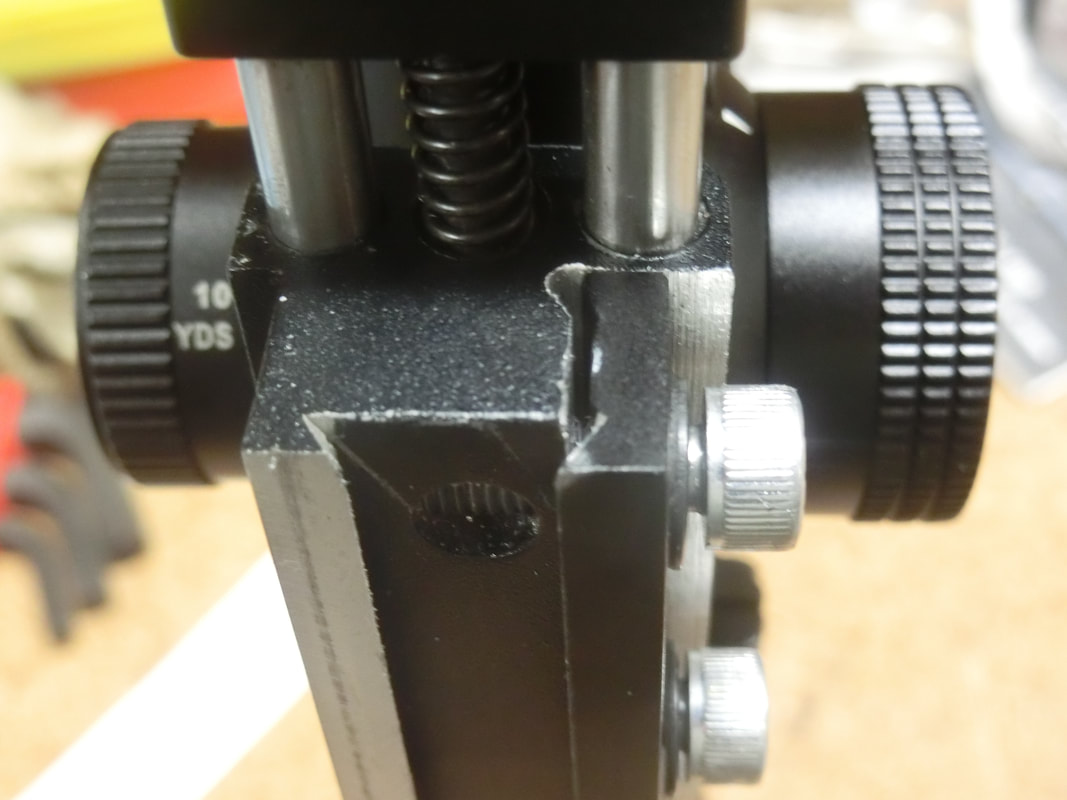
Apologies for the bad picture, cameras don't really focus well on shiny stuff. LOL!
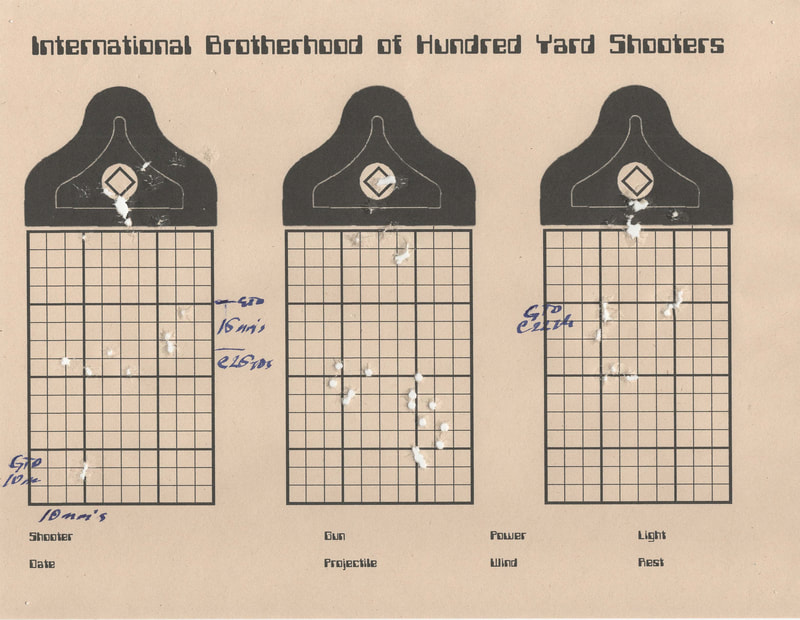
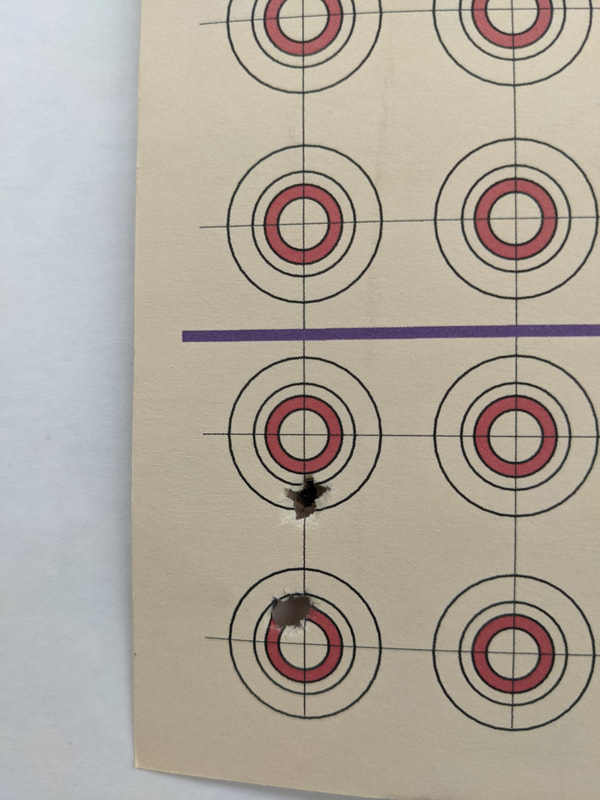
And then we tested the gun.
MV's were a complete disappointment.
We could also feel the valve bouncing repeatedly (the gun "burped" at each shot), and there was some serious issue with shot count and efficiency.
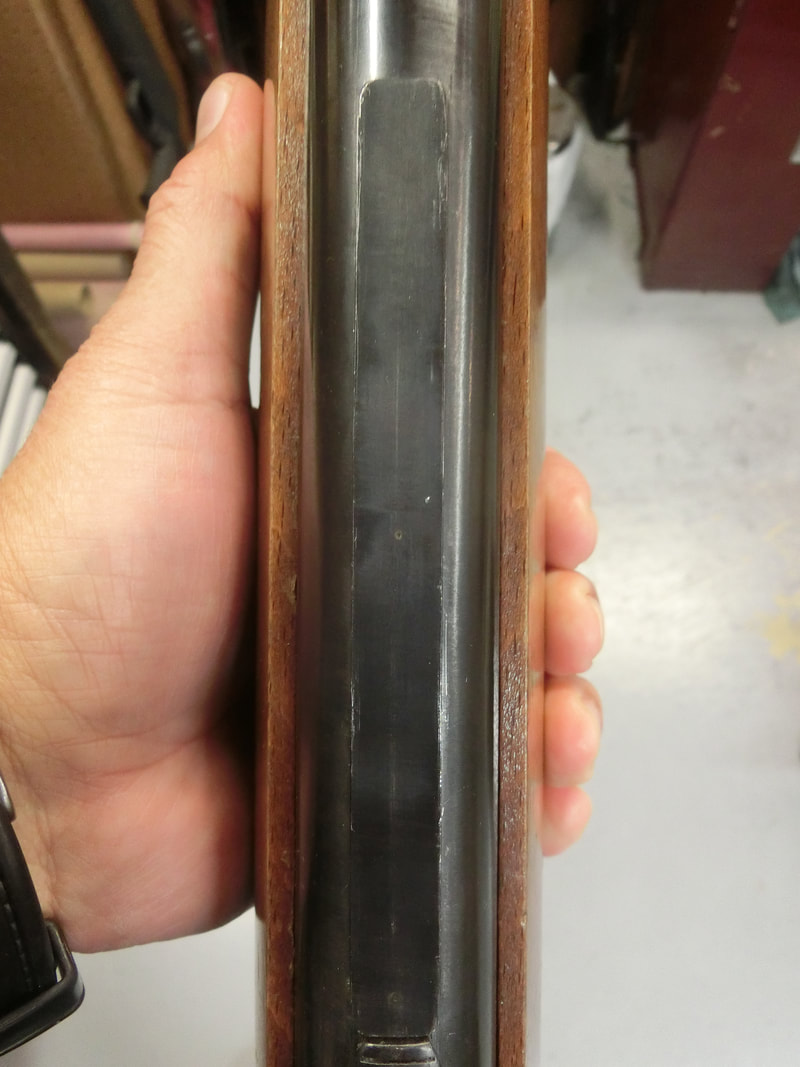
It was also sadly evident that the moderator was having problems with too slow pellets that were possibly wobbling. We had to take down the whole thing and re-arrange, re-screw and loc-tite all the parts.
We were using the OEM (Crosman) Transfer Port (TP), and we could feel that the whole thing was not sealing properly, so we dismantled the Pifle and obtained some clear tubing (HDPE) to create a new TP.
BUT, the connection tube had a different diameter than the action. So we made a special TP by putting a section of the tubing in a mandrel and turning it to dimension.
Picture
The MV's improved substantially, but there was still some "burping" and so we disassembled the gun again.
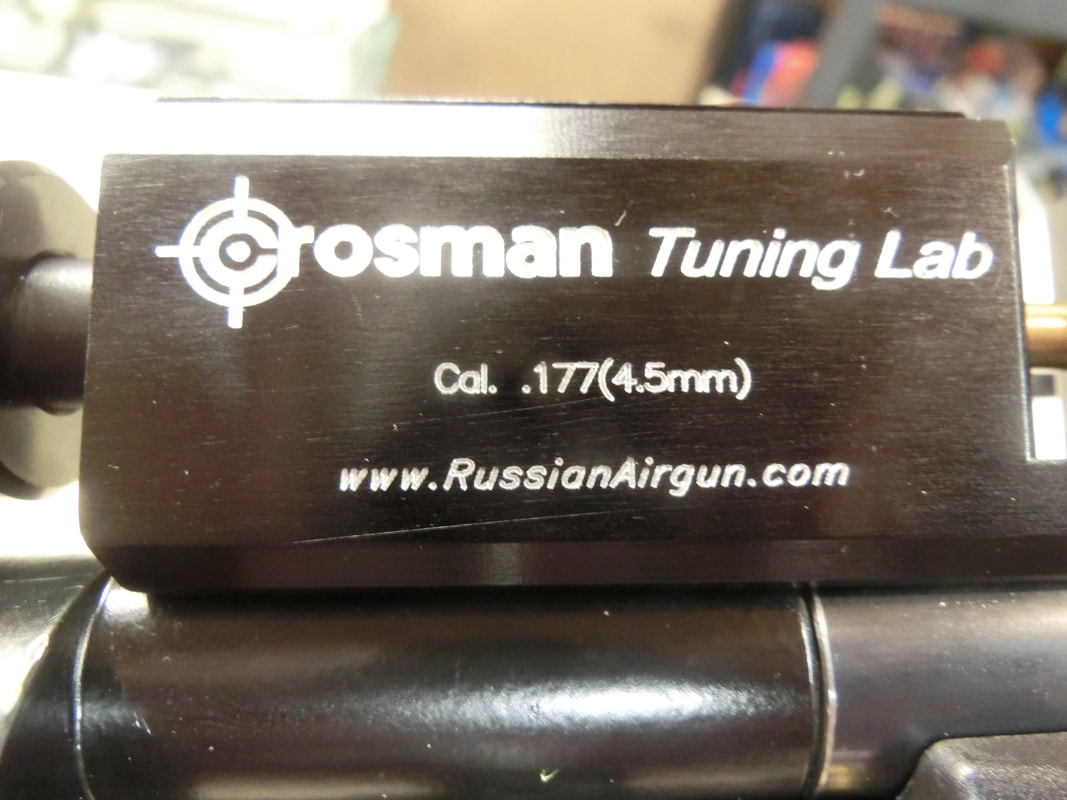
Somewhat frustrated I started looking into the internet for "Crosman Tuning Lab" and discovered that they had changed name and abandoned the old website and they are now located at : www.airgunbuy.com

I sent an Email through their contact page and almost immediately received an answer!

Wonderful! It turns out that George (Georgiy, in his native Russian) is still the main driving force for the company and they now have some other interesting stuff, even complete rifles available.
I sent him pictures of the build and a detailed description of the problem, and he said he would consult with his technical guy, so support is there for these kits, which makes it more reasonable to use them.
Perhaps we can test some other of their products in the future.

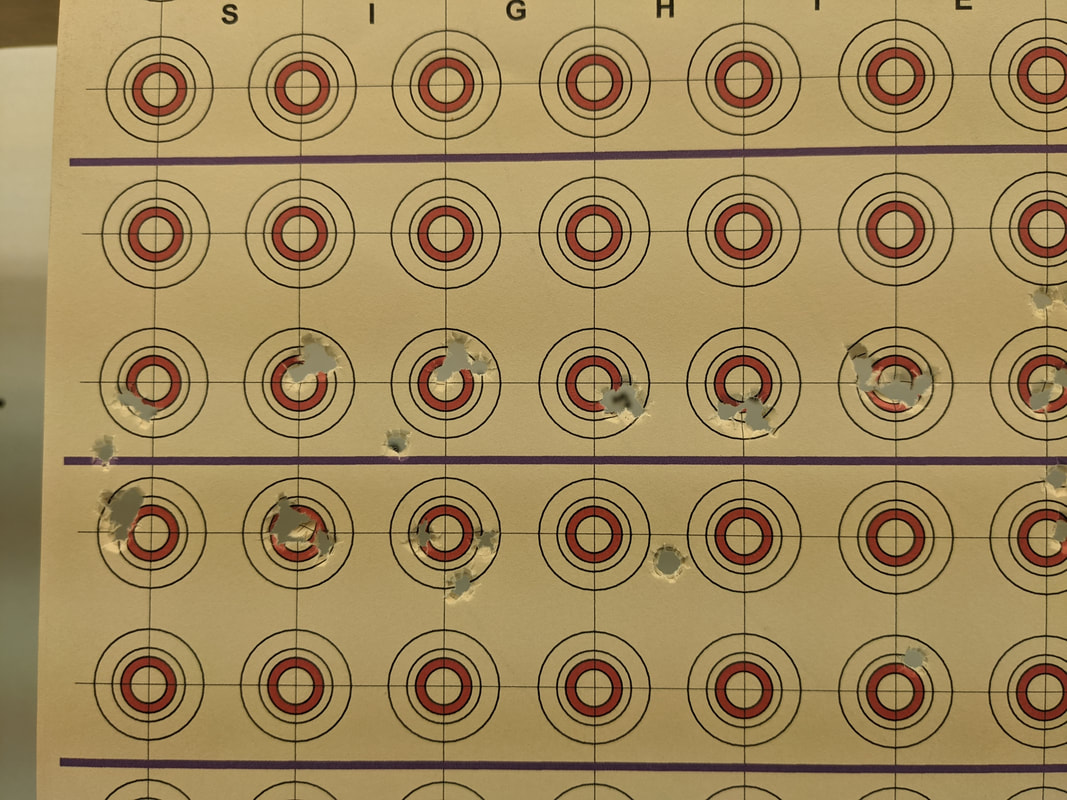
After a night of consulting it with the pillow, it occurred to me that there was NO serious reason why that connecting tube had to have a different diameter and so I mustered the courage to re-drill that passage to the needed 8 mm's and installed a full length HDPE TP.
And the result was simply amazing!
We went from barely peaking at 10 ft-lbs to exceeding 22 ft-lbs in rather longish strings.
Of course it would be ideal if these kits came in with a regulator and an extended LP plenum, as there is capacity to spare in the tank, but this one didn't and the owner was wanting to use his gun, so that will remain for a later date.

Take a look at Airgunbuy.com as all companies, supply chain problems are causing some items to be out of stock, but their philosophy is interesting and their products are innovative.

Keep well and shoot straight!


HM                                                                                                                                                    ©  2022/2/16
2 Comments

Noch zwei weitere Großartige Damen .- Part 2                ©

2/8/2022

4 Comments


Gun #2.- An attempt at shooting FT under German rules

Germans enjoy good engineering, but getting a license to operate an airgun at higher than the Olympic Match power level (5.5 ft-lbs / 7.5 J)  is a long and complicated process (also somewhat expensive).
But still, there are enough Germans shooting FT in Classes 4 and 5 that there are actually matches held for those.
Class 4 is the "F in Pentagon" (under 7.5 Joules/5.5 Ft-lbs) spring-piston rifles that recoil
Class 5 is the "F in Pentagon" (under 7.5 Joules/5.5 Ft-lbs) spring-piston rifles with recoil-less actions
These two classes are shot at distances between 9 and 25 meters (as opposed to 9 to 50 meters that the 12 ft-lbs limit game is played).

If you have ever tried to shoot a Match airgun at 27 yards (25 meters), you will realize that it is not an easy task. especially in the outdoors.

Here in the US, we do not have those limitations, and so, when someone talks about "indoor FT" (where distances pretty much correspond to Class 4 and 5 airguns in German FT), eyebrows are raised, and some even start gathering green firewood to burn the heretics, LOL!

But, we're moving too fast ahead, let's talk about THE RIFLE.

As we said in the first part of this entry, we had procured TWO LGV's directly from Germany:

The First one, we discussed extensively in that entry, and so we will not go into it again here.

Gun Number 2 had lost all historical or collector value because a scope rail had been added.
Here is a picture of the modification made by a German gunsmith, attaching the scope rail where normally the "Walther" brand and Patent statement would have been visible:
Picture
To compare, this is the original "unmolested" one from Gun #1:
Picture
It might be clear to the advanced airgunner that the rail itself seems to be handmade.

In any case, as I said above, this rail destroyed any collector's value the gun could have had and so, it made for a good test-bench to try a few different things and see where the limits of the little engines lie as far as power with accuracy is concerned. And, do please, remember at all times that power by itself is useless in airguns without accuracy.

The same gooey mass came out of the compression chamber of gun #2, and we used the same method (acetone) to dissolve the slime, and a contoured brass rod to scrape, without scratching, the compression chamber walls.
The same HMO style piston went into this gun with an Urethane ORing because the temperatures and the pressures  expected do not warrant the use of HNBR material.

I will not go into all the details of the different things tried (we tried Titan springs #'s 7, 10, and 1; plus the OEM spring and the two counter-wound OEM half-springs), but the end result was very interesting:

Using a Titan # 1 spring, cut to 21 total coils (yes, it was a drastic cut off), we obtained  a VERY nice shot cycle, somewhat skewed towards the light pellets normal for these guns:

The Diabolo Basic yielded 678 ± 4 fps
The QYS.-                         566 ± 5 fps
The JSB RS's.-                  575± 5 fps
And then, just out of curiosity, I tested the Domed GTO's (made out of tin using the JSB Exact 10.34 die) and what a surprise.-               732 ± 4 fps
the "little engine" was doing 8.1 ft-lbs at the muzzle!

I've heard of FWB 300's that using the JM/ARH "Arctic" spring yielded 7½ to 8 ft-lbs, but I have never actually seen, tested, nor shot one. So, to me, that is still "vaporware". But this is reality.

Checking the accuracy, at first was somewhat disheartening. The D-B shot well, but as a wad-cutter, it was not precisely FT material.
The RS's performed very poorly, but that detracts nothing of the JSB quality, it just means that the bore is a little on the large side.
The GTO's were nothing to brag about, and so I started thinking:

Here was a gun that was NEVER intended to reach the 8 ft-lbs, the barrel was pencil-thin, and the weight enhancing "anchor" of a sleeve was not there. Originally, it had borne a medium weight sleeve, but we did not need weight, we needed rigidity.
And then it flashed into my mind some experiments performed way back when (1975-1976), with an ultralight-mountain rifle in a heavy caliber.
And so, I decided to put a tensioning sleeve on the little LGV.

I procured some CF tubes in different sizes and tried various combinations of wall thickness to tensions.

​I also tried the Baracuda Green pellets.

In the end, the best result was obtained with a 15X18 CF tube tensioned to 35 in-lbs:
Picture
At 10 meters, from the FT position with the OEM peep sights, the performance was quite rewarding.

But, what to do with this gun? apart from shooting Olympic Match, of course, ROFL!

Well, my good friends at Palmyra Sportsman's Association provided the answer:
They hosted an indoor/winter FT session (not really a Match), that had targets between the 10 yards and the 22 yards that their indoor range allowed.

Obviously, the idea was to put some "handicap" into the shoot by not shooting my "formal" competition airgun. It's no fun to clean a course that has been designed for less energy and less ranging capabilities.

So, this little gun came in perfectly for the task. How perfectly? you will have to be patient because first we need to talk a bit more about the gun.

The challenge to shoot indoors and still make it a meaningful event, starts with the optics.

You simply cannot put a monster scope atop a relatively little engine. Yes, you will range perfectly, but that is not a challenge! I started looking over my collection of scopes and although I have some really remarkable specimens, after some testing between eye relief, magnification, weight and mounting options, the only real solution was a Leapers Bug-Buster, set in a pair of old steel RWS adjustable mounts.
Why the need for adjustable mounts?
Consider that the OEM peep sight has about 50 MOA's of elevation capacity. There is NO scope in this size that can match that.
And the rifle's architecture does correspond to that. So: adjustable mounts!

​Here is the result:
Picture
In here I have to say that I wish the original owner could now see the gun. All the expense and trouble to add a rail, in reality was not needed. The RWS steel mount is installed in the same dovetail that the OEM peeps sit.
Here is a view of the OEM peep arrangement:
Picture
And here is a view of the Bug-Buster equipped rifle:
Picture
Clean, light, unobtrusive.

And, so  equipped, I shot some distance targets to try to establish the trajectory:
Picture
Measuring the drop and measuring the LOS height, I came up with some reasonable idea of the trajectory, which we will discuss in the entry for the indoor FT event.
​Overall the gun is a pleasure to look at, to shoot, and to carry.
Picture
The Glossy CF tube adds some texture and bling, while contrasting with the matte of the sighting equipment.
Picture
In the old days they knew what they were doing and made no qualms about reinforcing the wrist/pistol grips of Match guns. By the very definition of a Match gun, it is a gun that will travel.
And they didn't use ugly wood either:
Picture
So, I packed scoped gun, pellets and all the necessary accessories and headed to Palmyra, where the sighting-in cards offered a rewarding and amusing testimony:
Picture
5 shots at 12 yards above and 10 shots at the same distance, but with "1 mil" elevation, below.
Picture
At 22 yards with various aiming variations. 5 shot groups. From the knee.

One thing that did became apparent early on is that the gun is temperature dependent. I am not saying sensitive, because 50° F of temperature swing is nothing to sneeze at. The gun had stayed in the trunk of the car overnight, and then brought into the indoors range where we were shooting in long sleeved T Shirts.

After a little while and with a little bit of action, the gun stabilized and I started shooting the course.
Picture
But that, as my Father used to say: "Is another story"  ;-)

Keep well and shoot straight!


HM                                                                                                                                                          © 08/02/22
4 Comments

Resurrecting an old DIANA 54                                              ©

2/8/2022

9 Comments

 
In the DIANA users' world, NOTHING elicits more fear than the idea of the scope rail becoming loose.
Or even worse, falling altogether off the gun!

This may happen for several reasons: Too heavy a scope at too high Muzzle Energy, or trying to "bottom" the stop pins in T06 rails, or a bad fall.

SOME users have detected some "play"  in the rail and have tried to fix it themselves tightening the "screws" that hold the rail in place.

The result isn't pretty.

On one hand the screws are riveted from the inside of the mechanisms tubes.

On the other, they are VERY hard screws that are torqued to a ridiculously high level.

So, when a good friend asked me how to tighten the rail, I immediately told him to stop and send me the gun.

Of course, following the advice of a professional is unheard of; LOL!

A few months after the conversation, another call was received and he told me that with the help of a machinist friend, he had tried to remove the screws and re-thread/re-attach the rail. Of course, they were not able to.
Furthermore, in the process of trying, the rail had been destroyed.

So, now the issue was to procure a dovetail rail AND attach it to the action in a way that was functional.

It is too easy to install a crooked rail that will not allow ANY scope nor mount to align with the trajectory

By then, I was too busy and had stopped taking in work, but he was decided to wait whatever it took and so he sent the gun.

I was truly taken aback by what I received. The "rivet" studs were still attached to the action, no rail was present, and the note just said: "Yes I know you will be terrified at our butchering. Please do what you can"

Ah, well . . .

And so the process started.

First a carbide spot drill was used to put a dimple into which a normal but tiny pilot carbide drill would "dig" in each of the studs. I had to locate each hole with a magnifying glass.
Then a tiny pilot hole was drilled through the stud and careful observation proved that indeed, all holes were fairly coaxial.
Then a more robust carbide drill was used to remove the hardened studs and create the hole for a new thread. The best possible thread for attaching things to relatively thin tubes is the superfine metric threads.


Special screws had to be sourced, luckily, the M4x0.5  flathead screws were available OTC.

Locating an 11 mm's dovetail was not direct, and the ones located made the whole project almost lose all sense because they had no curve on the underside. Machining that curve would have meant creating a fixture to affix the blank in the lathe and then using a fly cutter; and then creating the fly cutter itself.

So, we found a 3/8" dovetail blank plate that had the proper underside curvature and decided it would be preferable to modify extensively the ZR Mount than to create a dovetail to suit the gun's profile.

Same would have been true for the many Picatinny rail blanks available. AND ZR mounts of the Picatinny version are as scarce as hen's teeth.

Once the studs had been removed, the dovetail "plate" was locate and drilled to match the OEM holes.

As parts started to trickle in, it became obvious that the challenge was  going to be to get the plate in place roughly aligned to the bore of the gun. We COULD later, do some minor regulating, but we really did not want to have to do too much of it.

So, we sourced a bore-sighter and turned the stem to fit the airgun barrel.

It proved to be a very wise decision, as it turned out that the OEM holes were not precisely "perfectly" aligned to the barrel/bore, it may be that the barrel had been bent out of whack some time previously, or that in the operation of removing the old rail, the barrel had been affected.

In the end, after some relieving and "slack-building" we were able to mount the plate to the gun, and check everything before gluing the plate.

Once everything was dry and everything was re-checked, this was the result:
Picture
Just to clarify, I did NOT put that scratch to the left of the action. LOL!

I tested the gun with a 1" scope in an Accurized ZR mount and discovered that there was too much of a difference between the 3/8" and the 11 mm's dovetail, or at least between THIS dovetail plate and the 11 mm's standard dovetail as understood in Europe.

And so the really long part of the project began, because dovetails are fickle beasts! You take off a bit here and all the angles and surfaces change and all goes out of whack.

In the end, we spent more time making sure that the mount sat square and plumb and tightened enough the dovetail than attaching the dovetail rail plate.
Picture
A substantial amount had to be milled out of the right side of the base, so that the moveable clamp could tighten well and still keep the proper angle.
Then about 0.5 mm's had to be milled from the bottom of the left side, to ensure that the mount sat level & square.
Since this rail plate has no stops, I re-drilled and re-tapped the holding screws to receive M4 screws and ensure a solid attachment..​
Picture
Then came another challenge: The customer had decided on an Athlon scope, and those scopes have a rather hefty "saddle" which meant that 0.6 mm's had to be milled off the watertable to allow the scope to move freely in the ZR mounts.
All in all 7 solid hours of serious work were put into this, mostly setting up, measuring and re-measuring, and then re-checking everything once again before even starting the milling.
Picture
So, what do we get for all that work?
Picture
And
Picture
Do note:
- all these are 10 shot groups from a full powered (21 ft-lbs)  0.22" cal D54
- the 10 M groups are single hole
- the 25 M groups (zero)  are barely larger than ½"
- the 40 M groups are about ¾"
all this from the knee/FT position.

​For the first try some effort was made to compensate for the wind, for the second I tried to get a better feel for long distance (55 M = 60.2 yds) wind drift.
Wind was kicking hard and moving not only the pellet but the shooter also!
​
​
The rifle's architecture is a straight hunter, low-sitting scope for more reliable trajectory in the short to medium ranges, quite pleasing to carry and to shoot.
Picture

​So, from an almost "lost cause" case to a really good shooter.

Marvelous machines these are indeed!

Keep well and shoot straight!


​HM
​© 10/28/21
9 Comments

    Hector Medina

    2012 US National WFTF Spring Piston Champion
    2012 WFTF Spring Piston Grand Prix Winner
    2013 World's WFTF Spring Piston 7th place
    2014 Texas State WFTF Piston Champion
    2014 World's WFTF Spring Piston 5th place.
    2015 Maine State Champion WFTF Piston
    2015 Massachusetts State Champion WFTF Piston
    2015 New York State Champion WFTF Piston
    2015 US National WFTF Piston 2nd Place
    2016 Canadian WFTF Piston Champion
    2016 Pyramyd Air Cup WFTF Piston 1st Place
    2017 US Nationals Open Piston 3rd Place
    2018 WFTC's Member of Team USA Champion Springers
    2018 WFTC's 4th place Veteran Springer
    2020 Puerto Rico GP Piston First Place
    2020 NC State Championships 1st Place Piston
    2022 Maryland State Champion WFTF 
    2022 WFTC's Italy Member of TEAM USA 2nd place Springers
    2022 WFTC's Italy
    2nd Place Veteran Springers
    2023 WFTC's South Africa Member TEAM USA 1st place Springers
    2023 WFTC's South Africa
    2nd Place Veteran Springers

    Archives

    June 2024
    May 2024
    February 2024
    October 2023
    September 2023
    August 2023
    May 2023
    March 2023
    December 2022
    August 2022
    May 2022
    April 2022
    February 2022
    August 2021
    July 2021
    June 2021
    May 2021
    April 2021
    March 2021
    February 2021
    October 2020
    September 2020
    August 2020
    July 2020
    June 2020
    May 2020
    April 2020
    March 2020
    February 2020
    January 2020
    December 2019
    November 2019
    September 2019
    August 2019
    July 2019
    May 2019
    April 2019
    January 2019
    December 2018
    November 2018
    October 2018
    September 2018
    August 2018
    June 2018
    May 2018
    April 2018
    March 2018
    February 2018
    January 2018
    December 2017
    November 2017
    October 2017
    September 2017
    March 2017
    December 2016
    October 2016
    September 2016
    July 2016
    June 2016
    March 2016
    January 2016
    December 2015
    November 2015
    October 2015
    September 2015
    August 2015
    June 2015
    May 2015
    April 2015
    March 2015
    February 2015
    January 2015
    December 2014
    November 2014
    October 2014
    August 2014
    July 2014
    June 2014
    May 2014
    March 2014
    February 2014
    December 2013
    November 2013
    October 2013
    September 2013

    Categories

    All
    Events
    Gear
    Hunting
    Tests

    RSS Feed

Proudly powered by Weebly