In "gun-speak" blueprinting an action is understood as the modifications/alterations that make that action fit the specified dimensions of the design.
In this entry, we will use the verb as meaning that we are returning the rifle, as much as possible, to the "as it SHOULD HAVE BEEN issued" state.
It all started quite some months ago (Pre-CoViD) when I was contacted by a fellow FT shooter asking what was the potential in using a Walther LGV to shoot FT.
Since an LGV is my "back-up" gun for serious FT, I answered that a properly setup rifle could be accurate, precise and consistent enough to place well in a competition.
After that first conversation, there was no more talk and I thought that the whole idea had been forgotten.
BUT, in the last North Carolina Classsic, I met with the friend in question and after the first day of competition, he declared: "I'm done, take the gun and make it what it can be".
So, I came back with more guns than I took! LOL!
I will not go into detail about the tear down and the way the gun works, there are other entries that deal with that:
https://www.ctcustomairguns.com/hectors-airgun-blog/a-yankee-tune-for-the-walther-lgu
https://www.ctcustomairguns.com/hectors-airgun-blog/a-yankee-tune-for-the-walther-lgu-second-version
Since the guns are identical, except for the cocking mechanism, what is said of one gun applies to both.
What was the difference this time as regards those first ventures into the LGU/LGV realm was that on this occasion I had NO IDEA of the provenance of the gun. It was an LGV Master. And I am sure it was bought in the USA, my friend purchased it "from a gentleman in PA", but that still does not justify what happened.
So, let's get into the project.
The Rifle.-
My friend is a good shooter. He is, literally, Championship material, so if he says the gun is inconsistent, I tend to believe him, but inconsistent by how much was still a question, so . . . the first thing was to put the gun through the Chrono.
Testing with JSB's 8.44 grs./ 4.52 mms, gave horrible results, in a 20 shot string the ES was 27 fps for a Low of 735 and a High of 762, for an average of 750 ± 7 fps for 10.6 ft-lbs
CLEARLY something was wrong.
On disassembly, I noticed that the previous owner had applied the "Yankee Tune" principles to the "Tee". But the gun simply refused to yield the energy promised and even some drastic spacing forward and aft, did not provide the desired results.
Vortek unit with added spacers
It was also obvious that some effort had been made to tame the buzz through the liberal application of greases:
Gobs of grease
Complete disassembly showed the rear part of the powerplant train:
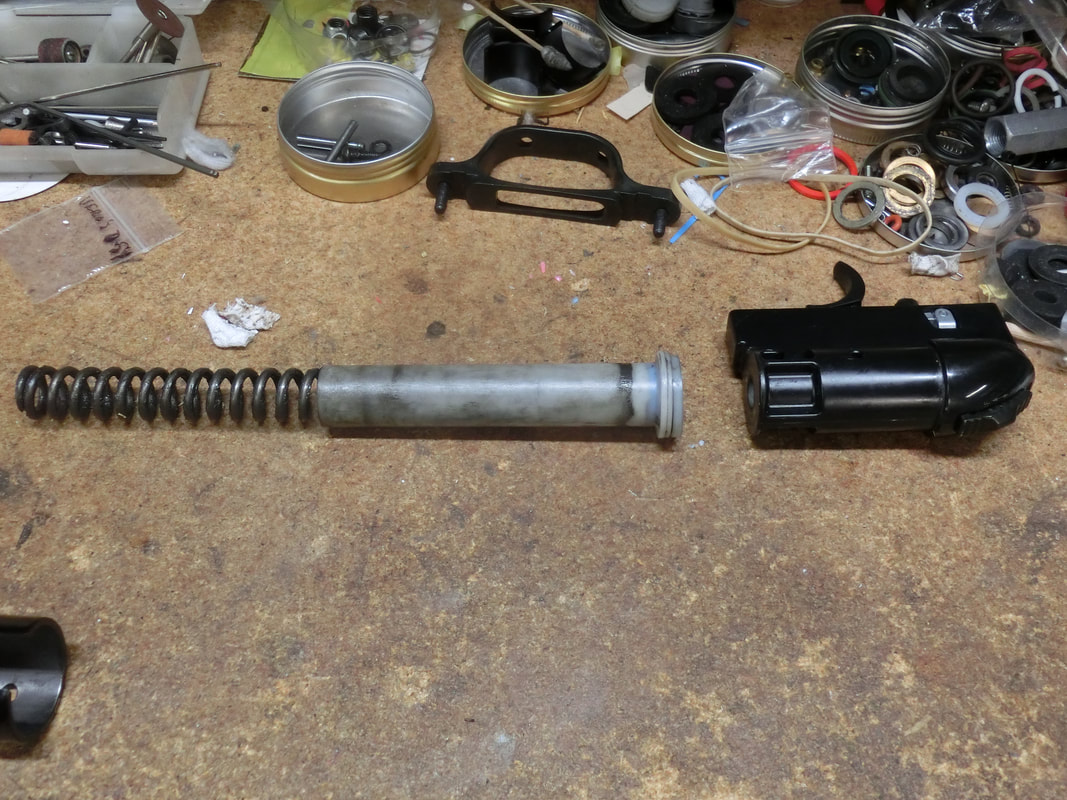
Rear Section of Powerplant
And I still had to find the heavily spaced TopHat which was hiding inside the piston.
The seal wasn't either an OEM one, being blue, slimmer and shorter than the original:
The seal wasn't either an OEM one, being blue, slimmer and shorter than the original:
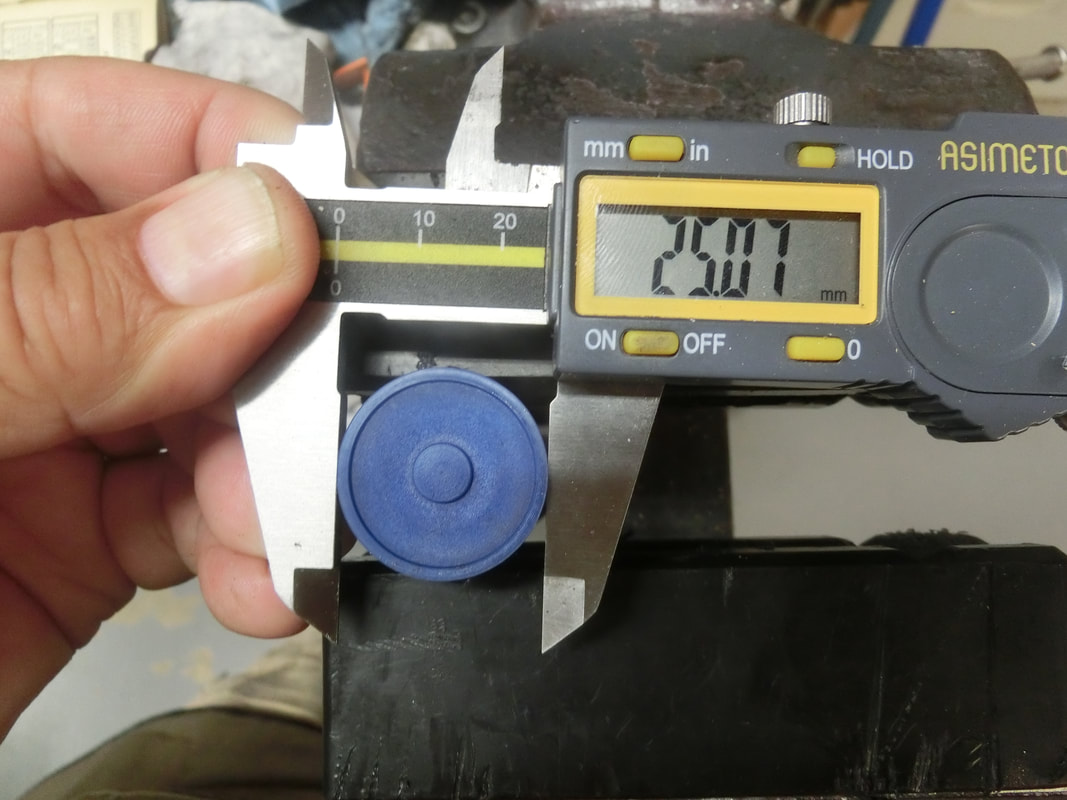
Non-OEM seal is slimmer
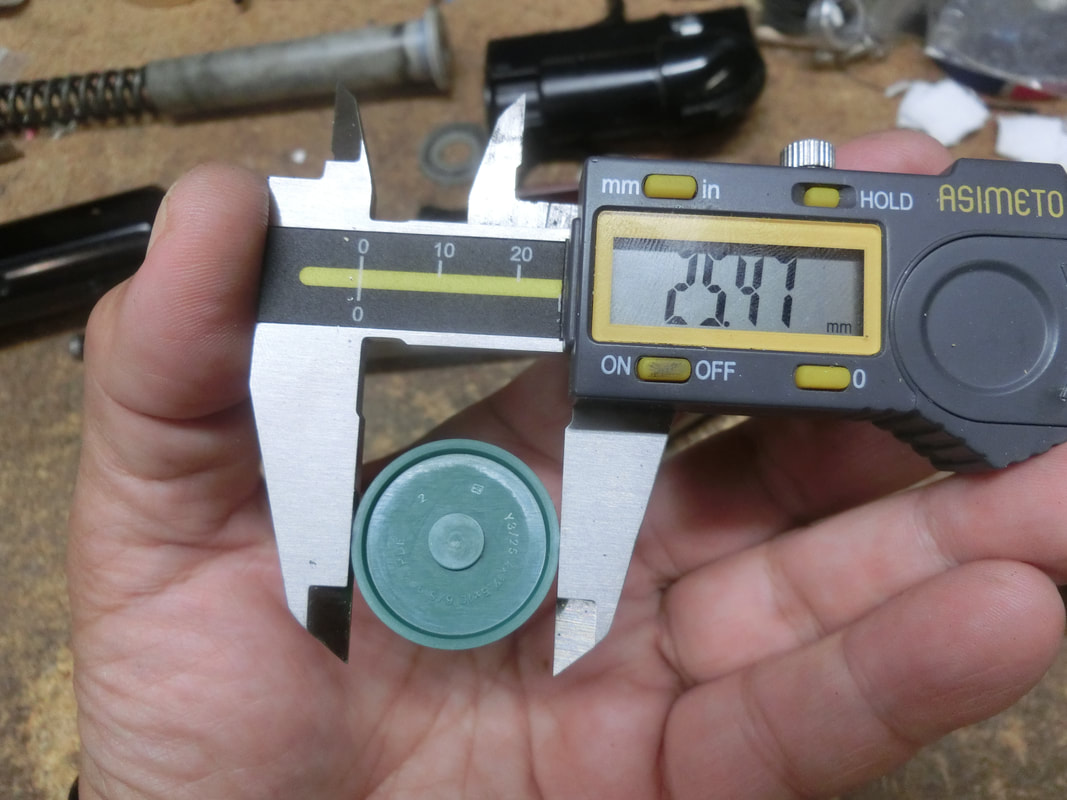
OEM seal's Bore Diameter
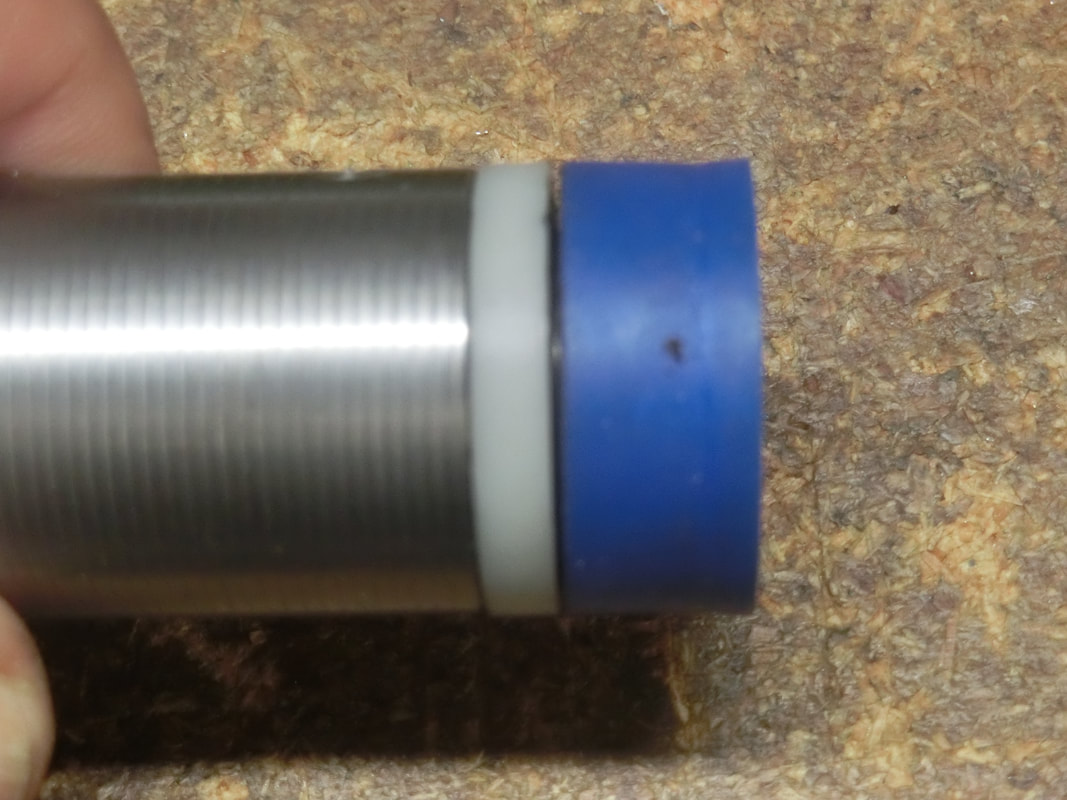
Rear Gap with Blue Seal
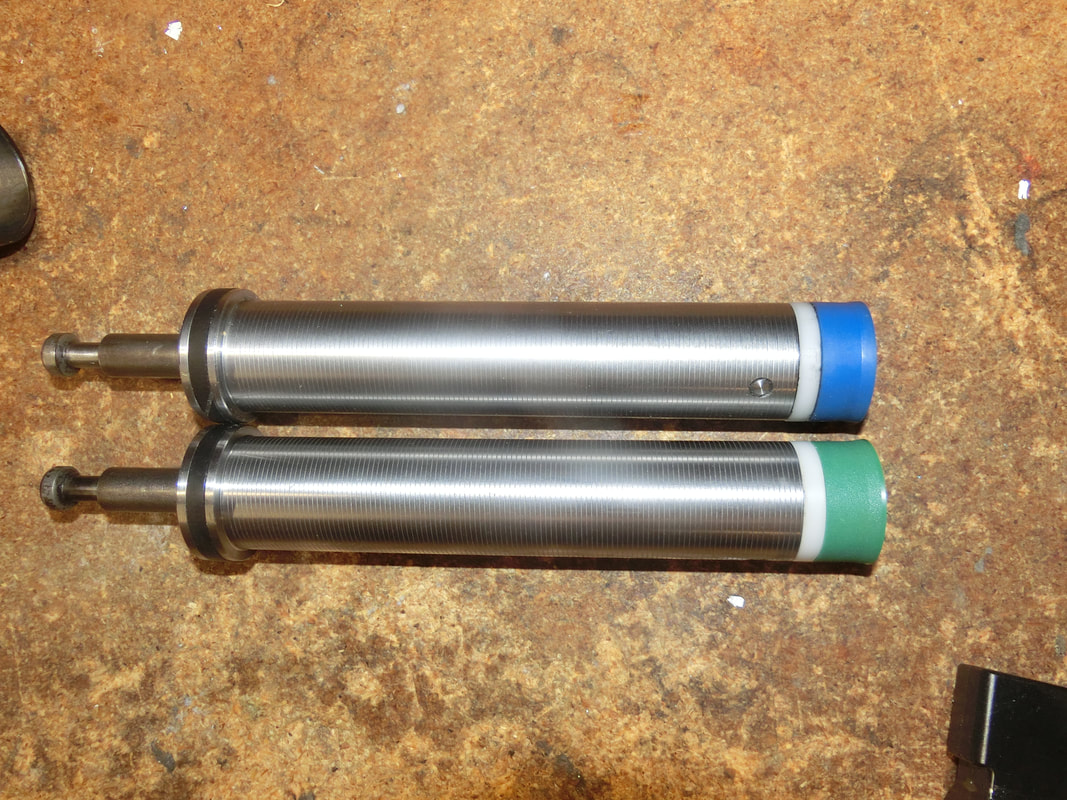
Piston with Blue seal is shorter
If the idea was to add a millimeter of stroke to the compression volume, the advantage was lost with the looseness and the gaps.
The Fix.-
Still, the job was cut out and so, I replaced all parts for OEM parts (as wished by the owner):
Still, the job was cut out and so, I replaced all parts for OEM parts (as wished by the owner):
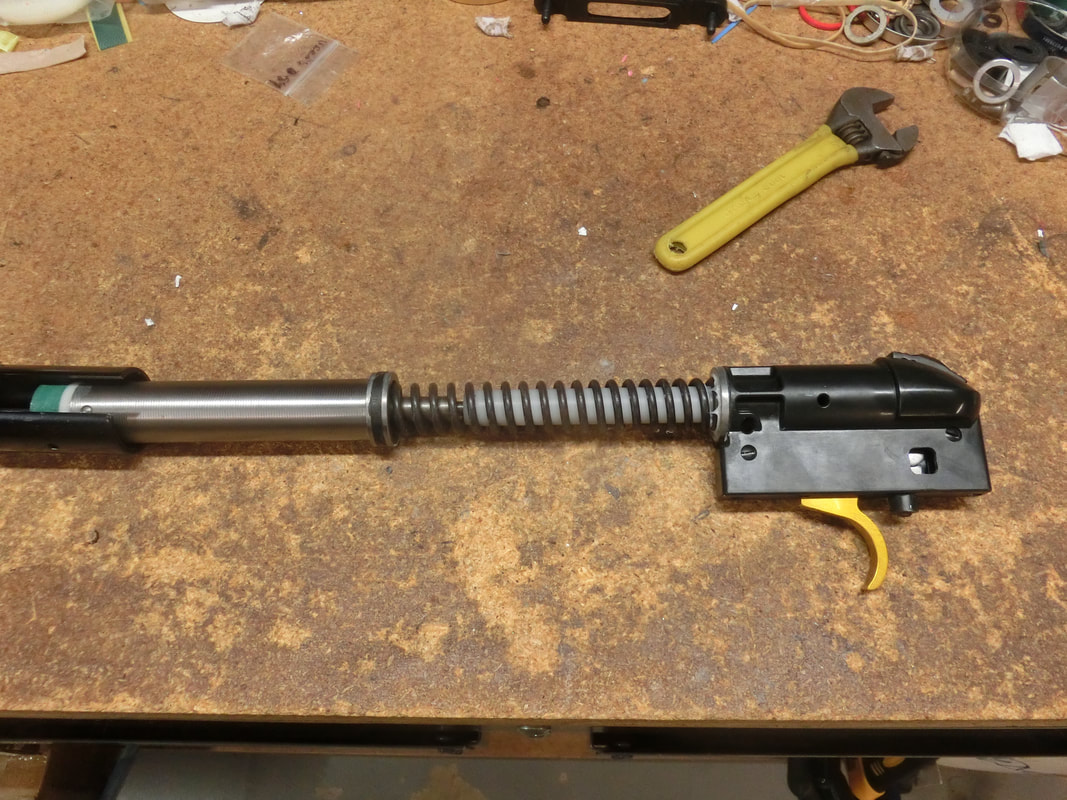
Full OEM Powerplant
A new piston, a new guide and a new spring were installed, all OEM parts.
Observant readers will note that the OEM trigger has been replaced! Yes that is one of Eric Pianori's triggers:
https://www.ctcustomairguns.com/hectors-airgun-blog/new-super-custom-trigger-for-the-walther-lgulgv
and it is superbly adjustable, consistent and reliable.
I thought that everything had gone "just peachy" till the chrono test:
With the same JSB's, the gun clocked 741 ± 4 fps
WHAAATTT?
Uhh-Ohh! I guess that, by now, I should KNOW that if a gun gets to me, it is because others have not found a way to make it work as the owner/customer wants, or as the gun is expected to perform.
Reading over some of my notes, I remembered that at one point I had refused to change the TP of an LGV, preferring to use a much more complicated solution:
https://www.ctcustomairguns.com/hectors-airgun-blog/the-walther-lgv-pushing-the-power-limits
But the owner, in THIS case wanted to have the gun "blue-printed" and nothing is as non-OEM as a custom piston.
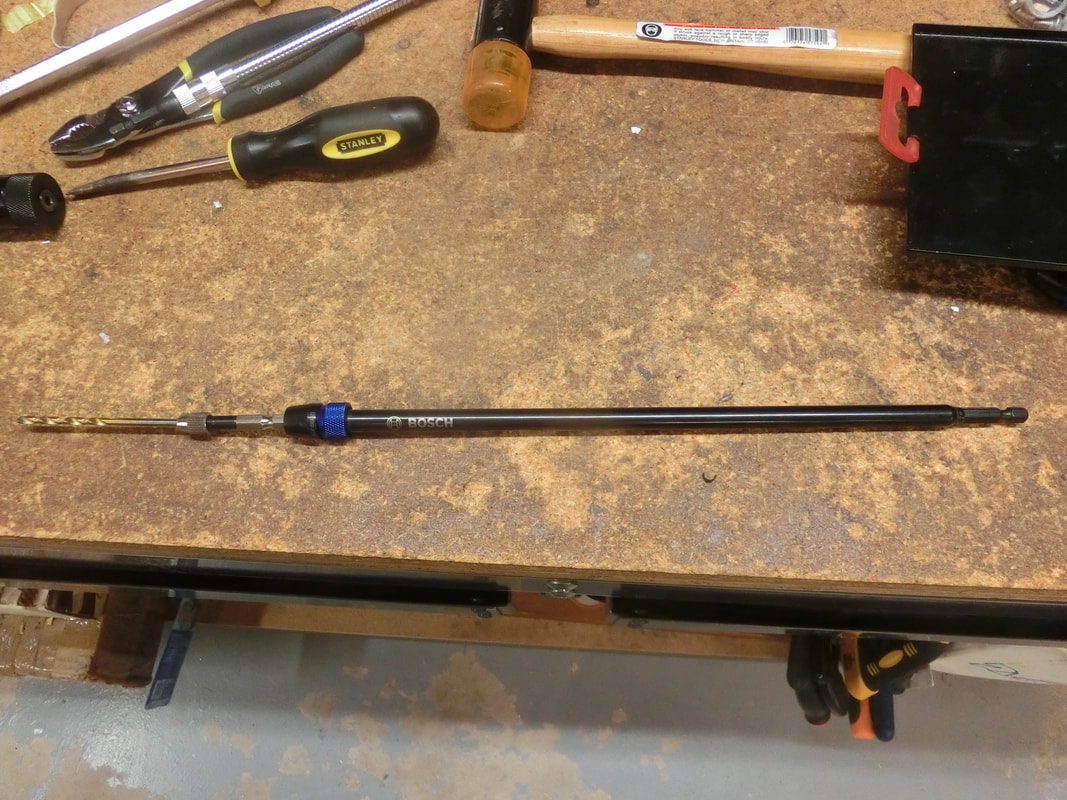
It had also happened that I had HAD to open a TP in some other break-barrels and I had made the tools to do it properly, so this time around, I did have the wherewithal to tackle the TP enlargement.
In brief: you need carbide drills to drill out the TP to the dimension you need/want, and also a way to remove the drilling burr from the INSIDE of the compression chamber that results from drilling from the outside in.
Carbide drills will cut a VERY precise and smooth hole in steel at slow speeds with mutton tallow lubrication, and that gives you control of the process, it also produces little burr on the other side of the drill, important when the "other side" is, in reality, the INSIDE of the compression chamber; where another surprise awaited us.
Observant readers will note that the OEM trigger has been replaced! Yes that is one of Eric Pianori's triggers:
https://www.ctcustomairguns.com/hectors-airgun-blog/new-super-custom-trigger-for-the-walther-lgulgv
and it is superbly adjustable, consistent and reliable.
I thought that everything had gone "just peachy" till the chrono test:
With the same JSB's, the gun clocked 741 ± 4 fps
WHAAATTT?
Uhh-Ohh! I guess that, by now, I should KNOW that if a gun gets to me, it is because others have not found a way to make it work as the owner/customer wants, or as the gun is expected to perform.
Reading over some of my notes, I remembered that at one point I had refused to change the TP of an LGV, preferring to use a much more complicated solution:
https://www.ctcustomairguns.com/hectors-airgun-blog/the-walther-lgv-pushing-the-power-limits
But the owner, in THIS case wanted to have the gun "blue-printed" and nothing is as non-OEM as a custom piston.
It had also happened that I had HAD to open a TP in some other break-barrels and I had made the tools to do it properly, so this time around, I did have the wherewithal to tackle the TP enlargement.
In brief: you need carbide drills to drill out the TP to the dimension you need/want, and also a way to remove the drilling burr from the INSIDE of the compression chamber that results from drilling from the outside in.
Carbide drills will cut a VERY precise and smooth hole in steel at slow speeds with mutton tallow lubrication, and that gives you control of the process, it also produces little burr on the other side of the drill, important when the "other side" is, in reality, the INSIDE of the compression chamber; where another surprise awaited us.
Deep Drilling Setup

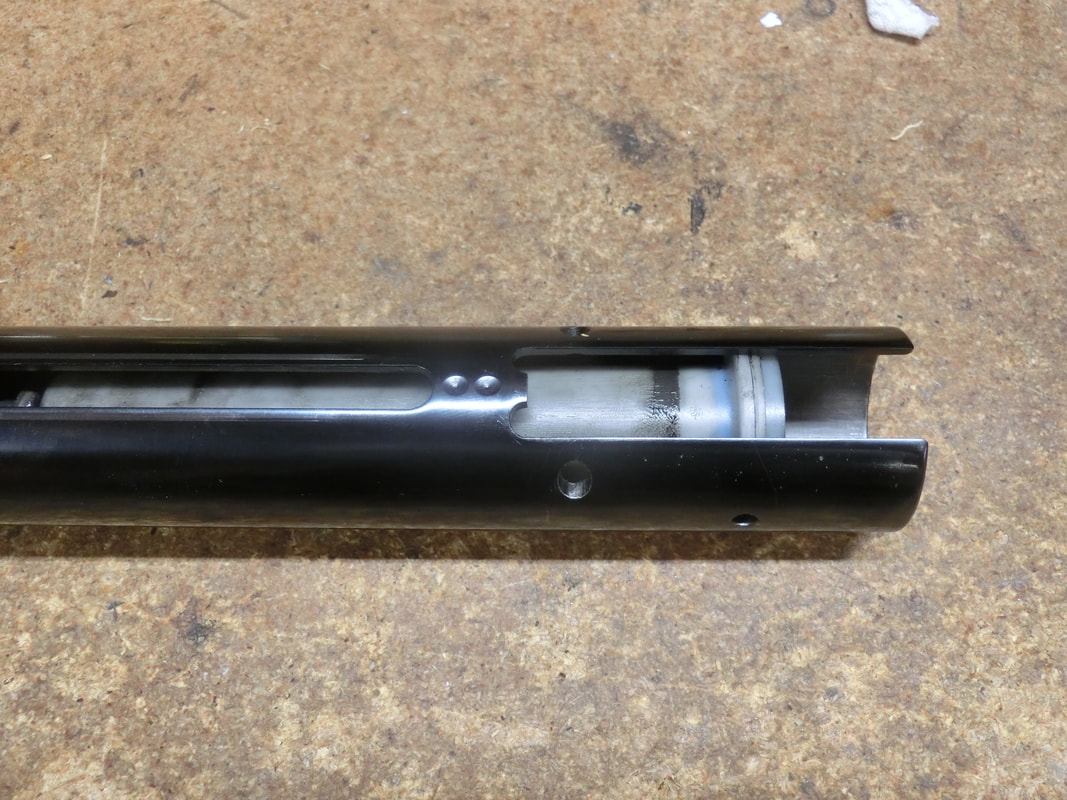
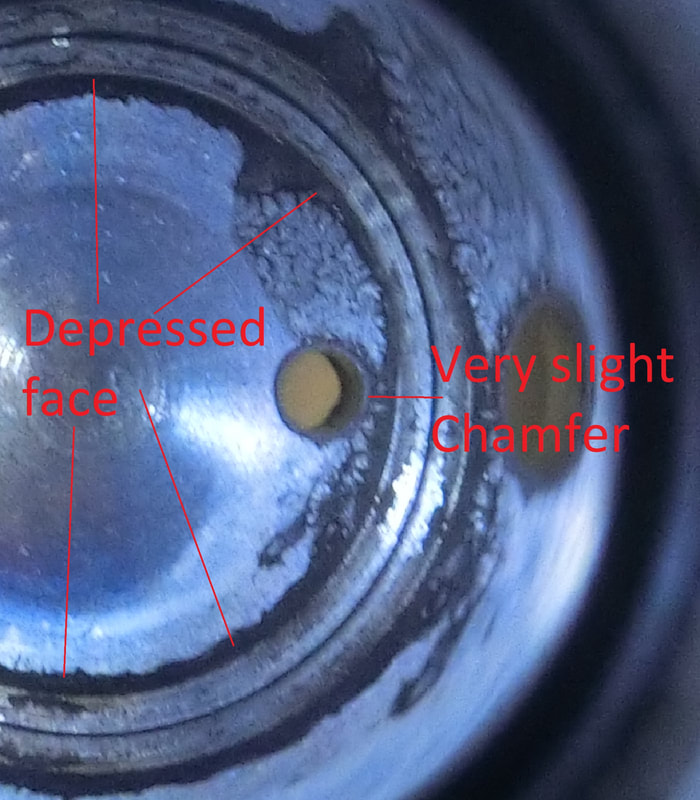
Peeking into the Face
As you can see there is a gap between the end and the sidewalls of the compression chamber, where a ring of "gunk" forms. You can also see that the face/end of the compression chamber is not perfectly flat.
This gun will never achieve true "full power" because there is a "lost volume" that we cannot get rid of. A lost volume that even the excellent OEM LGV "power pulse" style seal cannot remediate.
It could be fixed with a custom piston, but then that would not be a "blue-printed" gun.
The other thing you can see in this picture (or better yet, you CANNOT see), is the normal burr from drilling the TP out from the OTHER side.
A larger drill was applied with the extension shown above and the burr removed.
Some have argued that the inside of the TP's should be "venturi'ed", IMHO, that is counterproductive because when air flows at the speed at which it flows inside these machines, a slightly turbulent flow is actually a better "lubricated" flow; a venturi style of entry would tend to reduce turbulences, which is something we do not want.
So, we only removed the burr and made sure that nothing was there to damage the seal in the second (or third) landing of the piston.
Here is a detailed look at the TP and surrounding area:
This gun will never achieve true "full power" because there is a "lost volume" that we cannot get rid of. A lost volume that even the excellent OEM LGV "power pulse" style seal cannot remediate.
It could be fixed with a custom piston, but then that would not be a "blue-printed" gun.
The other thing you can see in this picture (or better yet, you CANNOT see), is the normal burr from drilling the TP out from the OTHER side.
A larger drill was applied with the extension shown above and the burr removed.
Some have argued that the inside of the TP's should be "venturi'ed", IMHO, that is counterproductive because when air flows at the speed at which it flows inside these machines, a slightly turbulent flow is actually a better "lubricated" flow; a venturi style of entry would tend to reduce turbulences, which is something we do not want.
So, we only removed the burr and made sure that nothing was there to damage the seal in the second (or third) landing of the piston.
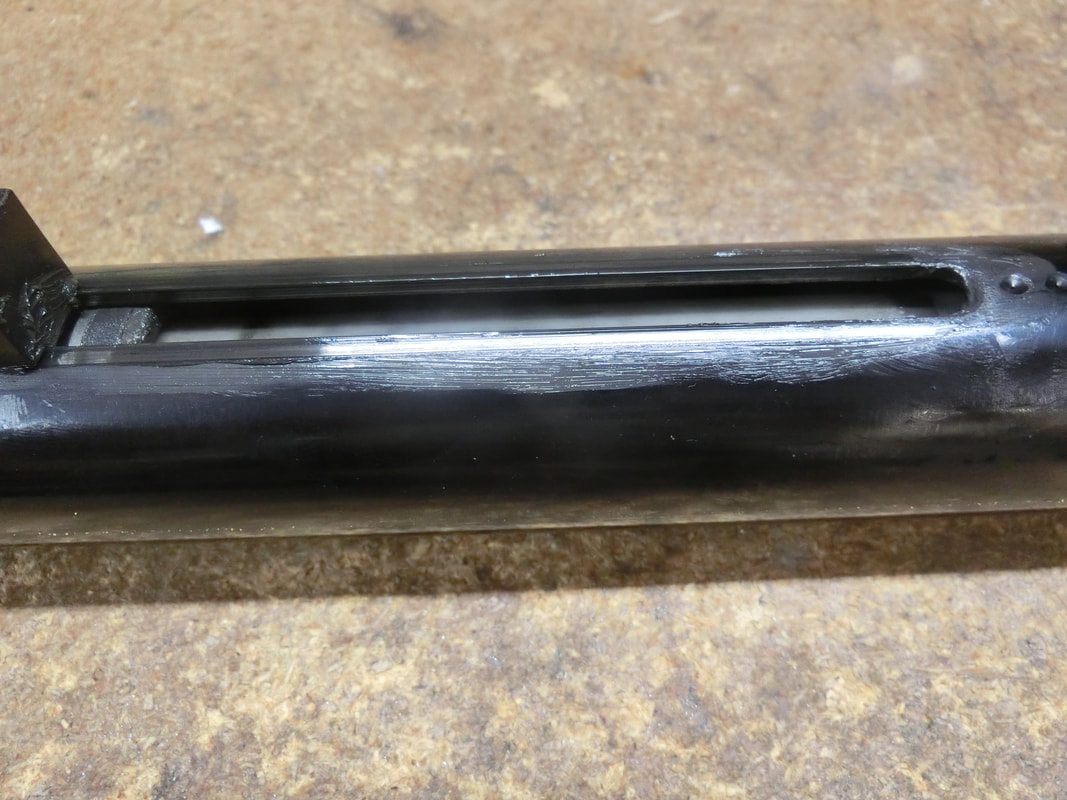
Here is a detailed look at the TP and surrounding area:
A detailed look of the Face
So, with the TP drilled out to the MINIMUM required for the 12 ft-lbs requested by the owner, we tested different pellets and finally settled on a combination that seems to give very good results.
The barrel in this rifle is easily one of the best I have seen/slugged in any modern Walther, and it seems to prefer the lighter spectrum of pellets (7.9 grs), shooting them at 827 ± 4 fps for 12 ft-lbs on the dot (and the innards are still in the "running in" phase). Predictably, this rifle will settle in the 835-840 fps average and the extreme spread in MV will be reduced to single digit.
This rifle is destined to shoot AAFTA style Hunter Division, so a little over 12 ft-lbs is no problem at all.
The results.-
To test this gun I installed a SIGHTRON 4-12X40 AO scope that has proven to be VERY reliable in an Accurized ZR mount:
To test this gun I installed a SIGHTRON 4-12X40 AO scope that has proven to be VERY reliable in an Accurized ZR mount:
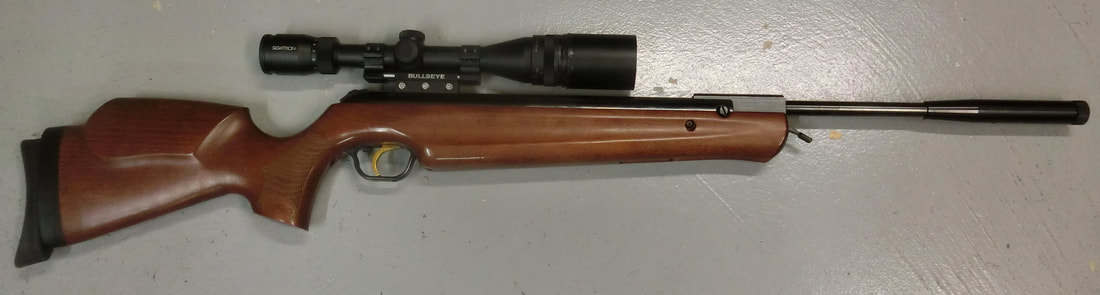
Complete view of the LGV rifle
It was very nice to just mount the scope and to have no need of further regulation to get the rifle sighted in at the optical axis of the scope. And so, after some short range tests to determine if the JSB Xp was the right pellet and confirming that it was, I adjourned to the 25 yards distance and this was the result (target shot from the bottom, up):
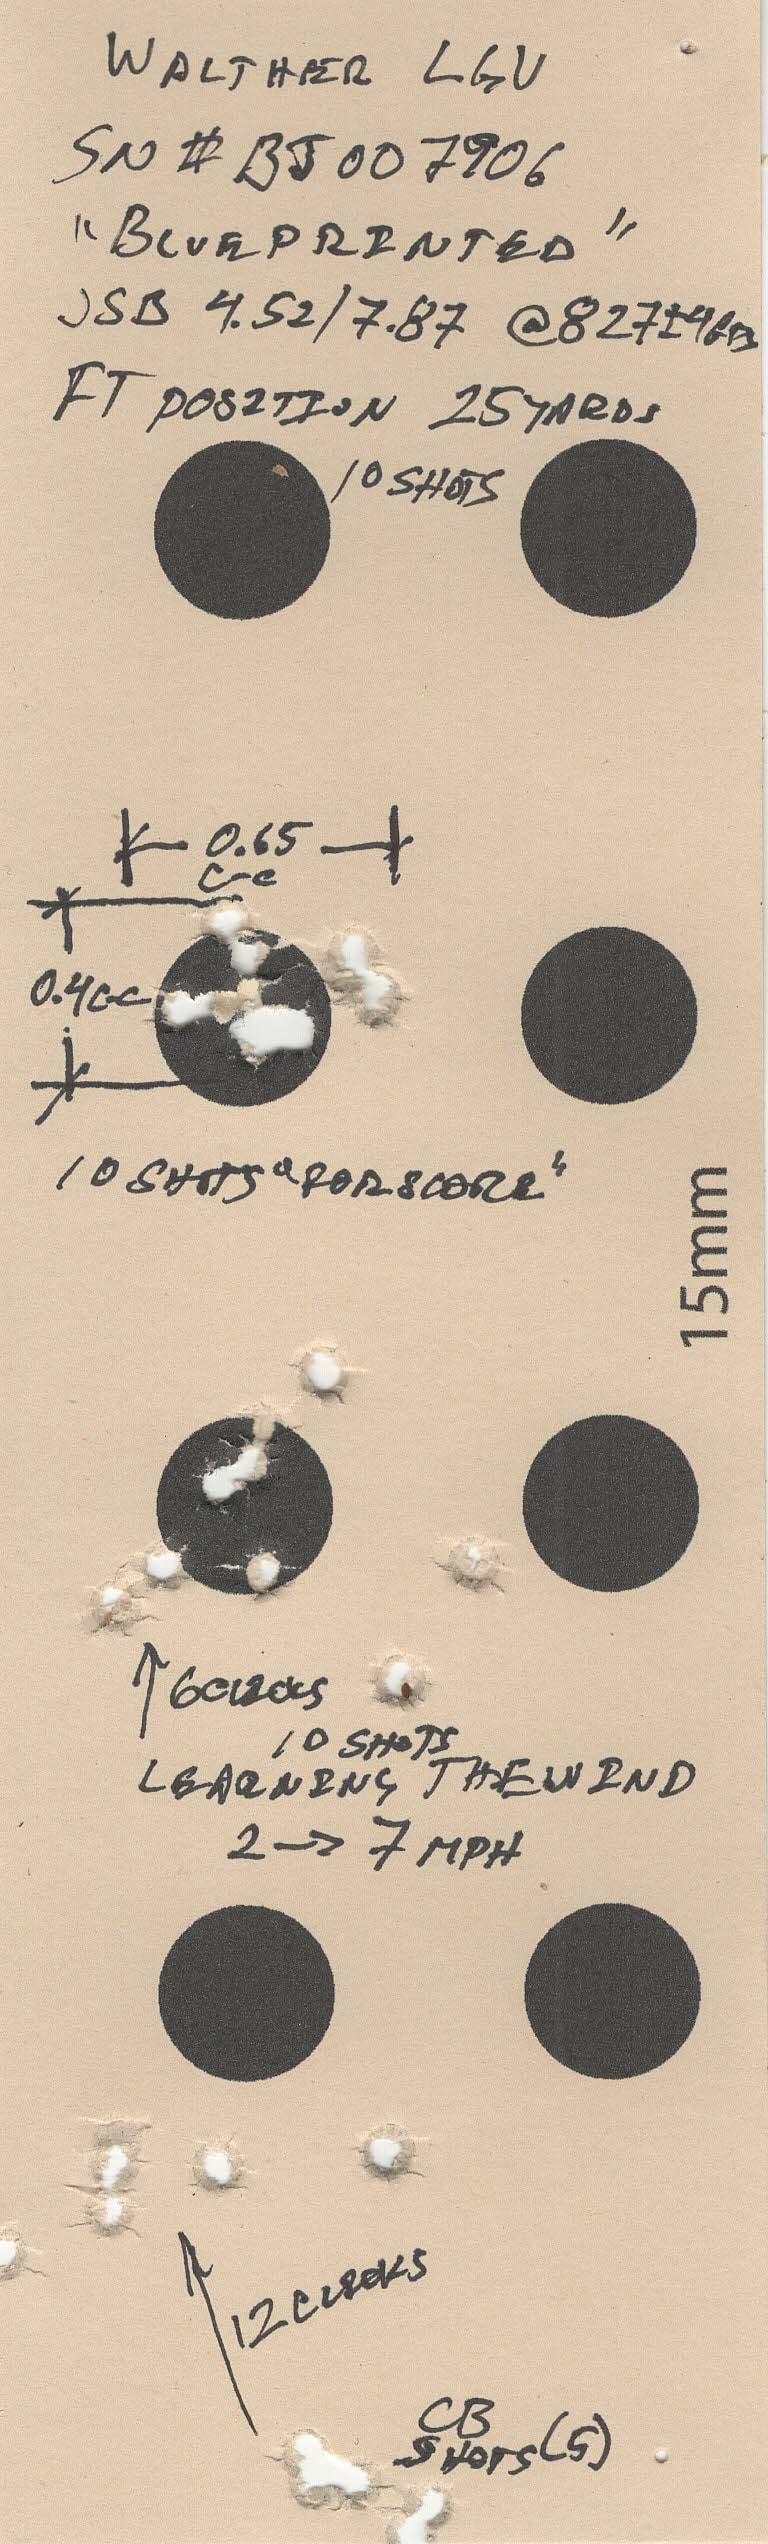
25 yds Test
As for the non-OEM part, my friend asked for a light and creepless trigger, so I used Eric's trigger's middle screw (to reduce the back force of the spring) and adjusted to a bit less than 1#, this is the average of 5 trigger pulls:
Trigger pull setting
Overall, a very rewarding project, while the gun will not achieve the 17/23 Joules advertised originally, it is still yielding a good performance for the cocking force, and it is working as a "pop gun" in the "Olde English Air Gonne" parlance, meaning that the lubricants are kept to a minimum and there is no energy contributed to the pellet by moderate dieseling.
As ALL Walthers that are made to work in the "pop gun" region, it is a bit "ringy". If this bothers the user the solution is extremely simple: just add a VERY LIGHT coating of tar to the spring. To ME, the thermal aspects of how tar behaves between a cool 50 ° F morning and a scorching 90 ° F noon are not worth it but, to each his own.
There is more to read about the LGV's in this blog, some of the entries have been superseded by newer materials and components, but I hope the readers will find them interesting:
https://www.ctcustomairguns.com/hectors-airgun-blog/swapping-the-walther-lgus-trigger
https://www.ctcustomairguns.com/hectors-airgun-blog/the-walther-lgv-a-second-look
https://www.ctcustomairguns.com/hectors-airgun-blog/the-gunsmiths-tune-part-14-full-power-walther-lgv
https://www.ctcustomairguns.com/hectors-airgun-blog/the-gunsmiths-tune-part-24-12-ft-lbs-walther-lgv
In the meantime, take care, keep well and shoot straight!
HM © May 23,2022
 RSS Feed