Connecticut Custom Airguns
  • Welcome!
  • Hector's Airgun Blog
  • Products and Products Blog
    • One-Off's
    • The "Héctors Special'" scope by Sightron
    • K1050i FT
    • The Hex Louver or "Secret Sunshade"
    • Pellet Path Calculator >
      • Questions, Answers and Comments on P-P Calc
      • Privacy Policy for PP-Calc
    • The Nautilus SideWheel
    • The X-10 TiltMeter
  • Zimmer-Silhouetten
    • Results 2017-2018
    • Results 2016-2017
    • Results 2015-2016
    • Results 2014-2015
    • Results 2013-2014
  • References and Links
  • Contact us
  • Store

Hector's Airgun Blog

Where we discuss, CIVIILY,  anything airgun.

Return Home

Shot cycle Dynamics in 3 Spring-Piston Airguns Chap 6

6/24/2021

7 Comments


Does more mass in a springer air rifle result in better accuracy?

Since an air rifle moves a fair amount before the pellet leaves the muzzle, it makes sense that anything that can inhibit that motion could help improve accuracy. An easy way to decrease movement is to add mass to an object. Newton’s famous 2nd law of motion states that F=ma, where F is the force applied to an object, m is the mass of that object, and a is the resulting acceleration of the object due to the force. For a given force, increasing the mass will decrease the acceleration, i.e., a=F/m. It is not too surprising that the accuracy ranking of the LGU (16.3 lbs), FWB 124 (14.3 lbs), and LGV (13.1 lbs) follows the masses of these three rifles. Of course, the difference between first and third place ctc averages is less than a ¼ of a pellet diameter, so the accuracies are quite close. However, after shooting thousands of pellets in these rifles, I think that this ranking is robust. However, these are three different rifles that have differences that go far beyond just their masses. So in this chapter, I will explore how the same rifle, my LGU, behaves when its mass is changed.
Changing the mass in my LGU was easy; I just switched from the homemade heavy FT stock to the original factory stock. The total weight with the FT stock is 16.3 lbs while the total weight with the factory stock is 12.7 lbs. The LGU is bedded in the FT stock with bedding compound and aluminum pillars, so that may help with day-to-day consistency compared to the wood-bedded factory stock.
Also, the beefier FT stock is a bit easier to hold on the sandbags. Despite these advantages, I think that the main difference is just the difference in overall weight.
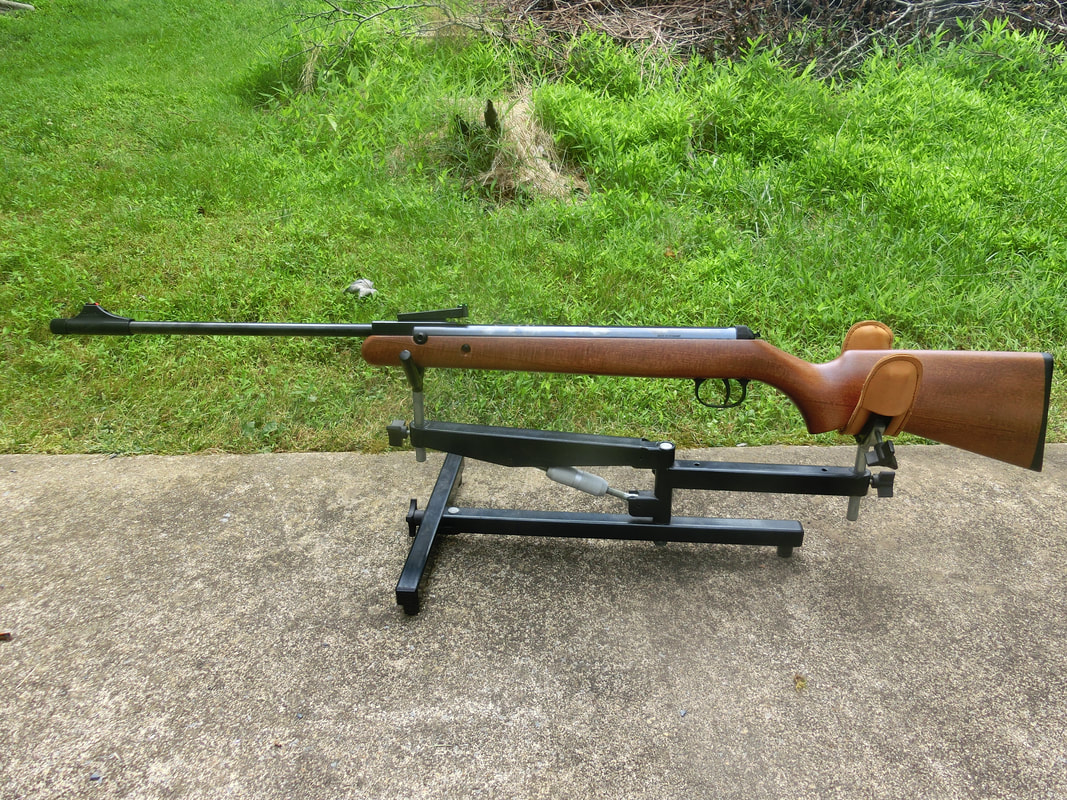
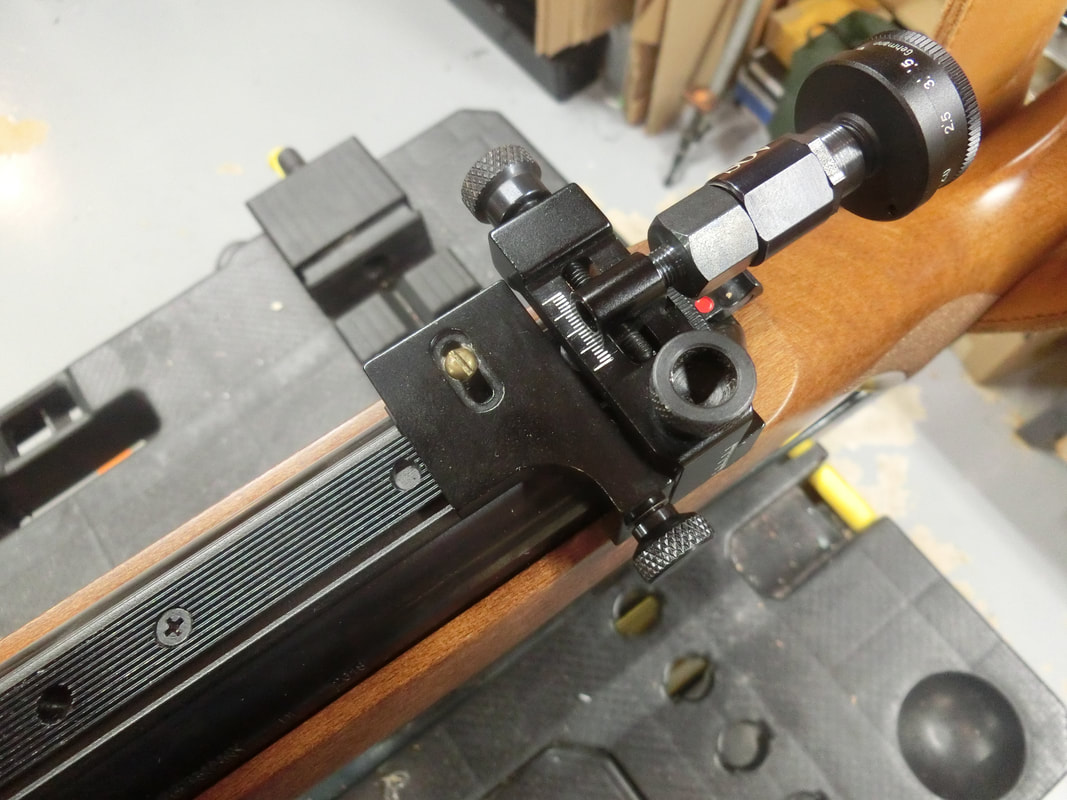
Figure 6.1 shows the LGU in the a) FT stock and b) the factory stock.
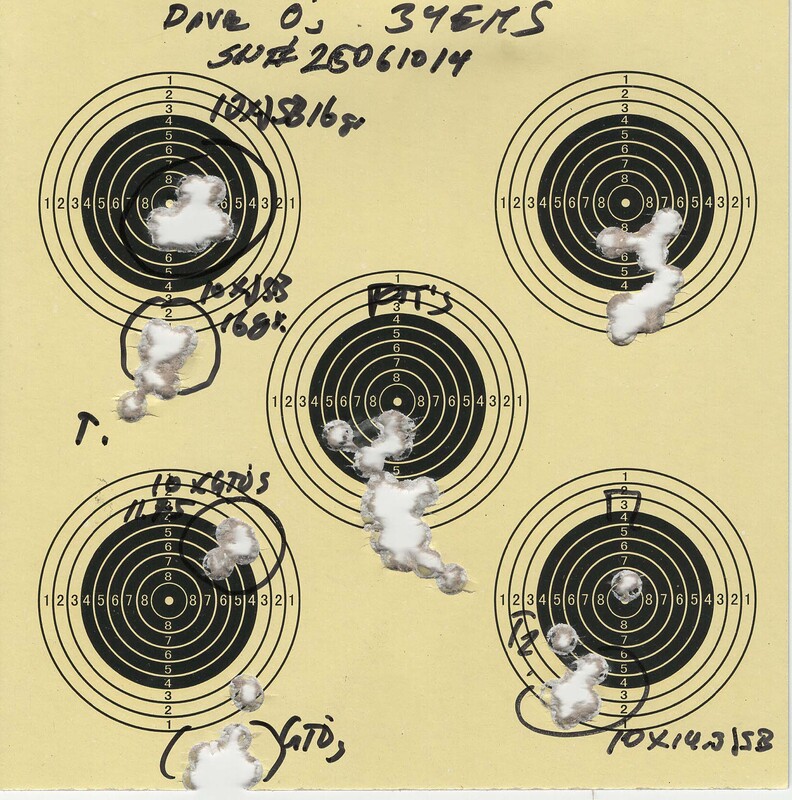
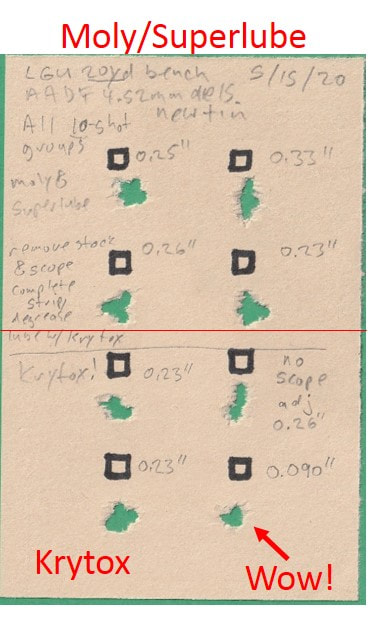
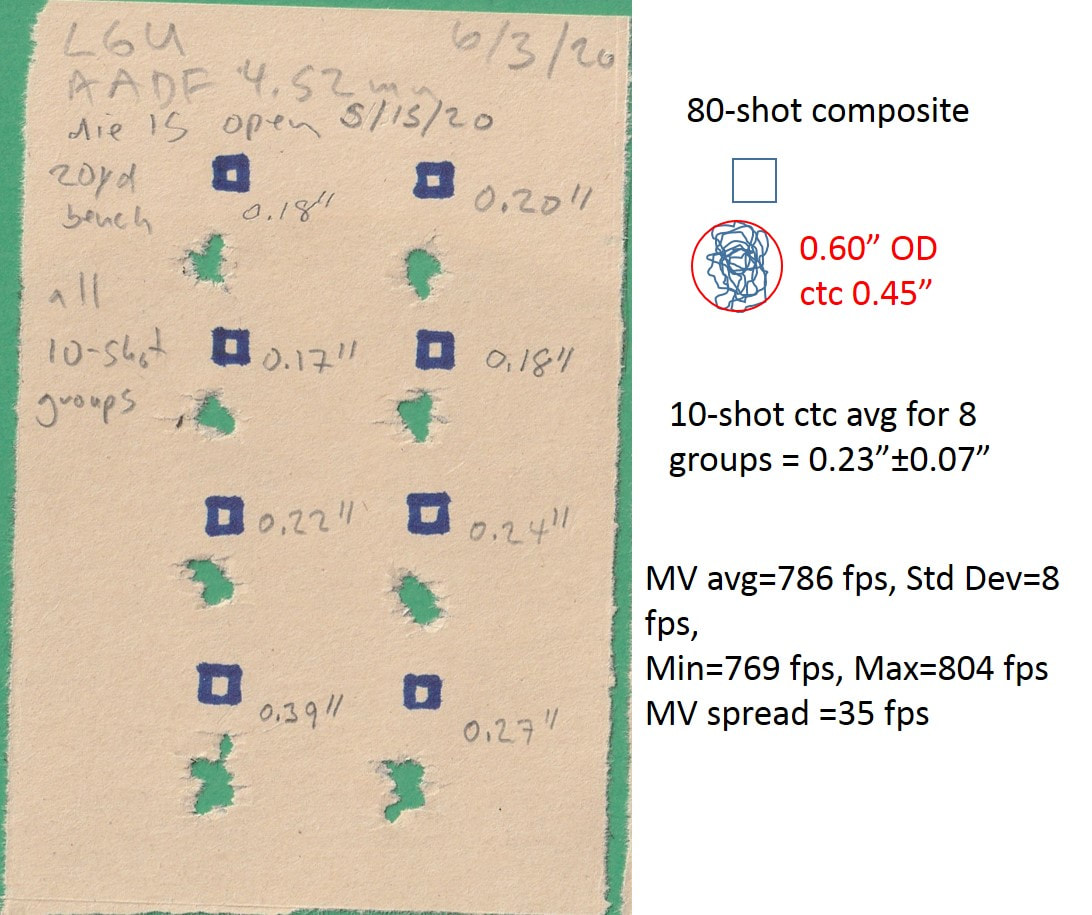
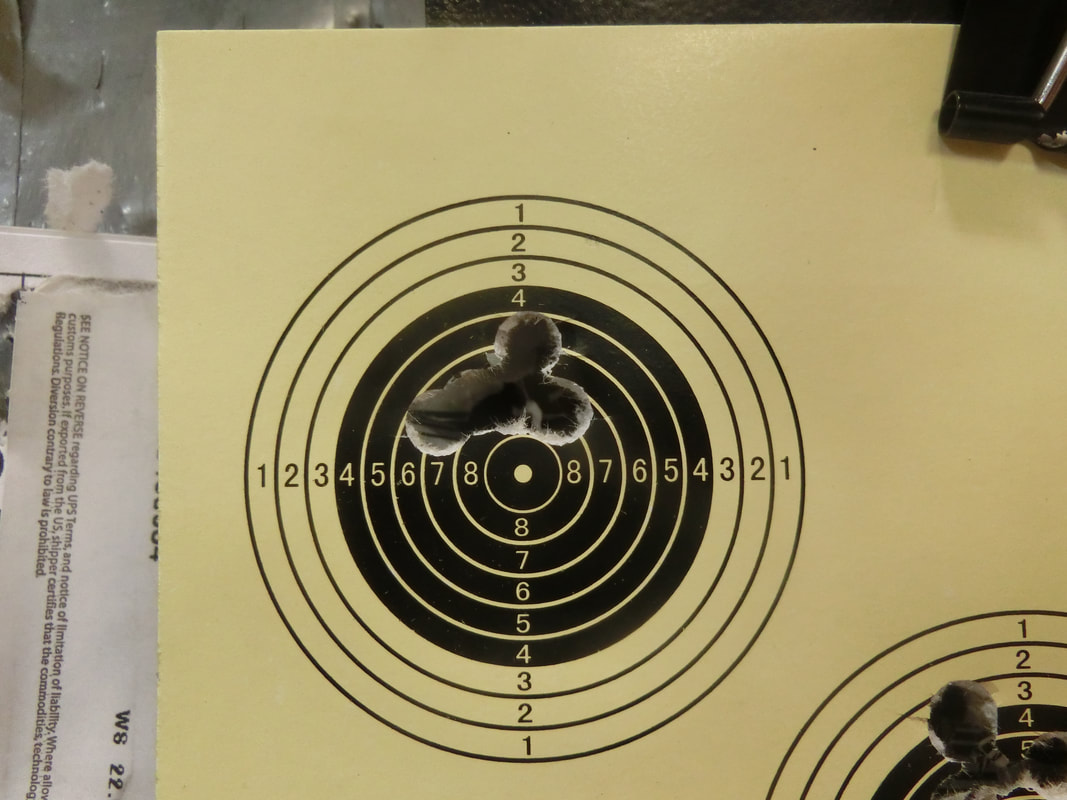
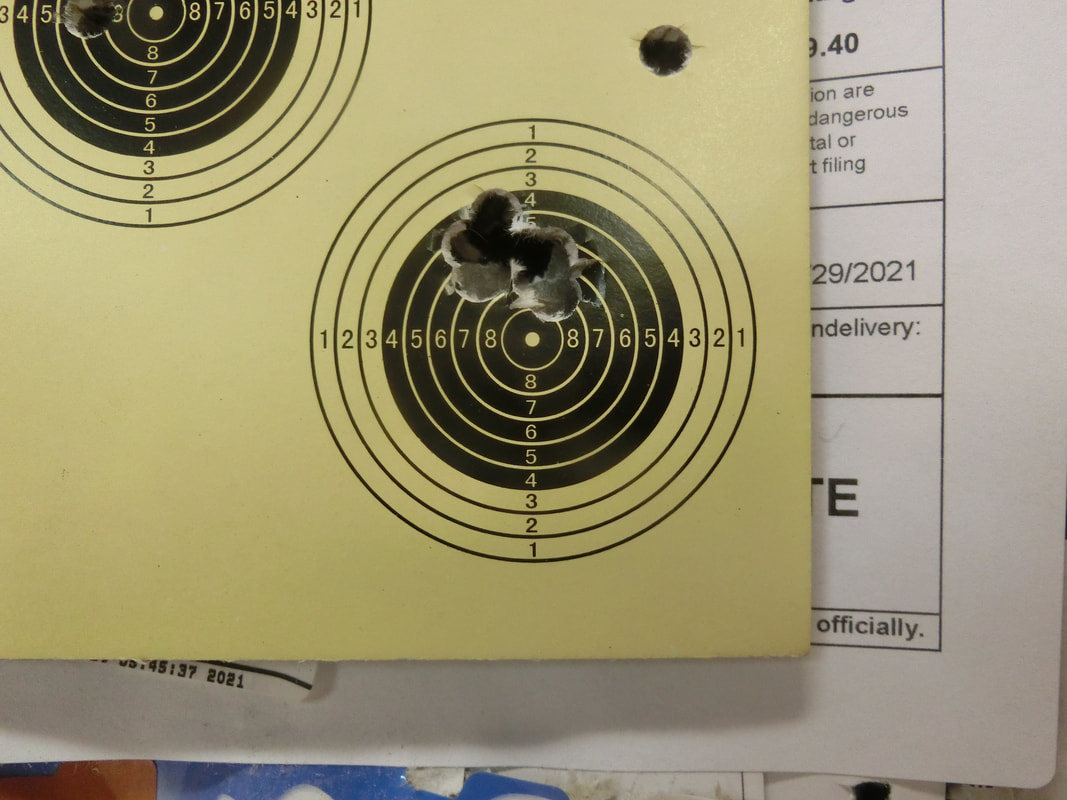
​The four 10-shot groups at the top of the target card in Fig. 6.1c) were made using the heavy FT stock while the four 10-shot groups at the bottom of the target card in Fig. 6.1c) were made using the factory stock. I went back to the FT stock for the 10-shot group at the very bottom of the target card. The groups weren’t great on that day and I’m not sure what was causing the vertical stringing. The main point is that the groups shot with the heavy FT stock were very close to those shot with the lighter stock. It’s interesting that the lighter stock caused a POI shift down and to the right. It’s very reassuring the POI returned to the same place when I put the LGU back into the FT stock for the target at the very bottom of Fig. 6.1c). The average ctc distance for four 10-shot groups using the FT stock was 0.28”±0.09” while the average ctc distance for four 10-shot groups using the factory stock was 0.29”±0.01”.
Picture
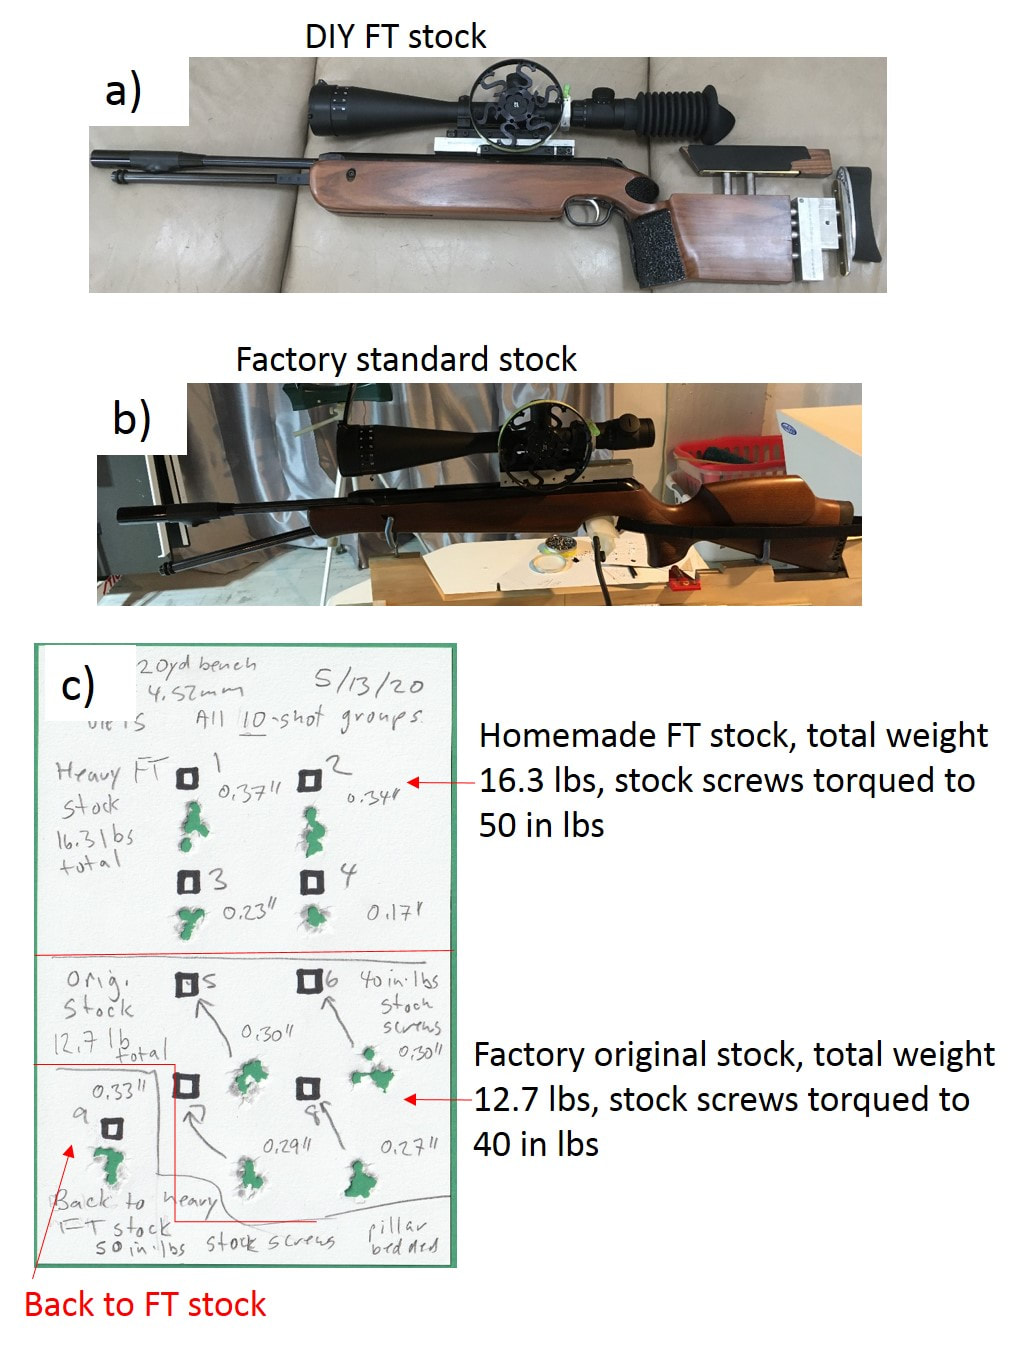
Fig. 6.1 LGU in DIY FT stock a) and original factory stock b). c) 10-shot groups at 20 yards from bench using FT stock (first four groups and bottom left group) and original factory stock (bottom right four groups). Total weight was 16.3 lbs for FT setup and 12.7 lbs for factory setup
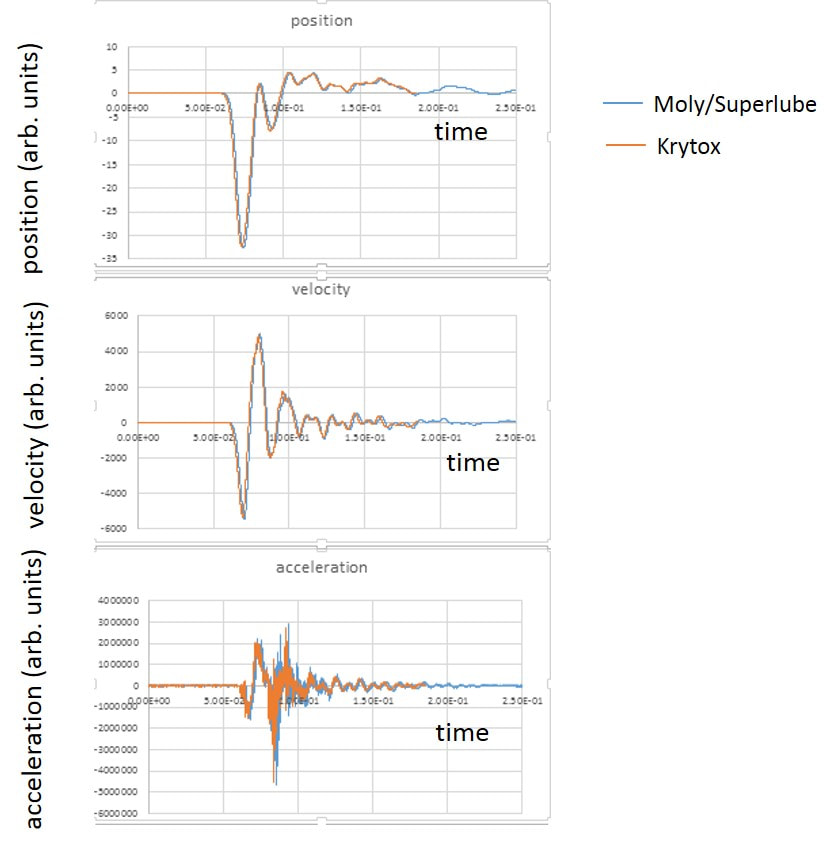
​Figure 6.2 shows the recoil traces for the two configurations. Not surprisingly, the recoil with the FT stock was reduced, with smaller peaks and dips in the position, velocity, and acceleration of the rifle. Since the moving sled itself weighs 2.4 lbs, we really are comparing a total recoiling weight of 18.7 lbs with 15.1 lbs (not the bare rifle weights). This translates in a weight decrease of about 20% in going from the FT stock to the factory stock. The decreases in the first velocity dip and first velocity peak were around 28% and 25%, respectively, which are a little more than what I would have expected if we simply scale the recoil by the rifle/sled mass. The greater mass also seems to smooth over some of the oscillations that occur in the 0.03s to 0.05s time range.
At longer times, the recoil traces come back together to be almost exactly on top of each other! One might expect the recoil dynamics to be slowed by the extra mass, but except for the second peak in the velocity, there don’t appear to be any clear shifts in time. It’s also interesting that the piston bounce time (when the velocity goes to zero and the rifle stops its rearward motion for the first time) is the same for both cases.” 
Picture
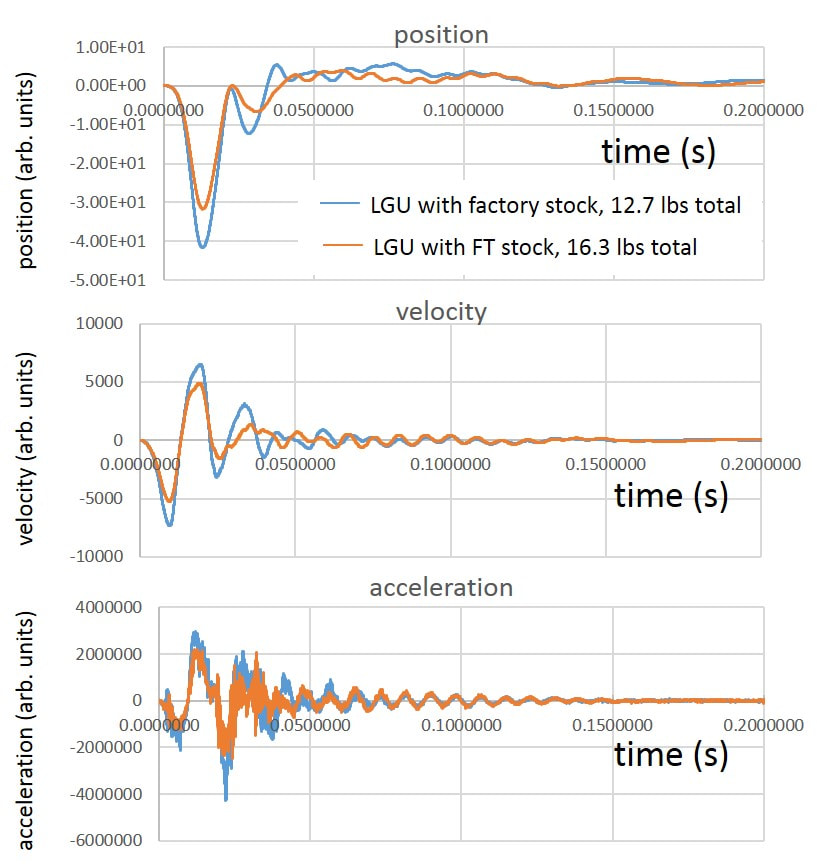
Fig. 6.2 LGU recoil traces showing the position, velocity, and acceleration of the sled-mounted rifle over 200 ms for a lighter factory stock and a heavier FT stock. Note that velocity was measured using the soundcard on a pc, so the signal is ac-coupled and the slower rearward drift of the sled is not captured.
​So if I were shooting groups from a bench I would definitely go with the heavier FT stock. If I was in a Field Target competition where the fit of the stock is important and the extra weight helps steady the rifle, I would also take advantage of the FT stock. The advantages of the FT stock go far beyond just adding weight. The FT stock has an adjustable height cheekpiece (which is critical for the very high scope mount that I’m using), and a buttplate that can be moved forward and back as well as up and down. This allows one to fit the rifle to the shooter and to the particular shooting position. A good fit allows one to relax and let the rifle rest with very little muscular effort. This makes it much easier to shoot the rifle accurately even if the intrinsic accuracy is not greatly changed. However, if I was carrying the rifle for longer distances, the lighter factory stock would make more sense and would produce similar levels of accuracy as the FT stock. 
7 Comments

The DIANA 34 EMS (Easy Modular System).- Chap. 1

6/13/2021

22 Comments


A new breed of Break-Barrel Piston rifle

Back in 2016 (that is already 5 years ago!) When I met Tobias Schmidt for the second time at Pyramyd Air Cup, we started toying around with ideas for the future of DIANA.
During the long hours of talks and idea sharing, we developed a respect and friendship that I am glad to be able to say that has survived the changing circumstances of life.
In subsequent years, we attended several IWA's and PAC's and our long drives to and from those events were usually spent brainstorming about the products and the markets.
About 2018, when we drove from Maryland to Ohio together, we started discussing in earnest what the EMS COULD mean to the shooters. Before that, it had been mainly a manufacturing simplification system, where the products could be built using common parts and only some parts would differentiate the versions.
Through our conversations, Tobias saw the value that the system could bring to the market; specifically, the US market that has a long tradition of "home tinkering" and enjoys a freedom not granted to citizens of other countries to CREATE our own rifles.
And so the "Easy Manufacturing System" became the "Easy Modular System" with a focus more towards the user than to the maker.

Given the HUGE opportunity that designing a new platform brought, we looked at every detail and every nook and cranny of the rifle, from the sights to the butt plate.

And when we were almost ready to release the first pre-production steps (first one series of 10 rifles, then a series of a 100), to then go into production at full pace, CoViD struck.

This disease/pandemic has brought different responses from different countries. MOST have opted to limit people's mobility and contact, some have opted to do nothing beyond putting the responsibility in the citizen's shoulders. Others started with a lenient attitude only to go into panic when hospitals filled overnight.

But in all aspects, it has been mostly "social distancing" what has prevailed.

In a production environment, "social distancing" carries a lot of collateral effects.
Things don't get transferred as fast and as completely as when there is face to face contact.
Things take, at least, twice as long (if not four times as long).
There are more errors and more problems that could have been solved, but were not, because people are not REALLY working together.

All our plans to release the whole suite of parts and accessories simultaneously with the guns have gone out the window. Though SOME parts are ALREADY available. And the reason is simple:

EMS builds onto the excellent results of the NTec series by using the NTec piston and trigger block; and then enhancing the architecture of the gun completely.

There are three "reviews" of the EMS currently published:

https://hardairmagazine.com/reviews/ham-exclusive-first-diana-34-ems-test-review/ 

https://www.airgunsofarizona.com/blog/2021/02/theres-a-surprise-at-aoa-the-new-diana-34-ems.html 

https://airghandi.de/en/diana-34-ems-air-rifle-my-test-and-review/
This last review has a video (in German), that is quite understandable even if you do not speak German.

As good as the reviews are from a consumer perspective, there is a LOT more going on and I will try to touch on some points that seem to me to be of importance, yet ignored by the reviews in favour of velocity numbers and pellet tests. IF there is enough interest, perhaps we can post a complete analysis of the differences and the real advantages of the new architecture.

A typical complaint in the fora, usually by people who are "keyboard shooters" more than the real thing, has been that the parts to upgrade the guns are not yet available, but that is not completely true, and in this blog entry we will look into an upgrade that CAN be performed with a part in the current list of spares from DIANA.

From Steel to Gas Spring

As we have mentioned above, the EMS builds on the success of the NTec rifles (mainly the 340 NTec) by using the NTec piston (that is stemless), and the T-06 NTec trigger (different from the T-06 Stemmed piston trigger).

​But, let's get started:
Picture
This is a 0.22" cal 34 EMS as they come out of the box.
The "Classic" version of the stock is the one currently available. IF you compare it to an old 34 "Classic" you will see that this stock is slightly more slender, and that the comb is a bit higher
This puts the recoil more in line with the center/shoulder point of contact to the butt plate, and so, the shootability of the gun gains because there is less "jump" to the gun when the piston is released.
This is something that has already been identified by HAM's technical reviewer, my friend Eric Brewer.

Picture
The front sight is a modern unit with fiber optic "pipe". It is held in place with the traditional grub screw from the top and a nut at the front. And NO the synthetic cover is NOT the holding nut, it is a threaded cover and thread protector of the ½"-20 UNF thread at the barrel's muzzle.
Picture
This is the real nut. Steel. It takes a 15 mm's slim wrench to losen it properly.
Picture
The rear sight is an interesting element.
With dual fiber optic pipes, it is adjustable for both windage and elevation and the screws have re-assuring "clicks" that tell you that the screws will not move on their own, as well as allowing to count the variation you are incorporating in the LOS.
You can also appreciate here the fork adjustment screw and nut, they both take a 5 mm's Allen wrench. Screw is on the left hand side, nut is on the right, and underneath are real nord-loc washers. IF your forks are "Too tight" shoot the gun at least 100 shots before deciding to losen the arrangement. In any case, you do not need to take the stock out to adjust the breech-block to fork tension.
Another thing to note is that all 34 EMS's are issued with the Serial Number in TWO locations: at the fork as you can see from the picture, but also in the barrel, so that people can know if a gun is keeping its original barrel or not.

Picture
As you can see, the sight picture is quite usable. Shooting with both eyes open is possible and reasonably accurate.
Picture
With the sights removed, now we can remove the stock and put the gun in the spring compressor.
Picture
To remove the stock there are two forearm screws and a trigger guard/block screw. In the picture above, you can see that the forearm screws are ANGLED into the compression tube finishing block. Something that is shared with some of the best airguns in history.
For the savvy shooter, this allows some degree of "tuning" because the tension between stock and action can be regulated in a solid manner. This could also be done with the "old" 34, but now the degree of adjustment is one degree of freedom better.

Picture
The EMS has a compound cocking linkage, which was first used in the 350 Magnum, the compound linkage reduces the Peak Cocking Force (PCF), AND allows an easier disassembly/piston extraction for maintenance or upgrade purposes.
Picture
This is what you find in the underbelly
Picture
This is how the linkage pops-up
Picture
And you simply remove the linkage from the piston. That allows the piston to be removed without having to disassemble the whole linkage from the barrel, as used to be the case with the "old" 34.
Picture
This is the T06NTec trigger block. You can clearly see the steel main spring and the rear guide inside the main tube.
The T06Ntec trigger is an interference trigger. Meaning that there is a ramp that rises and locks into the slot at the skirt of the piston. When the trigger is released, the ramp "falls" out of the way.
It is an incredibly fast trigger, especially useful for offhand shots.
Picture
Once the rear dust cover is removed, and the compressor has taken all the stress from the closing pins, the dummy pins can be inserted and the trigger unit can be slid back to reveal the spring,  and the rear guide.
Removing the whole spring lets you access the front guide.
Picture
This is what you have to get out of the gun, from left to right: Front guide, spring, rear guide.
The front guide is a solid piece of steel, and adds considerable weight to the piston. Once that guide is removed the gun's power plant is "skewed" towards lighter pellets.
This front guide can be replaced with an Anti-Bounce unit, but that is a custom project we may talk about in a future entry.
In the trigger you will find a simple allen headed screw that needs to be removed.
Picture
Here you can see the screw that acts as solid support for the rear guide. You can also see in the bottom of the trigger unit the "ramp" that locks into the piston slot, when that ramp falls, the piston flies forward.
Picture
Once that screw is out, you can then simply screw the NTec gas spring into the trigger unit.
I would STRONGLY recommend using Vibra Tite by applying to the thread and then letting it dry. THEN assembling the NTec gas spring to the T06NTec trigger block.
Picture
The "button" at the end of the stem in the gas spring needs to fit into this recess in the piston's head.
Picture
And you need to ensure that everything is properly aligned.
When everything is a go, you simply insert the trigger/gas spring assembly, properly seated into the piston, into the gun. I STRONGLY recommend using shim material to prevent the cuts in the mechanisms tube from scoring/cutting/hurting the piston seal.
​
Picture
If you want to de-burr the edges prior to assembly, do use the "quintessential" tool of rifle-making. It's called a "riffler file" and nowadays the diamond versions are not that expensive. Get a proper one and learn to use it (rifflers are used by pulling, as opposed to files that are used by both pushing and pulling). It will save you a lot of headaches.
Picture
Put everything in, pop the cocking linkage in its place, put the gun in the spring compressor, compress the gas spring, put in the action closing pins, put the dust cover.
Assemble the stock to the gun, taking care to glue some flat washers to the bottom of the recesses so as to protect the wood from the star washer chewing the stock to death.
​
​And test.
Picture
With the NTec gas spring, it takes a meager 30½ lbs of PCF to fully cock the gun.
Testing different pellets at short range will give you an idea of which pellets to try at long range.
Picture
The three pellets that are outstanding in this particular example are the JSB's 16's, the 14.3's and the GTO's at 11.75 grs.
The Crosman, FTT's,  and other pellets simply did not "jive" with this barrel. Perhaps in the future, once the full 500 shots "running in" has been accomplished things may change a little.
Picture
While the JSB 16's behaved better, the GTO's perhaps need more work.
The JSB's yielded 15 ft-lbs, while the GTO's yielded upwards of 17 ft-lbs
Picture
So, for "real-life" (meaning lead) pellets the conversion complies with the catalog specs, using the GTO's (which are not bad as a hunting pellet out to about 40 yards), it easily exceeds the catalog specs.
This rifle is now equipped with a fixed shroud that still allows the tuning of the muzzle harmonics, so once the user defines exactly what he wants to do with the gun, some fine tuning is possible to achieve the best accuracy with the pellet he chooses.
Picture
While the rifle may seem a bit too long, remember that there will be short barrels available in the future.
In our tests, the length of the barrel is not as crucial to the energy delivered to the pellet as in the PCP's.

The conversion itself took all of 20 minutes to do and I think it is achievable by anyone that can change a spring or a piston seal. I do believe that it complies with the "design intent" when we set-out to make a gun that was easy to be "converted" to what each shooter wanted.

As this pandemic eases and we learn to live in the "new normal", I hope that more and more of the planned accessories and tuning elements will become available.
For the time being, I have secured 8 gas springs to do this conversion, if you are interested, drop me a line through the contact page.

Keep well and shoot straight!


HM
22 Comments

Shot cycle Dynamics in 3 Spring-Piston Airguns Chap 5

6/10/2021

0 Comments


​Does lubrication with Krytox improve performance?

There are lots of excellent articles on the benefits of lubricating spring piston rifles with Krytox, but I’ve never been able to find a detailed, quantitative before/after evaluation of Krytox in these rifles. There also are some excellent posts on Krytox in GTA:

https://www.gatewaytoairguns.org/GTA/index.php?topic=141898.0
 
I first heard about Krytox from Leo Gonzales. Leo is a fantastic WFTF competitor (he placed 4th in the last WFTF World Championship!) and he knows a lot about springers, so when he makes suggestions, I listen very carefully! 
​
In this chapter I switched my LGU and FWB 124 to Krytox and took a look at their performance before and after the switch.
Before Krytox, both rifles were sparingly lubricated with a combination of moly and Superlube, with the moly mainly for the metal parts and Superlube for the synthetic piston seal. This was the lubrication used in Chs. 1 and 2 of this blog.
​Before lubricating with Krytox, I first thoroughly degreased the mainspring, piston, piston seal, and compression chamber. Then I applied GPL 205 very sparingly, wiping off after applying. Krytox is much more expensive than molybdenum disulfide or Superlube, but Leo pointed me to an online store with pretty reasonable prices:

https://www.amazon.com/Krytox-Grease-Pure-PFPE-PTFE/dp/B00MWLDALQ/ref=sr_1_16?keywords=krytox&qid=1580829181&sr=8-16
​

Figure 5.1 shows how Krytox affected the accuracy of my LGU. Accuracy was about the same after Krytox was applied, where four 10-shot groups were made off the bench at 20 yards before Krytox, and another four 10-shot groups were made after Krytox. No warm up shots were taken after the Krytox lubrication and the last 10-shot group with Krytox is pretty nice, with a ctc distance of 0.090”, so maybe accuracy is improving as the rifle starts settling with the new lube? As I discussed in Ch. 3, this group needs to be taken with a grain of salt! 
Picture
Fig. 5.1 LGU accuracy with 10-shot groups off bench at 20 yards with moly/Superlube (top four groups) and Krytox (bottom four groups).
​Accuracy with the two types of lubes was similar, but there was a BIG difference in the fluctuations in the MV. Figure 5.2a) shows the MV for each of the first forty shots in Fig. 5.1, before Krytox. Figure 5.2b) shows the MV for each of the last forty shots in Fig. 5.1, after Krytox, plotted with the same vertical scaling. The standard deviation and extreme spread of the MV both dropped by about a factor of two when the moly/Superlube was replaced by Krytox! Again, this happened right after the Krytox was applied; there were no shots to get the rifle settled in with the new lube. My LGU shoots lots of different types of pellets very well with similar POI, but one of my concerns has always been that the MV can be pretty erratic with some brands/dies of pellets. At 20 yards, fluctuations in MV aren’t that critical, but at longer ranges these fluctuations could cause big POI shifts. The Krytox did an amazing job of stabilizing the MV using pellets from the very same tin.
Picture
Fig. 5.2 LGU MV with a) moly/Superlube and b) Krytox for the groups on shown in Fig. 1.
​Krytox made no discernable difference in the recoil of the LGU, as can be seen in Fig. 5.3, which shows recoil traces before (blue) and after (orange) Krytox.
Picture
Fig. 5.3 LGU recoil traces showing the position, velocity, and acceleration of the sled-mounted rifle over 250 ms for moly/Superlube and Krytox lubrication of piston seal and mainspring. Note that velocity was measured using the soundcard on a pc, so the signal is ac-coupled and the slower rearward drift of the sled is not captured, as explained in Ch. 1.
​Later on the same day, I shot eight 10-shot groups off the bench at 20 yards with my Krytox-lubed LGU, as shown in Fig. 5.4. These are the best 10-shots groups that I’ve ever shot at 20 yards with any air rifle, with an average ctc of 0.23”! MV fluctuations were a bit higher than I would have hoped, but I expect that if I had been using the original moly/Superlube on that day with those pellets, the MV fluctuations would have been even worse
Picture
Fig. 5.4 LGU accuracy with 10-shot groups off bench at 20 yards with Krytox.
​Since Krytox did such a good job of taming MV fluctuations, I did some accuracy testing at 52 yards where MV fluctuations make a much bigger difference than at 20 yards. At 50 yards, a decrease in MV from 800 fps to 760 fps translates into a drop of around 0.75”! The extreme spread in MV using my LGU with Superlube/moly is around 37 fps, so one will get vertical stringing on the order of 0.75” at 50 yards just from MV fluctuations. Figure 5.5 shows typical groups at 52 yards off the bench before Krytox. Looking at the bottom row we can see that some 5-shot groups were pretty small, around 0.40”! However, there was a lot of vertical drift in the first two groups, shot from left to right, so I only counted the last three 5-shot groups. Again, choosing the smallest group would not be very representative of how the rifle was shooting. Putting the last three groups together resulted in 15 shots inside a 1” circle.
Picture
Fig. 5.5 LGU accuracy with 5-shot groups off bench at 52 yards with moly/Superlube (before Krytox). Here I’m focusing on the last three groups on the right in the bottom row.
​Figure 5.6 shows how the Krytox-lubed LGU did at 52 yards. Unlike Fig. 5.5 where I shot three 5-shot groups, in Fig. 5.6 all the groups were 10 shots. I was hoping that the Krytox would results in a more dramatic improvement at 52 yards, but the groups are still pretty good for a springer at 52 yards! Most 10-shot (not 5-shot!) groups were under 1” and 70 shots landed in a circle just over 1” in diameter.
Picture
Fig. 5.6 LGU accuracy with 10-shot groups off bench at 52 yards with Krytox. The first group in upper left hand corner was for warming up and wasn’t counted.
​My LGU’s POI has always been pretty consistent and I think part of this is because I use very little lubricant. I’m not sure if the consistency is much better with Krytox, but I’m finding that over several months under different conditions, the POI has not changed much.
​
Encouraged by what Krytox did to my LGU, I decided to try it in my FWB 124. Surprisingly, and unfortunately, Krytox had a very different impact on my FWB 124! With the Krytox-lubed LGU, MV remained about the same but MV fluctuations dropped by a factor of two. With the Krytox-lubed FWB 124, MV dropped by about 35 fps and MV fluctuations stayed about the same, as can be seen in Fig. 5.7. Figure 5.7 a) and b) show that accuracy was about the same or perhaps a bit worse with the Krytox. Maybe it will take some time for the rifle to settle in with the Krytox? One possible explanation is that my FWB 124 was lightly dieseling with the moly/Superlube, which have a lower ignition temperature than the Krytox, so that pushed the MV up a bit? That’s just one guess.

Picture
Fig. 5.7 a) FWB 124 accuracy with 10-shot groups off bench at 20 yards with moly/Superlube (top four groups) and Krytox (bottom six groups), b) more 10-shot groups with Krytox. Average MV dropped about 35 fps but the standard deviation and extreme spread stayed about the same when Superlube/moly was replaced with Krytox.
​So is Krytox worth it? If I had only tested my LGU, I would answer with an emphatic YES! However, the Krytox experiment on my FWB 124 showed that things are a bit more complicated, as they tend to be in real life!
​I’m very intrigued how/why Krytox could affect two 12 ft-lbs springer so differently. Maybe it has something to do with the differences in piston seal material? I would very much like to understand the cause(s) of these differences and believe that will teach me something new about springers. If you have any ideas, please let us know.
0 Comments

Setting up a DIANA 460 for Iron Sights

6/5/2021

2 Comments

 
After more than 10 years after its introduction, the DIANA 460 has already become a "Classic".
No other gun displays the power, the accuracy and the elegance of this svelte lady.
22-24 ft-lbs yields are the norm, and accuracies well within minute of rabbit ;-) at 70 yards are not uncommon.

So, when a friend asked me to take a look into her gun because the cocking linkage had failed, and then she decided to take the opportunity to have the gun set-up for iron sights I was more than intrigued.

As things go these days, we had to wait for over 4 months to get the spare parts to repair the gun (on warranty from DIANA), but in the end they came and we got the repair done swiftly.
We took advantage of installing a custom guide made for the OEM springs.
OEM DIANA springs are reasonably good. They are powerful and consistent. But the molded guides leave something to be desired. A guide turned to the proper dimensions will quell the spring's longitudinal vibrations, and reduce the twang and the buzz.
Normally I would not tackle a "partial" tune, but since this was really a "repair", it really was not a problem to be flexible.

Once the guide was installed and checked, the gun was chronoed at almost 23 ft-lbs with the JSB  Exact  Jumbo (15.89 grs in 5.52 mm's). No twang, no buzz.

And once the uniformity of the MV's was established (SD's of 3 and 4 fps), we proceeded to change the front sight for something more useful with a peep.
We looked at different options for the front sight, from the very "field" Firesight, to the Lyman Olympic.
In the end, we decided to use the Firesight.
Picture
We eliminated  the large, flat "blade" and cut a cross-dovetail for a Williams Firesight
Then we drifted the front sight in (always right to left).
Picture
We had settled on the system months ago, left to right:
​Williams GR base, Int'l to Williams adapter  made by Gehman, then the Sinclair / AOS Microsight, and then the Gehman Iris adjustable "stop". 
It is worthy of note that the AG base is too high for this application and to keep a very low LOS, corresponding to the OEM design of the stock.
Picture
The thumbscrew replaces the locking screw and makes it easy to keep  the sight set. Even though it is a Williams part, it has to be cut as the original thread length is too much.
Picture
Picture
In this picture you can see how the bridge can come as low as the base itself. This allows a bit forward mounting and the use of the DIANA OEM rear sight recoil arresting screw (the original use and design of that screw from 50 years ago).
Typical offhand 5 shot groups at 10 meters
Picture
Picture
We will tackle putting sling swivels (Pachmayr Flush) and then the gun will be off to its owner.

Really interesting guns, these 460's.

Keep well and shoot straight!


HM

2 Comments

    Hector Medina

    2012 US National WFTF Spring Piston Champion
    2012 WFTF Spring Piston Grand Prix Winner
    2013 World's WFTF Spring Piston 7th place
    2014 Texas State WFTF Piston Champion
    2014 World's WFTF Spring Piston 5th place.
    2015 Maine State Champion WFTF Piston
    2015 Massachusetts State Champion WFTF Piston
    2015 New York State Champion WFTF Piston
    2015 US National WFTF Piston 2nd Place
    2016 Canadian WFTF Piston Champion
    2016 Pyramyd Air Cup WFTF Piston 1st Place
    2017 US Nationals Open Piston 3rd Place
    2018 WFTC's Member of Team USA Champion Springers
    2018 WFTC's 4th place Veteran Springer
    2020 Puerto Rico GP Piston First Place
    2020 NC State Championships 1st Place Piston
    2022 Maryland State Champion WFTF 
    2022 WFTC's Italy Member of TEAM USA 2nd place Springers
    2022 WFTC's Italy
    2nd Place Veteran Springers

    Archives

    August 2022
    May 2022
    April 2022
    February 2022
    August 2021
    July 2021
    June 2021
    May 2021
    April 2021
    March 2021
    February 2021
    October 2020
    September 2020
    August 2020
    July 2020
    June 2020
    May 2020
    April 2020
    March 2020
    February 2020
    January 2020
    December 2019
    November 2019
    September 2019
    August 2019
    July 2019
    May 2019
    April 2019
    January 2019
    December 2018
    November 2018
    October 2018
    September 2018
    August 2018
    June 2018
    May 2018
    April 2018
    March 2018
    February 2018
    January 2018
    December 2017
    November 2017
    October 2017
    September 2017
    March 2017
    December 2016
    October 2016
    September 2016
    July 2016
    June 2016
    March 2016
    January 2016
    December 2015
    November 2015
    October 2015
    September 2015
    August 2015
    June 2015
    May 2015
    April 2015
    March 2015
    February 2015
    January 2015
    December 2014
    November 2014
    October 2014
    August 2014
    July 2014
    June 2014
    May 2014
    March 2014
    February 2014
    December 2013
    November 2013
    October 2013
    September 2013

    Categories

    All
    Events
    Gear
    Hunting
    Tests

    RSS Feed

Proudly powered by Weebly