Connecticut Custom Airguns
  • Welcome!
  • Hector's Airgun Blog
  • Products and Products Blog
    • One-Off's
    • The "Héctors Special'" scope by Sightron
    • K1050i FT
    • The Hex Louver or "Secret Sunshade"
    • Pellet Path Calculator >
      • Questions, Answers and Comments on P-P Calc
      • Privacy Policy for PP-Calc
    • The Nautilus SideWheel
    • The X-10 TiltMeter
  • Zimmer-Silhouetten
    • Results 2017-2018
    • Results 2016-2017
    • Results 2015-2016
    • Results 2014-2015
    • Results 2013-2014
  • References and Links
  • Contact us
  • Store

Hector's Airgun Blog

Where we discuss, CIVIILY,  anything airgun.

Return Home

A Yankee tune for the Walther LGU

12/28/2014

22 Comments

 
When you think of the word "Yankee", all sorts of things come to mind, both positive and negative. But in the context of what we want to relay here, the best interpretation of what "Yankee" means would be to say that we align ourselves with the great Samuel Clemens (Mark Twain) and think of Yankee as that indomitable spirit that can be transported to the Middle Ages and still looks forward to making the world a better place. A bit by science, a bit by engineering, a bit by well placed, and played, bluffs. It's all in the "character".
Luckily, that character has not been lost. I have more than a few good friends that are true "Yankees" in the best sense of the word. One of them lives in Pennsylvania. So we'll call him the Pennsylvania Yankee.

When the LGU first arrived to American shores, we invited some shooters to be part of the pioneering group to purchase the first few. From there, our first review and testing came out:
 
http://www.ctcustomairguns.com/hectors-airgun-blog/the-walther-sport-family 

Because the trigger was so terrible and we knew that in advance, from some reviews of the LGV that bears exactly the same trigger unit, we got Match triggers for everyone and posted detailed instructions on how to swap the blades, where 2 out of 3 adjustments are located. That set of instructions can be found here:

http://www.ctcustomairguns.com/hectors-airgun-blog/swapping-the-walther-lgus-trigger 

Do note that ALL DISCLAIMERS posted there also apply for this post.

But after a while, my good Pennsylvania Yankee friend and airgun tinkerer extraordinaire came up with some comments and some tests that warranted a further look into the trigger unit first, and then into the power plant.

The first thing our good "Pennsylvania Yankee" told us was that there was really no need for the metal trigger.

WHAT!!!!!  LOL!

¿After all the chastisement Diana went through when Doc. Beeman started his negative disinformation campaign stating that Diana triggers were plastic and therefore inferior to the point that the T-06 version now incorporates a metal trigger blade?, and now ¿a dyed in the wool airgunner tells me that he prefers the plastic triggers? Well, the world is changing indeed!

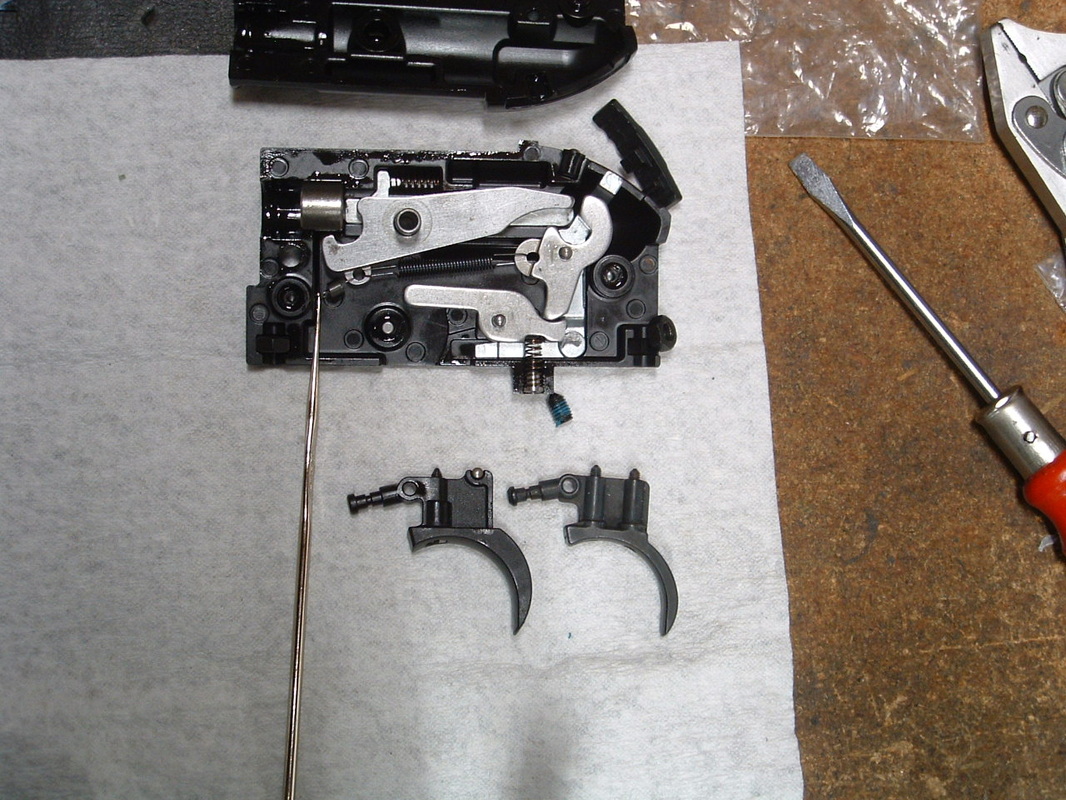
For the UK market (and with a substantial price difference), Walther made available the adjustable metal two screws trigger blade they call the "Match Abzug" or "Tuning Trigger".
Picture
On the left, the OEM plastic trigger blade. On the right, the "Match Abzug" or "Tuning Trigger". Do note the one screw of the first and the two screws of the second.
But once the trigger is installed (not a complicated operation in itself), it is the adjustment of the trigger what takes more time and is overly complicated. You can swap the triggers in about 10 minutes, but it takes at least 1 hour and multiple firings to get the trigger set to a good, usable, shootable point.

It is so complicated that one of the foremost spring-piston shooters in the world, wished someone would post somewhere a "starting point" of where the screws needed to be so as not to loose so much time.
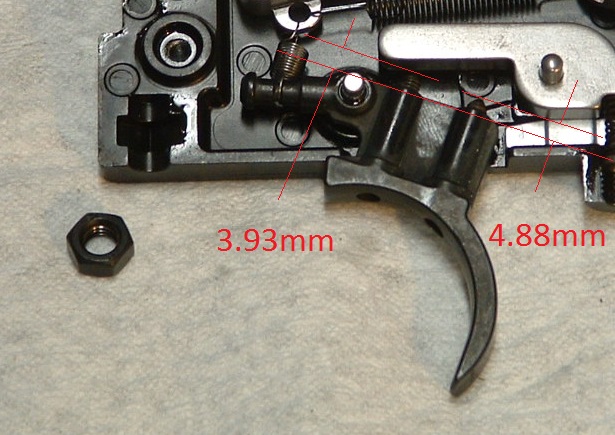
Here is what worked for me in my gun:
Picture
The screws' protrusion is measured from the flat web between the two screws.
Users should start at slightly lower protrusions and then work their way to whatever final adjustment each shooter prefers.

BUT, ¿what could be done with the OEM plastic blade to make the trigger crisp and clean-braking?

Part of the answer is to polish the surfaces. Stoning is one way, but not the safest. 
Jeweler's rouge works better, though it takes patience in hardened surfaces, it is also the least prone to failure method because it removes so little material that the surface hardening of the trigger parts is preserved.
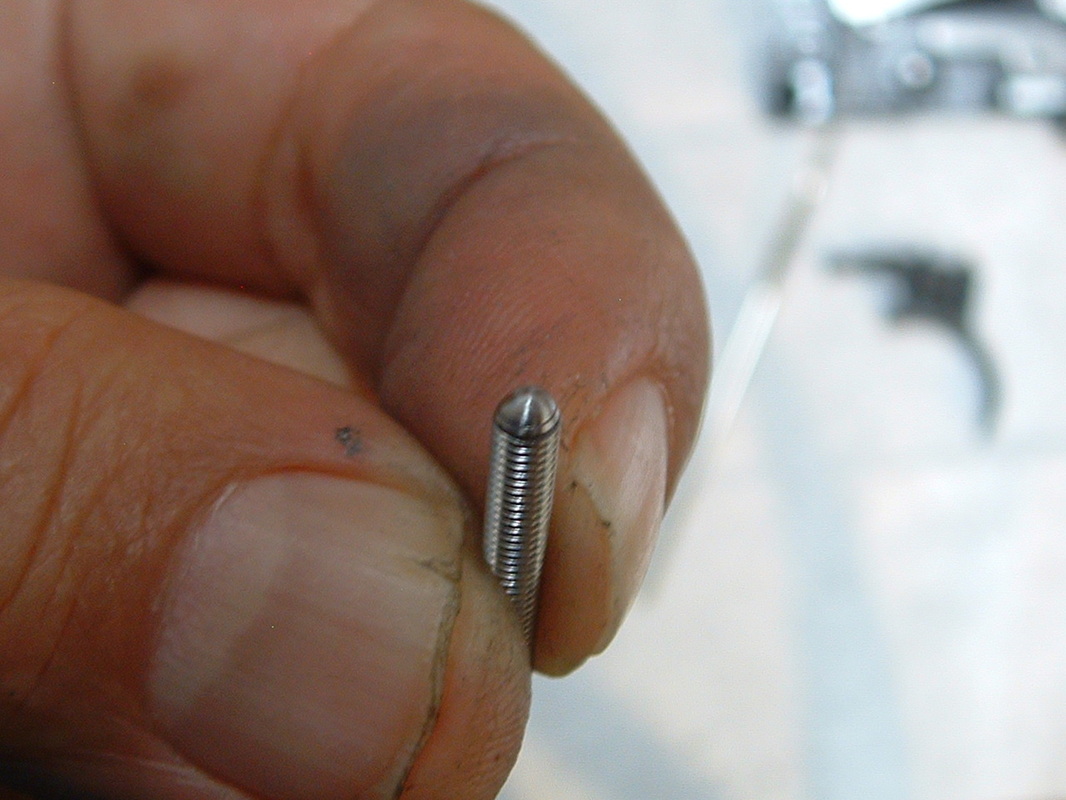
The other part is to round and polish the screws' faces, whether it is the one screw of the plastic blade or the two screws of the metal blade, making the screws pointed against a gritty surface is not precisely the best way to get a smooth, crisp, clean, repeatable trigger release.
Picture
Round faced screws provide a much better feel to the trigger pull.
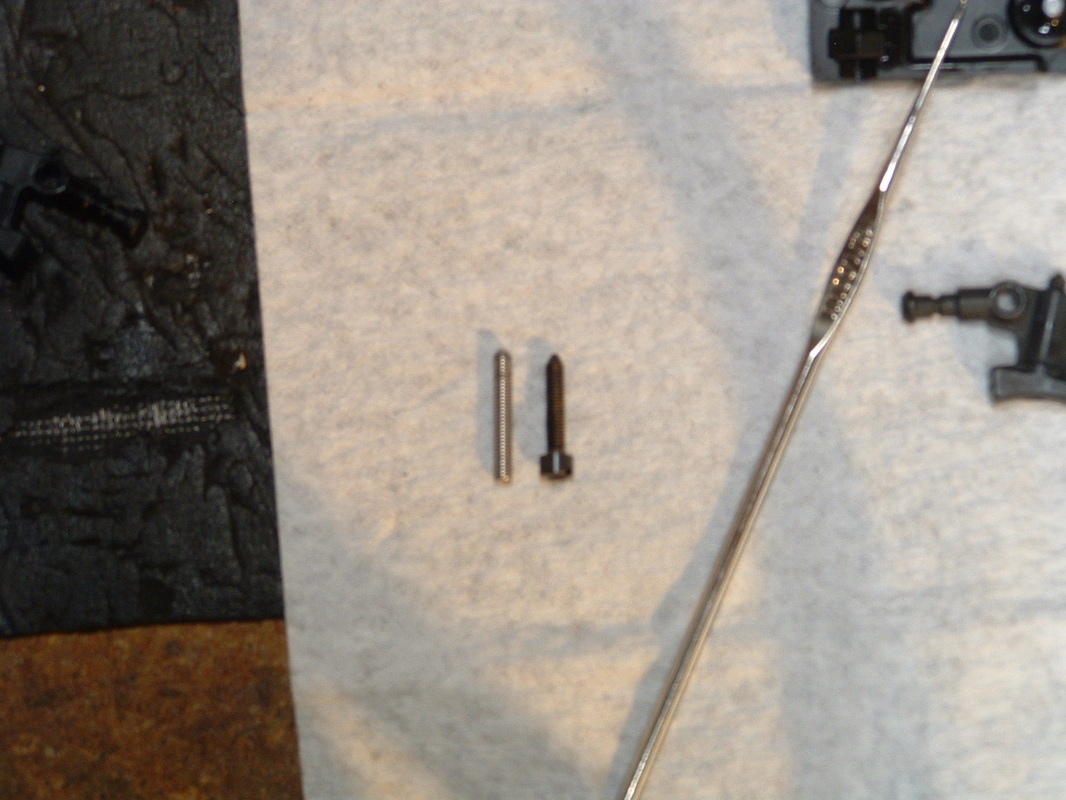
But even after that, the OEM plastic single screw blade refused to give a good "feel". Yet, it had no further adjustment, it was "bottomed out". So . . . . .  a change of screws was in order!
Picture
On the left, my custom screw. On the right the OEM screw.
Picture
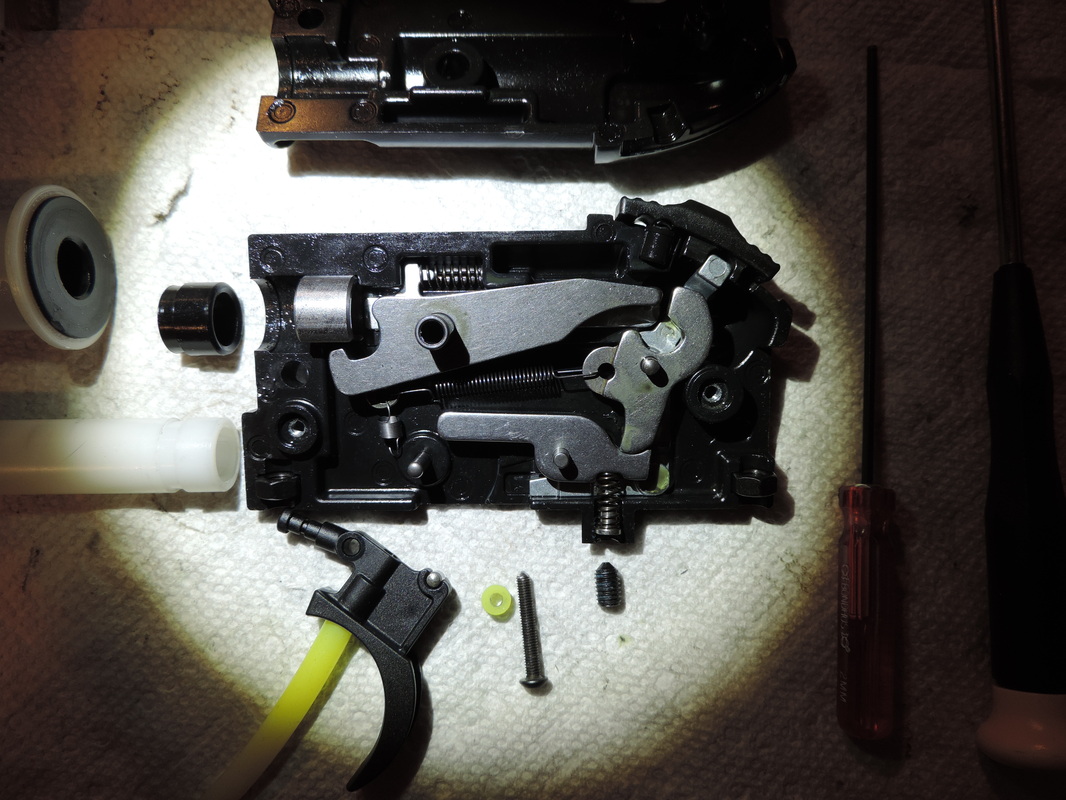
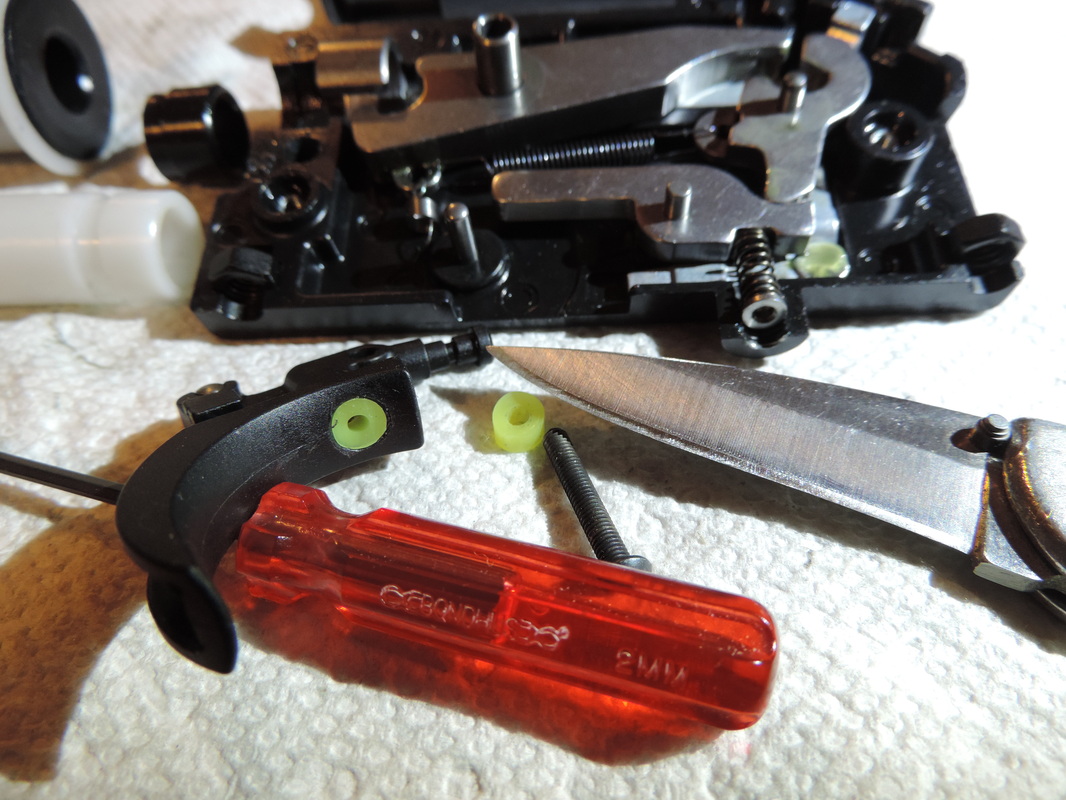
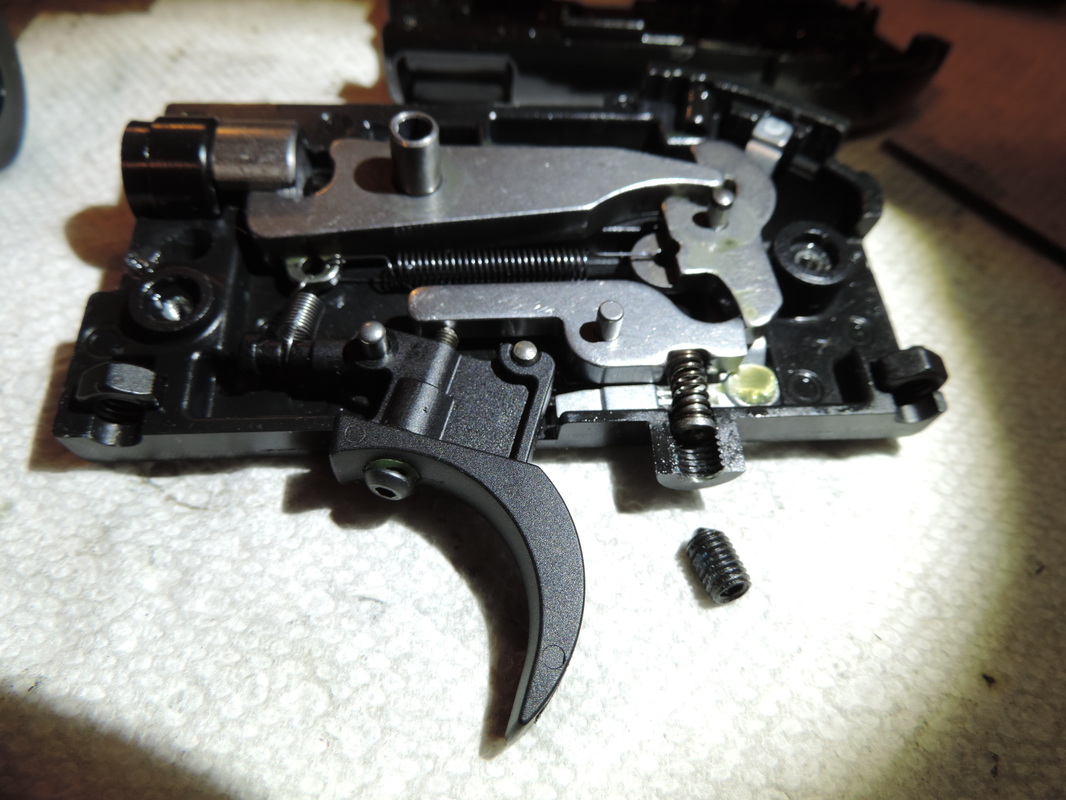
And this is the Pennsylvania Yankee screw. A longer, button headed screw. He needs that because of the ugly color of the urethane fuel line short section he uses to hold the screw's adjustment. Without the head, you cannot but see the bright yellow bit in there.
Picture
The urethane fuel line is inserted to keep the button screw from turning on its own. Once the line has been inserted it is cut with a really sharp knife to follow the blade's curve.
Picture
Like this. The button head hides the fuel line
The combination of the rounded trigger screw face, with more reach and the rear roller give indeed a much better feel to the trigger pull than the metal trigger blade.
After thorough testing I can say that it is true, the single screw trigger blade feels better, releases crisper, is more gentle, predictable and consistent than the metal blade with the two screws.
The metric screw (M3X0.5X20 or 25) will cost you substantially less than the metal trigger blade and, above all, you do not need to disassemble the trigger unit/rifle to do this swap.

Doing more with less, ¿what could be more "Yankee" than that? LOL!

But that was not the full extent of his discoveries. He had tested the Maccari and the Vortek kits that would fit this gun and came up with an interesting proposal:

To use the HW77 25mm's kit

Dimensions seemed to be spot on, there was no slop and only a hollow section of the trigger unit needed to be filled to maintain the piston's stem alignment.

So we also tried that.
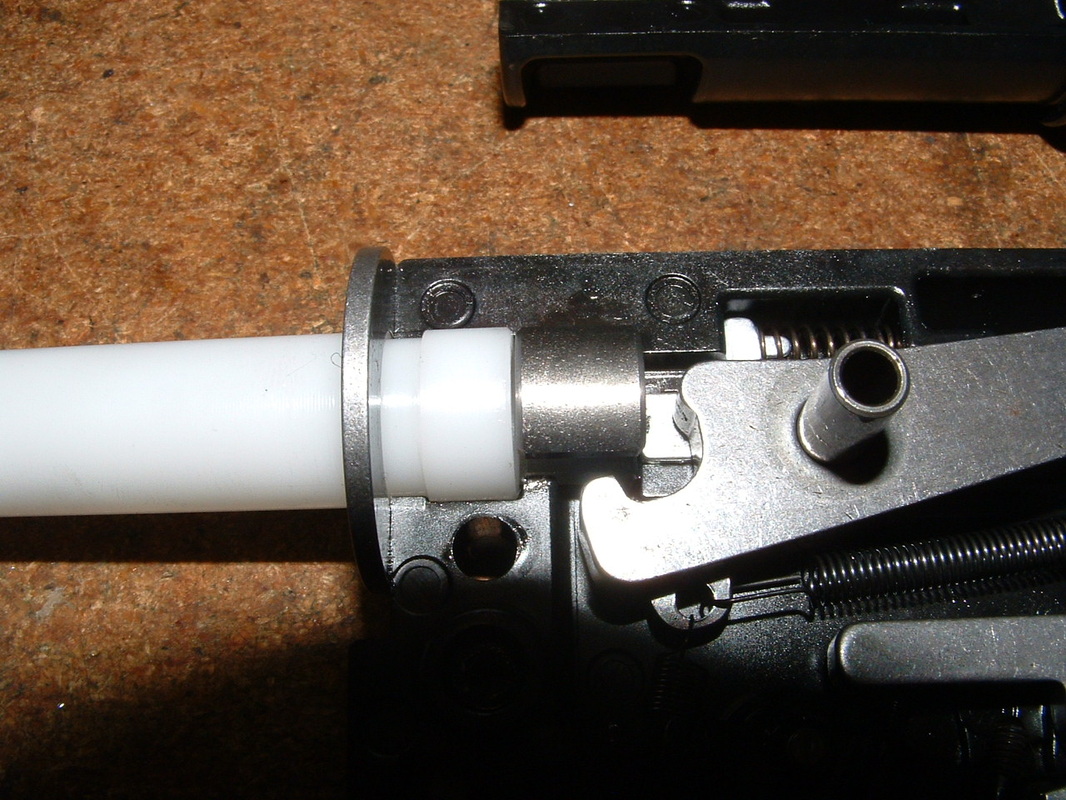
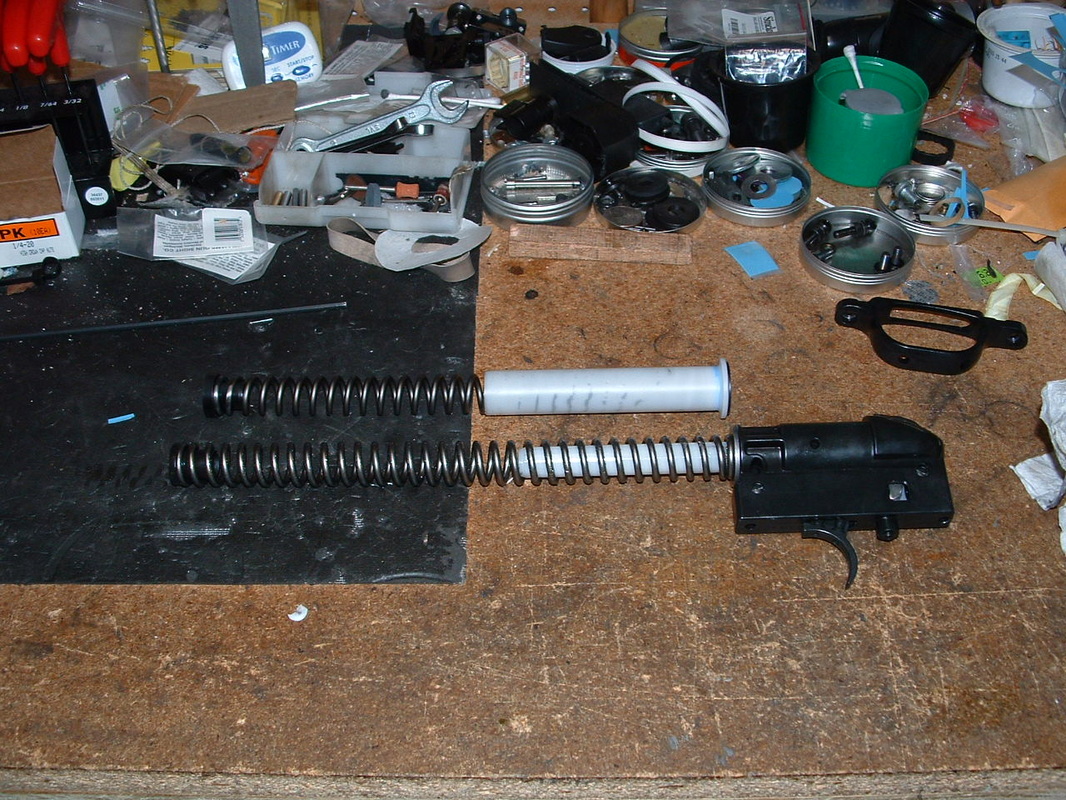
Picture
On the top, the Vortek kit for the HW97. On the bottom, the OEM trigger unit with guide, thrust washer and spring installed.
Picture
This is how everything fits together. The white spring guide has a groove that is caught in the trigger housing casting. That keeps the steel insert against which the piston's stem is kept by the hook. If the OEM plastic guide is removed, then there is a gap through which the piston's stem's button has to travel unsupported.
As you can see from the photos above, our friend chose to use a short black plastic guide to fill this gap.
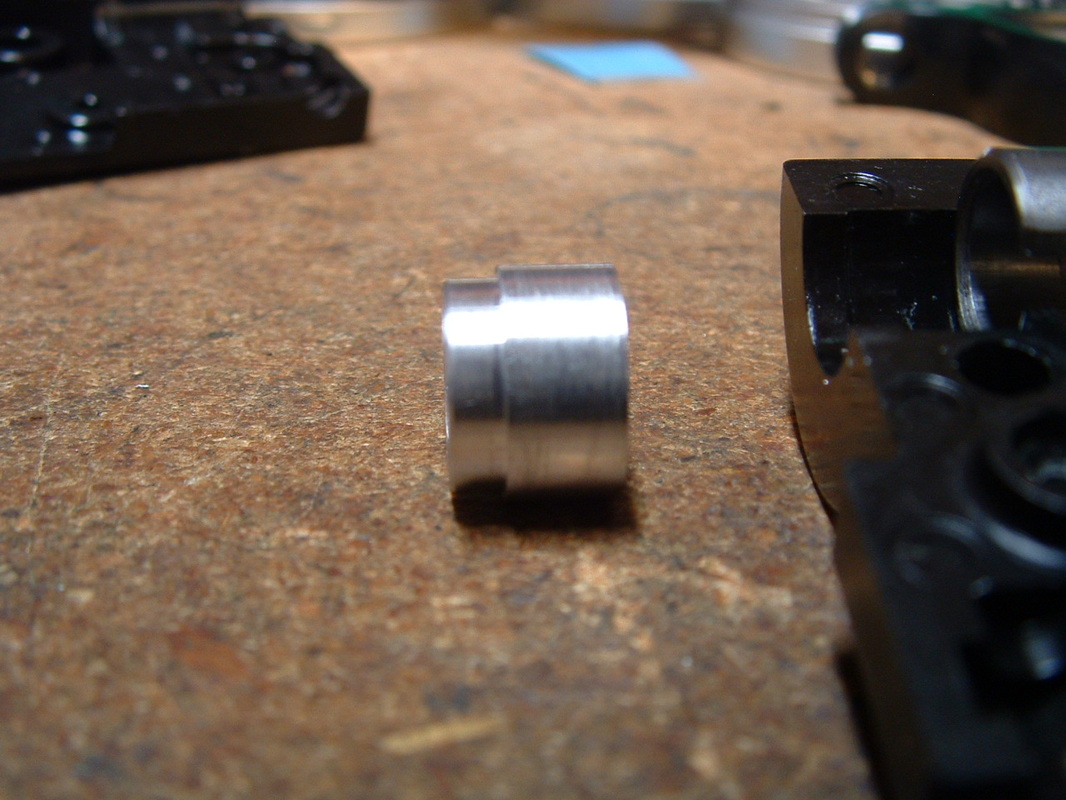
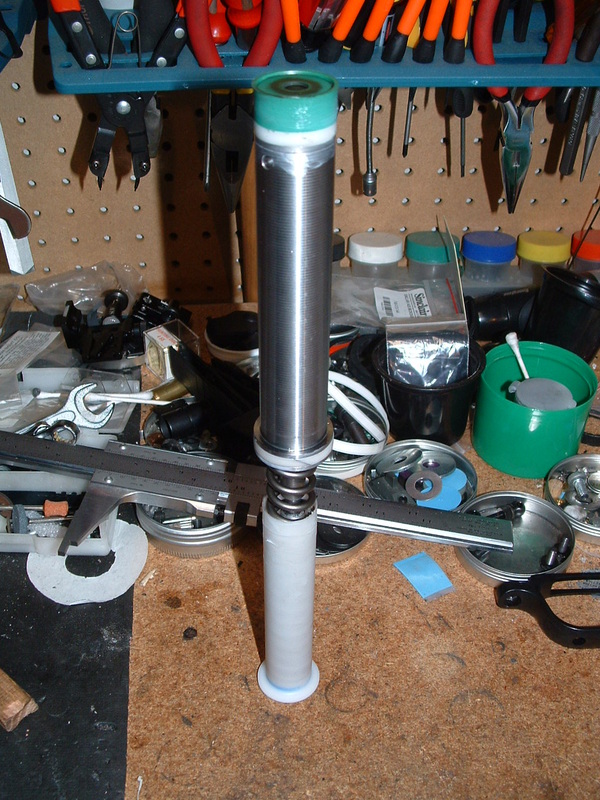
I have never had too much success turning plastic, so I turned an aluminum one:
Picture
This is the aluminum short guide turned, and placed in its proper relative position.
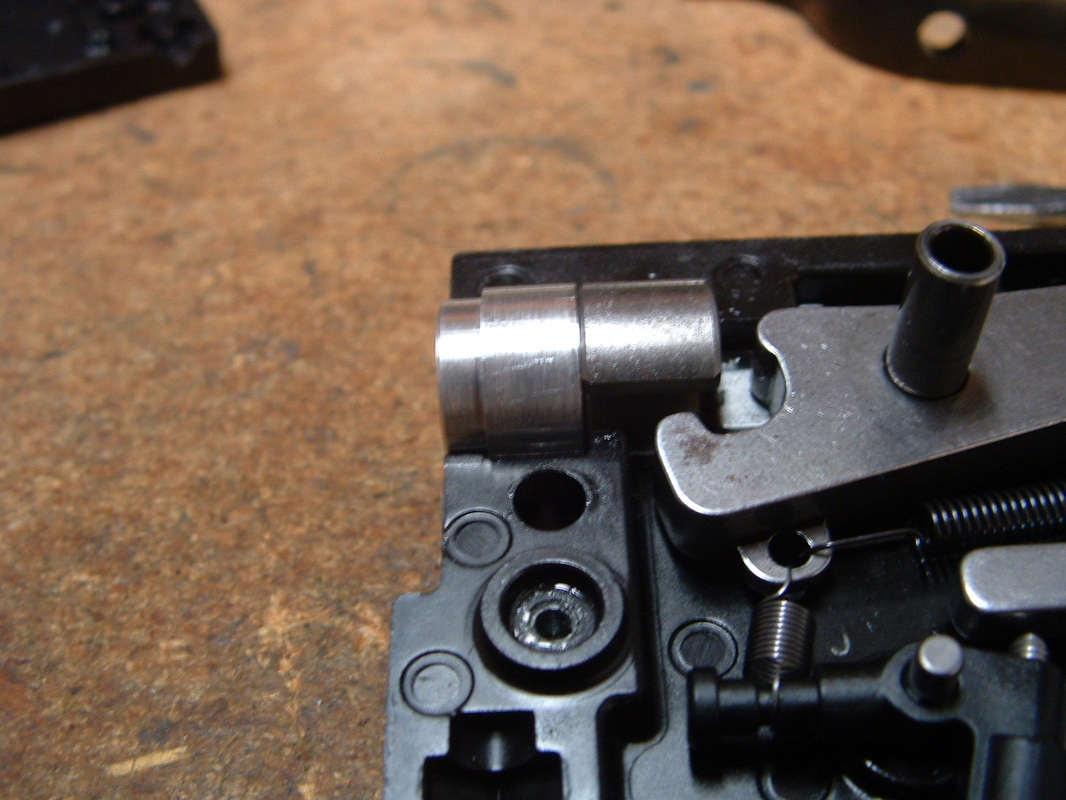
Picture
And this is how the part fits inside the housing.
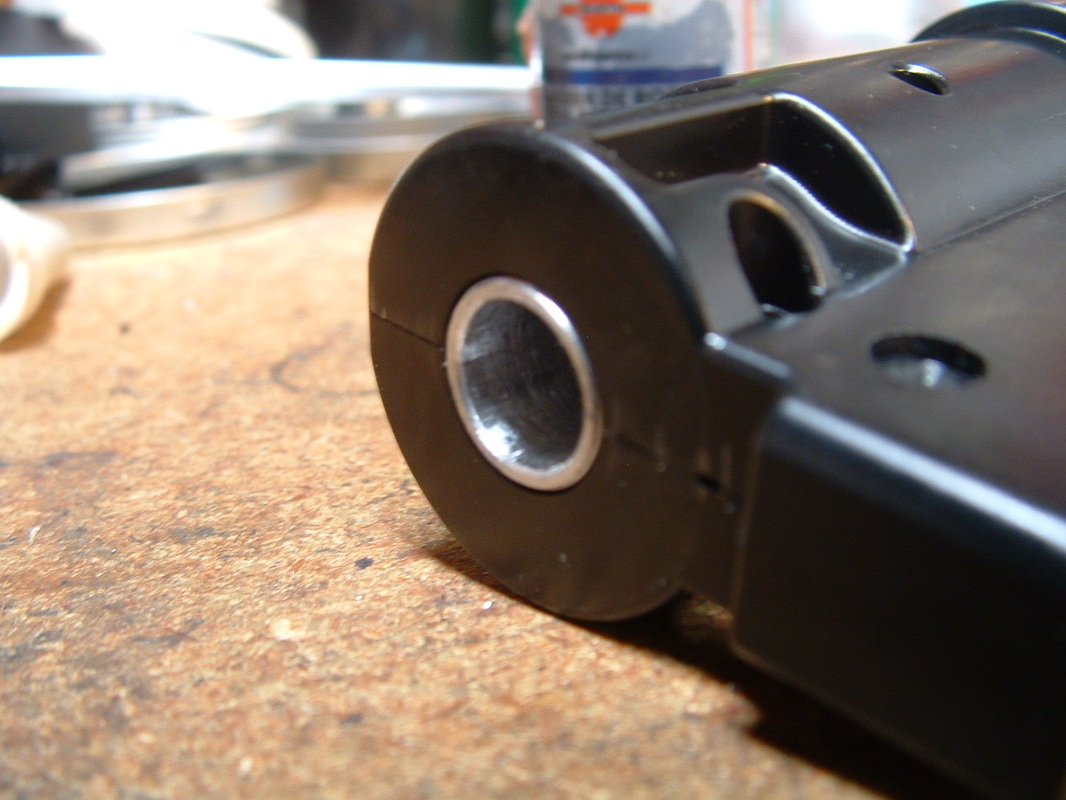
Picture
And this is how it fits inside. Because the Vortek kit has a flat rear end, it is important that the insert also fits flush.
Picture
It is interesting to note that once the kit is inserted and everything put into place, the whole assembly sits, feels and works almost like a single unit. The Vortek TopHat fits better than the OEM one and this, while not creating a resisting force to keep the two together (spring and piston), still has a very good fit.
Once the gun was assembled and everything had been worked once or twice by cocking and de-cocking manually, we tested the feel of the shot cycle. Impressive indeed.
The very obvious piston bounce of the OoB shot cycle was gone. The "thud" was sudden, quick, indubitable.
Very pleasant, indeed.

An interesting aside here is that the guns we receive in the US ALREADY have the "large" transfer port. Whatever you read on the U.K. and S.A. fora is not necessarily applicable to the guns we get here.

I've tried and tested many spring guns over the years with different tunes and from different corners of the world, but this combination is among the best I've tried. Not perfect, because the gun is slightly overpowered for WFTF shooting and the gun still recoils vertically, but it was like that before we started and now what needs to be done is to reduce the power to "legal" levels.
The recoil characteristics cannot be changed without serious changes in the weight distributions and that is changing the gun too much for my tastes.
There are a few other things about this rifle that need attention to. One of them is the distance between the pistol grip, the cheekpiece, and the scope rail.

Most scopes nowadays have reasonable eye reliefs, but there are exceptions, notably the short scopes that are most useful in hunting. In this particular case the scope of interest was the Tac-Vector Optics Gladiator, a 2-12X32 FFP MD scope made for very peculiar applications but uniquely suited to airgun hunting.

And also, the fact that the rails are cut INTO the receiver makes for a very low L.O.S. unless you use very high bases.
When you couple that with the need in a piston gun like the Walther that kicks UPWARDS, you need to get something to put everything at ease.

A good alternative is to use a rail, which also gives us a chance to correct the "droop" that is needed to keep an optically centered scope on target with a perfectly concentrically mounted barrel.

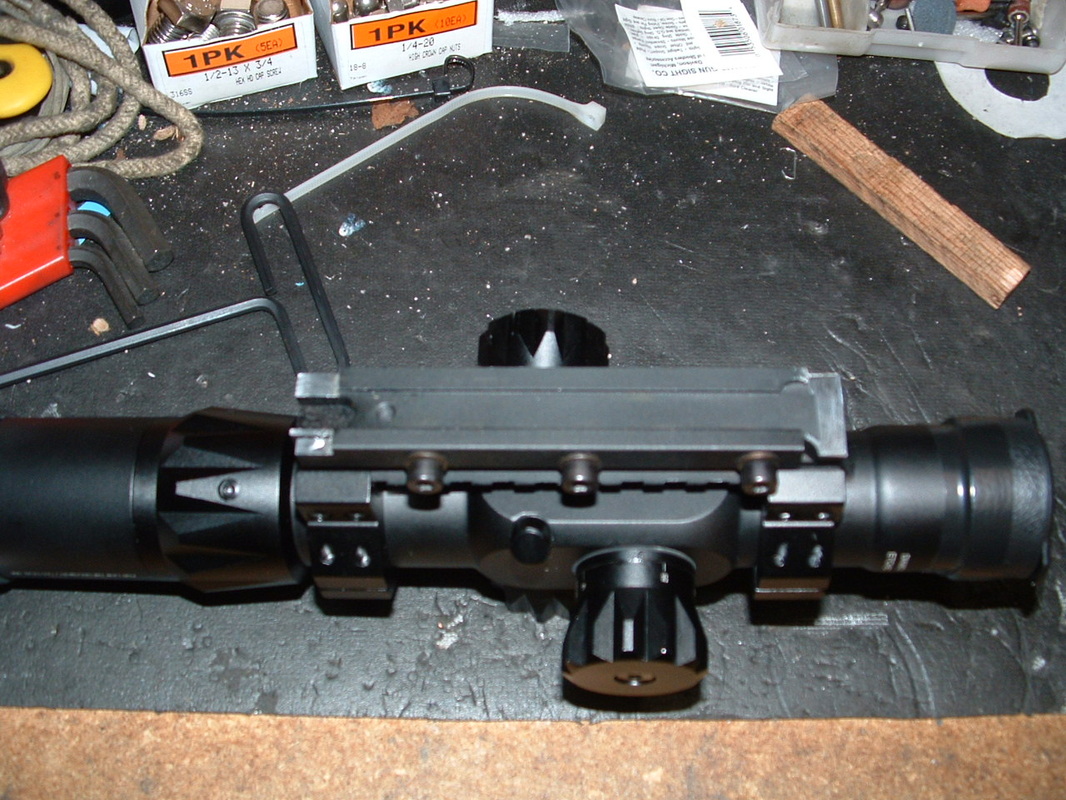
In order to "cure" both inconveniences I decided to alter an UTG rail to fit what needed to fit.
Picture
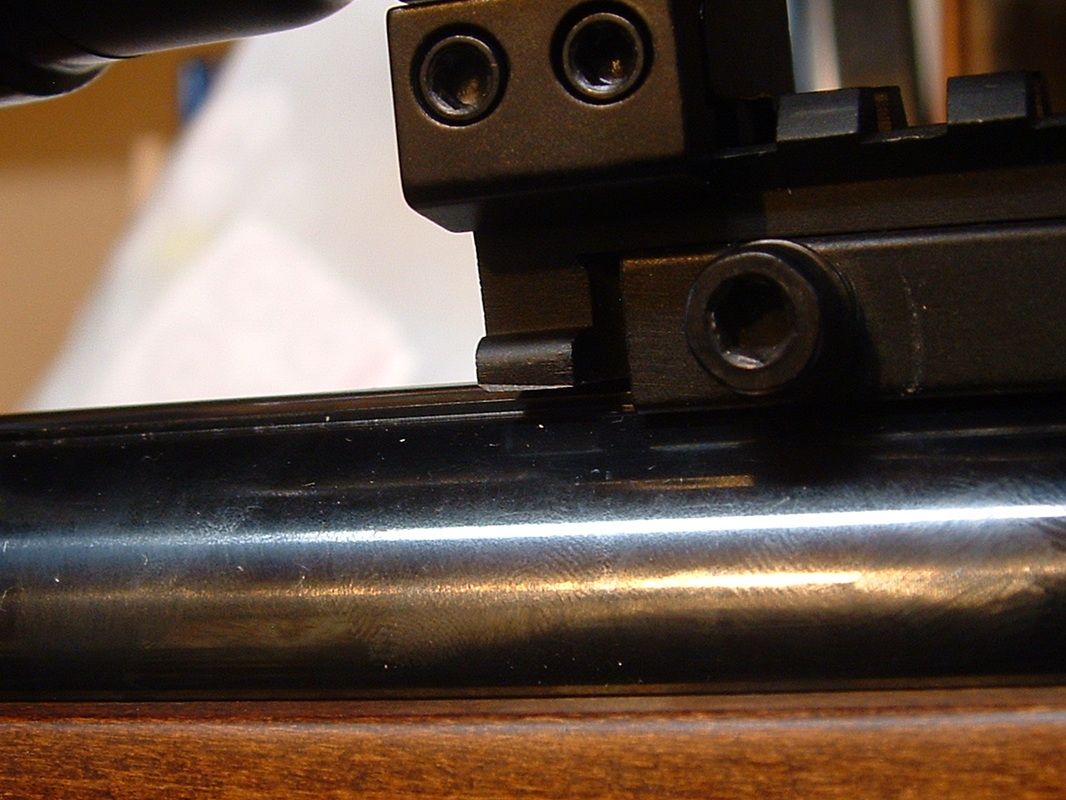
An UTG rail with droop compensation milled to fit the LGU
Picture
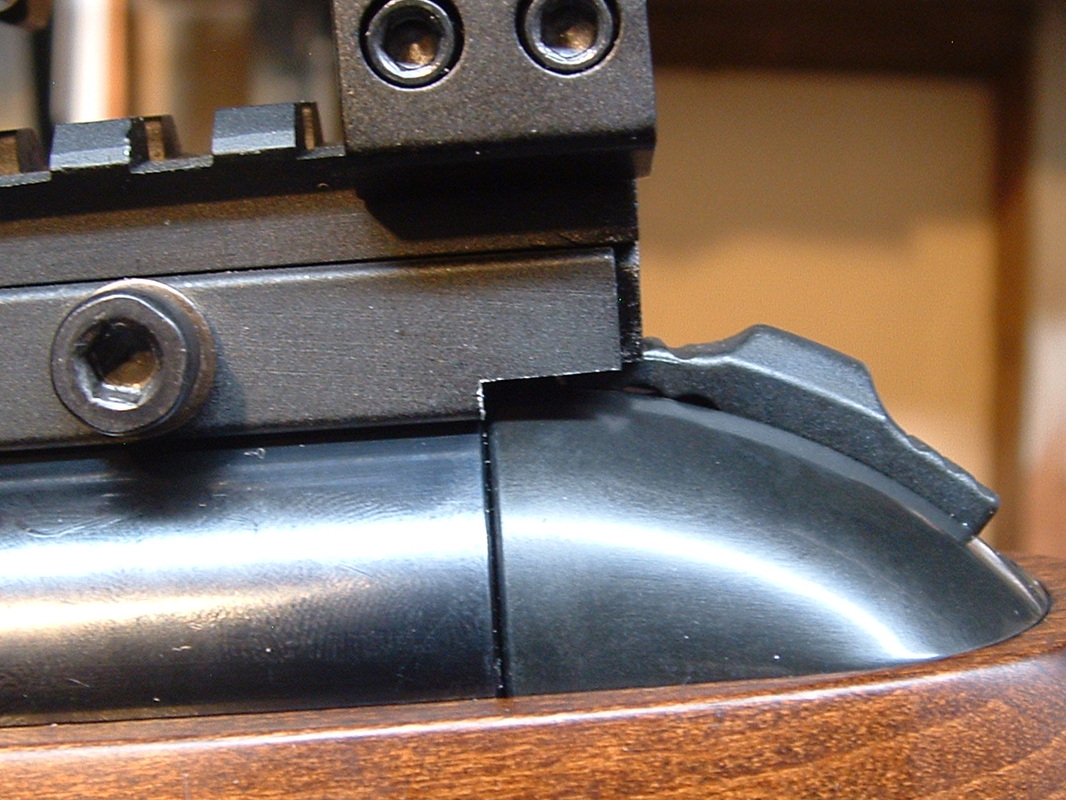
There is reasonable clearance in front.
Picture
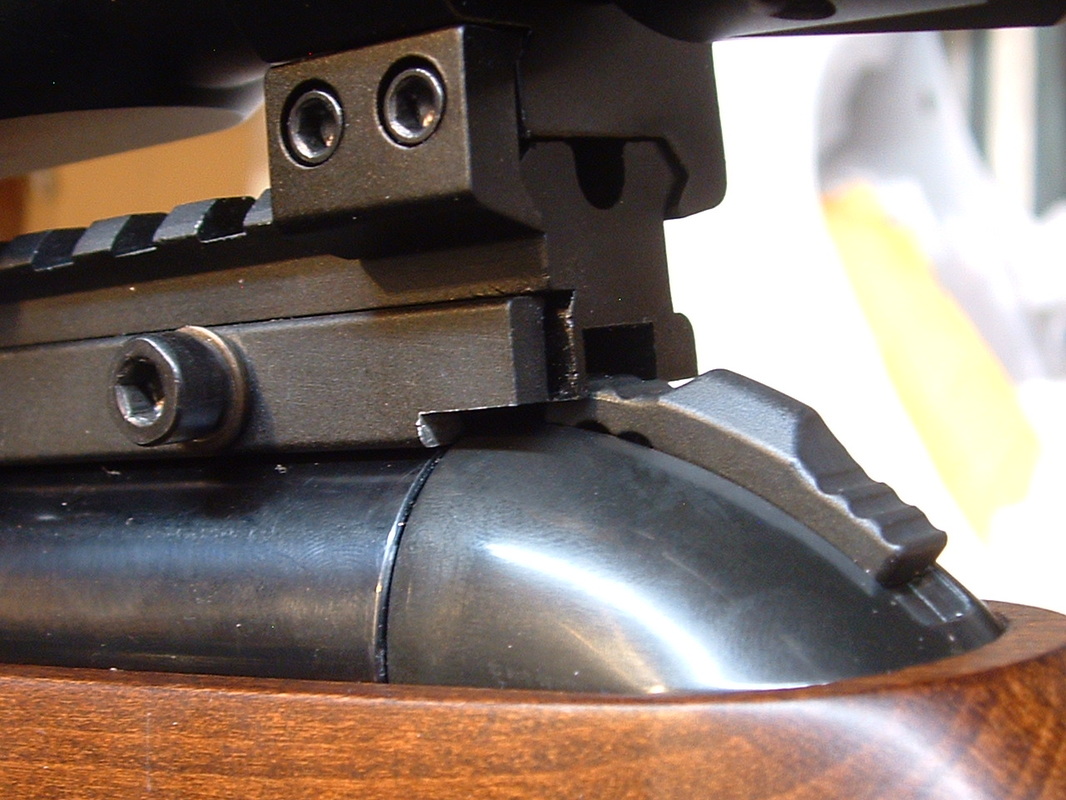
And the "overhang" has been kept to the point where it is useful to get the scope near to the eye and still allow the safety to go on / off.
Picture
By combining the recess that Leapers puts into the rails to accommodate Diana's rear rail screw and overhang, the safety goes on and off.
We'll continue with this gun later, for the time being it is rewarding to see itty bitty groups appear in the targets at the far side of the range.


;-)
22 Comments
charlie
6/5/2015 15:59:19

Thank you big time! the m3 - .5 x 20 screw is the cats meow!! Very sweet trigger. Charlie

Reply
Joerg
10/8/2015 01:33:41

Hi Hector, the piston looks like the 7.5 Joule Version. But I am not sure. The 16 Joule Version is a little bit shorter, that is why I am asking.
Thank you so much
Joerg

Reply
Héctor J Medina G
10/8/2015 21:19:23

Dear Jörg,

As far as I know, ALL guns sent to the USA have the 16J piston and a stouter spring, to yield the 23J that the platform can.
Subsequent reception of the Walther 16J kits proved that the pistons were indeed the high power ones

HTH

HM

Reply
Joerg
10/9/2015 03:21:54

Dear Hector,
thanks for your reply. That is exactly what I thought. The colour of the delrin stuff on the piston looks different to mine. In 7,5 it is normally white and the piston is 19 mm longer and the 16J is normally black and shorter. Maybe they changed the delrin stuff....I will try the Vortek Kit as well with the 16J piston. I can't wait to see how it works.
Looked one more time on your pictures...it is for sure the short version.
That helps a lot.
Joerg

Reply
Alex
5/11/2016 12:49:26

Hi I would like to know the diameter of the Transferport that is dilivered to the US.
It would help me to tune the rifle in the right way.
Thank you Alex

Reply
HECTOR J MEDINA GOMEZ
5/14/2016 00:46:36

Alex,

We have received both diameters. It's a little bit annoying to have to measure each gun, but it has become a habit.

We prefer those guns with a 3.5 mm's (I think; I'm traveling now and cannot look up in our files) transfer port.

The port is not the most important part of the tune.

I'll get back to you as soon as I can.

Hang in there.


HM

Reply
CS
9/19/2016 20:38:52

Hello again! ...After studying your 'trigger information' for two weeks, thinking, wondering, concerns for my inabilities, I finally wrote you a "note for help yesterday." Today, for some reason, I finally made the longer single mini-bolt for my LGU trigger. My new mini-bolt is ~.085 longer than the original, and after testing (and adjusting) in my LGU, it is ~.075 longer than the original. Plus, IT WORKS!!!!! It actually works! Instead of a 4 pound trigger pull, it is now 12 oz. That is perfect!

Thank you so much for your great articles, photos and advise. You 'saved me' on "this one." All the Best! CS .......(please do not Post.)

Reply
Hank
10/5/2016 09:59:29

Hello Hector, can you tell me the size (perhaps little drawing ) of the alluminium turnguide you made because i would like to fit a vortek in my LGU. I still have a lot of twang and I ve tried several options with other springs. The vortek in my R1 is doing very well so thats why i want to try vortek. Greetings, Hank

Reply
Hector Medina
10/5/2016 12:40:51

Hello Hank!

I'm on my way to the FT Nationals. But if you measure the OEM guide it will give you all the dimensions you need.

Turn a thimble that fits in the recess and then trim it to make it sit flush with the trigger housing.

If you want, I can make you one, but I have not priced the little part because Vortek supposedly was going to come out with "stemmed" PG-2 kits for the LGU.

Let me know if you want me to sell you one. But if you measure the OEM guide and stick to those dimensions when turning the little thimble, you will be fine.

HTH


HM

Reply
Hank
10/6/2016 07:24:20

Halo Hector,
Thanks for your information. I`m going to give it a try. If it doesnt work out I will let you know and probably will buy one from you. Isuppose you can send it to the netherlands.

Greetings, Hank.

Reply
Hector Medina
10/10/2016 16:12:54

Sure thing!

It's just a thimble,

;-)


HM

Reply
mauricio
8/15/2019 22:55:35

Dear Hector, now is working. The problem came from a wrong spring instalation at the trigger. The rifle works with the vortek kit. I feel it a little bit harder to cock, pass from 14 J to 18 J, bur still is just installed. Thxs

Mauricio
8/15/2019 18:53:37

I recieved after more than two months my LGV mater pro, who was sold out in all stores in Europe. I replaced the pastic trigger by the original plastic, as I did with my LGU.

I am insterested to try the vortek kit, as Hector blog shows ;:

https://www.ctcustomairguns.com/hectors-airgun-blog/a-yankee-tune-for-the-walther-lgu


Hi Hector,
I installed the vortek HW77 25 mm t (I had installed vortek kit at other 8 air rifles) , but the rifle dont cock with the vortek kit installed. I cut the guide as link shows and I removed the internal original steel washer inside the cylender beforethe top hat , any idea what is missing ?

Reply
Hector Medina
8/15/2019 19:37:57

Hello Mauricio;
I'm a little bit confused.
You asked for the data on the Maccari spring in the comments in Part 2, now you say you are interested in testing the Vortek and it seems you already have that kit.
You mention that you removed the washer before the top hat, but you do not mention removing the top hat itself.

The Vortek kit has a top hat, and you cannot use two top hats.

Make sure you have removed EVERYTHING from inside the piston and then remove the spring from the Vortek kit.
Then test without the spring. If the piston latches, then test with the spring.
You will then know if the spring is too long, or if there are other obstructions.

Keep us posted!


HM

Reply
mauricio
8/15/2019 23:17:06

Dear Hector,
Thanks for your reply. Yes, I had removed the original top hat, the problem was with the trigger when changed fot the steel watlther version. The vortek kit works good , up to 18 J. Did you test cutting a spring coil in vortek kit, to reduce a little the power ? Today is dark to verify how is grouping, I just chronny it I had better performance with my LGU when chaged from 24J to 16J.
Cheers , y muchas gracias nuevamente por haberme respondido

Reply
Hector Medina
8/16/2019 16:01:21

Yes, Mauricio;

I tried cutting, forging and squaring the spring to reduce the power, but still it had an obvious bounce and jump.
That is why I went to the Maccari spring and a VERY tight composite top-hat. See the second version:

https://www.ctcustomairguns.com/hectors-airgun-blog/a-yankee-tune-for-the-walther-lgu-second-version

HM

Reply
Mauricio
8/17/2019 22:12:58

Hector, I am ordering two Maccari spring, one for LGU&LGV, Have you measures for the "tight top hat", I saw at Maccari web page they can do it for 9 usd. Could be great if they can do it for me, I have have not tools to own build, and materials here could cost the same. If you dont have meassures for the top hat, just should said the top hat for LGU with Maccari spring, very tight ... thanks again for all your suppor and share your experience.

Mauricio
8/17/2019 21:52:46

Hector,
Thanks for the link for the Maccari spring . I am happy with the PG2 installed in the LGV. I bought two kit, one for the LGV other for the LGU. My LGU is still as factory, I just installed a plastic layer inside the cilender and is working perfect and VERY smooth to chock. I really worst to install the Maccari ?, I am thinking to buy one, biut still I have the PG2 for the LGU and 3 original kit from Walther (guide, spring, cylender and grease). Those rifles are very difficult to find and I stock for a long time enjoy. The Maccari works for LGU and LGV ?

Reply
peter ashley
4/23/2020 09:10:03

Your help is still useful, thanks. I got a new LGU and overall it's working great for me but I need just that little something special for the trigger still. A few parts are in the mail ;-)

Reply
Hector Medina
4/23/2020 09:55:14

Glad you are still finding it useful.
There's a new SuperCustom trigger for the LGU/LGV
We will be reviewing it soon.

Make sure you read all 7 entries about the Walthers.

😉

Keep well and shoot straight!


HM

Reply
peter ashley
4/28/2020 10:29:03

I tried your yankee tune and it was working ok but I had also changed to a lighter spring at the same time. The first stage felt like nothing and the sear wasn't resetting if you released the trigger. I swapped back to the stock spring and now it feels much better. The yankee tune seems to have removed the previous first stage slack so the first stage is long but it is a first stage.

Do you know of triggers besides rowan and BMS? Tony's out of stock. BMS seems to have more of a classic trigger and I'm not sure if their match style triggers are in stock.

I have the tuning trigger on order but I'm not sure it's worth bothering to install given the yankee since the geometry seems so similar. The wide roller on the stock seems less likely to dig into the sear sliding surface.

Dua link
12/16/2020 22:07:48

Thanks forr this

Reply


Leave a Reply.

    Hector Medina

    2012 US National WFTF Spring Piston Champion
    2012 WFTF Spring Piston Grand Prix Winner
    2013 World's WFTF Spring Piston 7th place
    2014 Texas State WFTF Piston Champion
    2014 World's WFTF Spring Piston 5th place.
    2015 Maine State Champion WFTF Piston
    2015 Massachusetts State Champion WFTF Piston
    2015 New York State Champion WFTF Piston
    2015 US National WFTF Piston 2nd Place
    2016 Canadian WFTF Piston Champion
    2016 Pyramyd Air Cup WFTF Piston 1st Place
    2017 US Nationals Open Piston 3rd Place
    2018 WFTC's Member of Team USA Champion Springers
    2018 WFTC's 4th place Veteran Springer
    2020 Puerto Rico GP Piston First Place
    2020 NC State Championships 1st Place Piston
    2022 Maryland State Champion WFTF 
    2022 WFTC's Italy Member of TEAM USA 2nd place Springers
    2022 WFTC's Italy
    2nd Place Veteran Springers

    Archives

    August 2022
    May 2022
    April 2022
    February 2022
    August 2021
    July 2021
    June 2021
    May 2021
    April 2021
    March 2021
    February 2021
    October 2020
    September 2020
    August 2020
    July 2020
    June 2020
    May 2020
    April 2020
    March 2020
    February 2020
    January 2020
    December 2019
    November 2019
    September 2019
    August 2019
    July 2019
    May 2019
    April 2019
    January 2019
    December 2018
    November 2018
    October 2018
    September 2018
    August 2018
    June 2018
    May 2018
    April 2018
    March 2018
    February 2018
    January 2018
    December 2017
    November 2017
    October 2017
    September 2017
    March 2017
    December 2016
    October 2016
    September 2016
    July 2016
    June 2016
    March 2016
    January 2016
    December 2015
    November 2015
    October 2015
    September 2015
    August 2015
    June 2015
    May 2015
    April 2015
    March 2015
    February 2015
    January 2015
    December 2014
    November 2014
    October 2014
    August 2014
    July 2014
    June 2014
    May 2014
    March 2014
    February 2014
    December 2013
    November 2013
    October 2013
    September 2013

    Categories

    All
    Events
    Gear
    Hunting
    Tests

    RSS Feed

Proudly powered by Weebly