In the DIANA users' world, NOTHING elicits more fear than the idea of the scope rail becoming loose.
Or even worse, falling altogether off the gun!
This may happen for several reasons: Too heavy a scope at too high Muzzle Energy, or trying to "bottom" the stop pins in T06 rails, or a bad fall.
SOME users have detected some "play" in the rail and have tried to fix it themselves tightening the "screws" that hold the rail in place.
The result isn't pretty.
On one hand the screws are riveted from the inside of the mechanisms tubes.
On the other, they are VERY hard screws that are torqued to a ridiculously high level.
So, when a good friend asked me how to tighten the rail, I immediately told him to stop and send me the gun.
Of course, following the advice of a professional is unheard of; LOL!
A few months after the conversation, another call was received and he told me that with the help of a machinist friend, he had tried to remove the screws and re-thread/re-attach the rail. Of course, they were not able to.
Furthermore, in the process of trying, the rail had been destroyed.
So, now the issue was to procure a dovetail rail AND attach it to the action in a way that was functional.
It is too easy to install a crooked rail that will not allow ANY scope nor mount to align with the trajectory
By then, I was too busy and had stopped taking in work, but he was decided to wait whatever it took and so he sent the gun.
I was truly taken aback by what I received. The "rivet" studs were still attached to the action, no rail was present, and the note just said: "Yes I know you will be terrified at our butchering. Please do what you can"
Ah, well . . .
And so the process started.
First a carbide spot drill was used to put a dimple into which a normal but tiny pilot carbide drill would "dig" in each of the studs. I had to locate each hole with a magnifying glass.
Then a tiny pilot hole was drilled through the stud and careful observation proved that indeed, all holes were fairly coaxial.
Then a more robust carbide drill was used to remove the hardened studs and create the hole for a new thread. The best possible thread for attaching things to relatively thin tubes is the superfine metric threads.
Special screws had to be sourced, luckily, the M4x0.5 flathead screws were available OTC.
Locating an 11 mm's dovetail was not direct, and the ones located made the whole project almost lose all sense because they had no curve on the underside. Machining that curve would have meant creating a fixture to affix the blank in the lathe and then using a fly cutter; and then creating the fly cutter itself.
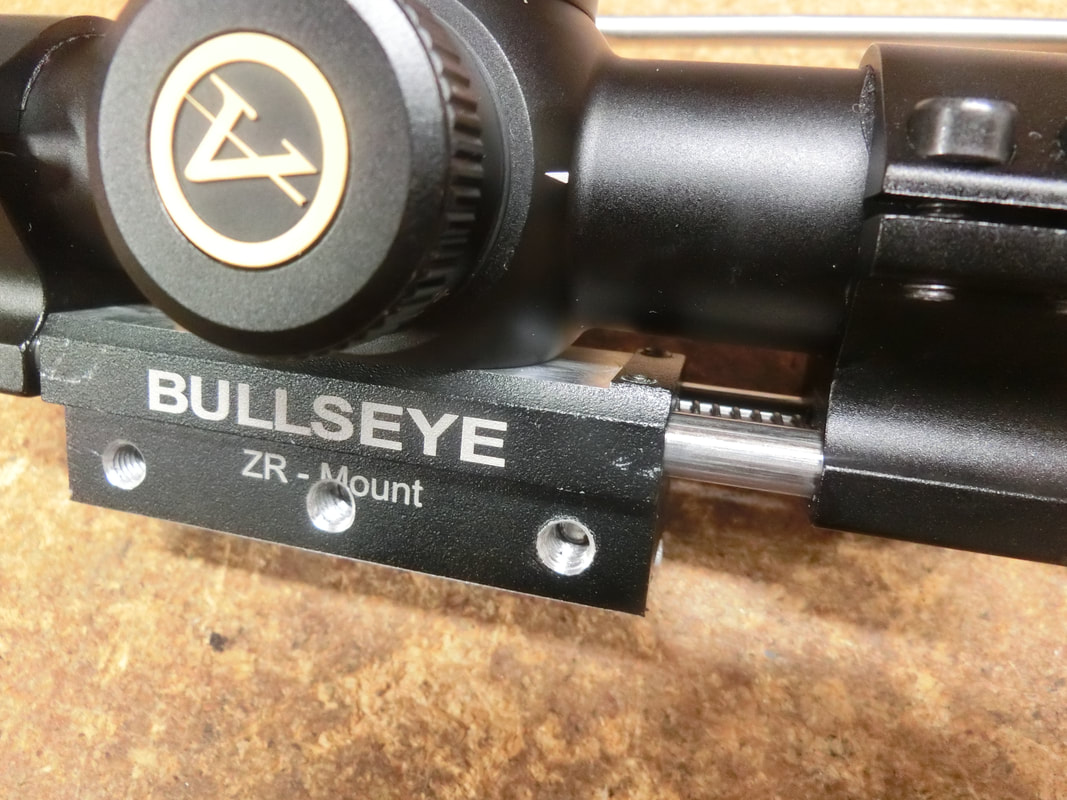
So, we found a 3/8" dovetail blank plate that had the proper underside curvature and decided it would be preferable to modify extensively the ZR Mount than to create a dovetail to suit the gun's profile.
Same would have been true for the many Picatinny rail blanks available. AND ZR mounts of the Picatinny version are as scarce as hen's teeth.
Once the studs had been removed, the dovetail "plate" was locate and drilled to match the OEM holes.
As parts started to trickle in, it became obvious that the challenge was going to be to get the plate in place roughly aligned to the bore of the gun. We COULD later, do some minor regulating, but we really did not want to have to do too much of it.
So, we sourced a bore-sighter and turned the stem to fit the airgun barrel.
It proved to be a very wise decision, as it turned out that the OEM holes were not precisely "perfectly" aligned to the barrel/bore, it may be that the barrel had been bent out of whack some time previously, or that in the operation of removing the old rail, the barrel had been affected.
In the end, after some relieving and "slack-building" we were able to mount the plate to the gun, and check everything before gluing the plate.
Once everything was dry and everything was re-checked, this was the result:
Or even worse, falling altogether off the gun!
This may happen for several reasons: Too heavy a scope at too high Muzzle Energy, or trying to "bottom" the stop pins in T06 rails, or a bad fall.
SOME users have detected some "play" in the rail and have tried to fix it themselves tightening the "screws" that hold the rail in place.
The result isn't pretty.
On one hand the screws are riveted from the inside of the mechanisms tubes.
On the other, they are VERY hard screws that are torqued to a ridiculously high level.
So, when a good friend asked me how to tighten the rail, I immediately told him to stop and send me the gun.
Of course, following the advice of a professional is unheard of; LOL!
A few months after the conversation, another call was received and he told me that with the help of a machinist friend, he had tried to remove the screws and re-thread/re-attach the rail. Of course, they were not able to.
Furthermore, in the process of trying, the rail had been destroyed.
So, now the issue was to procure a dovetail rail AND attach it to the action in a way that was functional.
It is too easy to install a crooked rail that will not allow ANY scope nor mount to align with the trajectory
By then, I was too busy and had stopped taking in work, but he was decided to wait whatever it took and so he sent the gun.
I was truly taken aback by what I received. The "rivet" studs were still attached to the action, no rail was present, and the note just said: "Yes I know you will be terrified at our butchering. Please do what you can"
Ah, well . . .
And so the process started.
First a carbide spot drill was used to put a dimple into which a normal but tiny pilot carbide drill would "dig" in each of the studs. I had to locate each hole with a magnifying glass.
Then a tiny pilot hole was drilled through the stud and careful observation proved that indeed, all holes were fairly coaxial.
Then a more robust carbide drill was used to remove the hardened studs and create the hole for a new thread. The best possible thread for attaching things to relatively thin tubes is the superfine metric threads.
Special screws had to be sourced, luckily, the M4x0.5 flathead screws were available OTC.
Locating an 11 mm's dovetail was not direct, and the ones located made the whole project almost lose all sense because they had no curve on the underside. Machining that curve would have meant creating a fixture to affix the blank in the lathe and then using a fly cutter; and then creating the fly cutter itself.
So, we found a 3/8" dovetail blank plate that had the proper underside curvature and decided it would be preferable to modify extensively the ZR Mount than to create a dovetail to suit the gun's profile.
Same would have been true for the many Picatinny rail blanks available. AND ZR mounts of the Picatinny version are as scarce as hen's teeth.
Once the studs had been removed, the dovetail "plate" was locate and drilled to match the OEM holes.
As parts started to trickle in, it became obvious that the challenge was going to be to get the plate in place roughly aligned to the bore of the gun. We COULD later, do some minor regulating, but we really did not want to have to do too much of it.
So, we sourced a bore-sighter and turned the stem to fit the airgun barrel.
It proved to be a very wise decision, as it turned out that the OEM holes were not precisely "perfectly" aligned to the barrel/bore, it may be that the barrel had been bent out of whack some time previously, or that in the operation of removing the old rail, the barrel had been affected.
In the end, after some relieving and "slack-building" we were able to mount the plate to the gun, and check everything before gluing the plate.
Once everything was dry and everything was re-checked, this was the result:
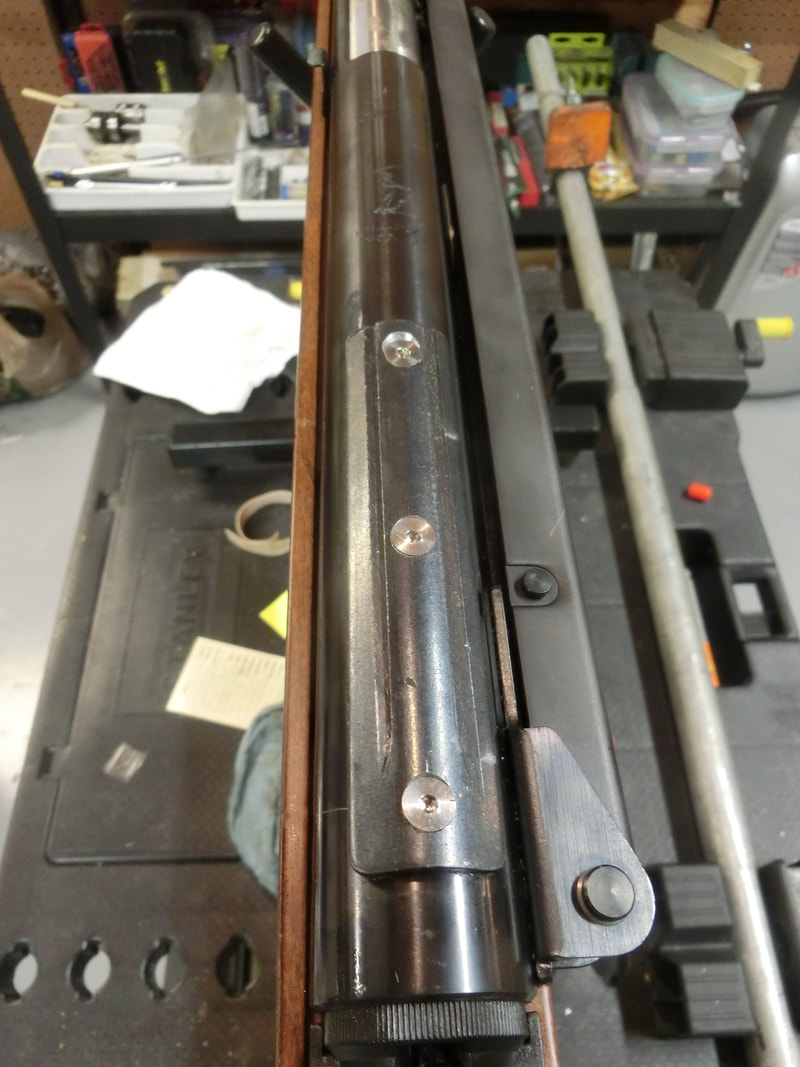
Just to clarify, I did NOT put that scratch to the left of the action. LOL!
I tested the gun with a 1" scope in an Accurized ZR mount and discovered that there was too much of a difference between the 3/8" and the 11 mm's dovetail, or at least between THIS dovetail plate and the 11 mm's standard dovetail as understood in Europe.
And so the really long part of the project began, because dovetails are fickle beasts! You take off a bit here and all the angles and surfaces change and all goes out of whack.
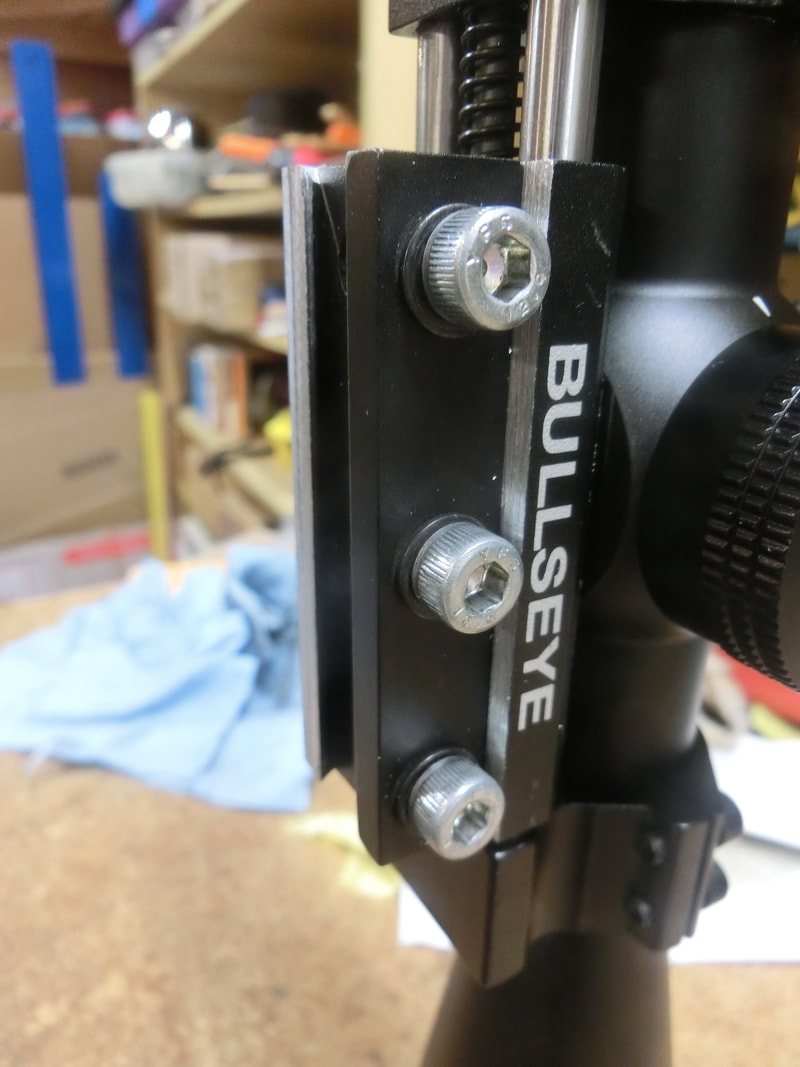
In the end, we spent more time making sure that the mount sat square and plumb and tightened enough the dovetail than attaching the dovetail rail plate.
I tested the gun with a 1" scope in an Accurized ZR mount and discovered that there was too much of a difference between the 3/8" and the 11 mm's dovetail, or at least between THIS dovetail plate and the 11 mm's standard dovetail as understood in Europe.
And so the really long part of the project began, because dovetails are fickle beasts! You take off a bit here and all the angles and surfaces change and all goes out of whack.
In the end, we spent more time making sure that the mount sat square and plumb and tightened enough the dovetail than attaching the dovetail rail plate.
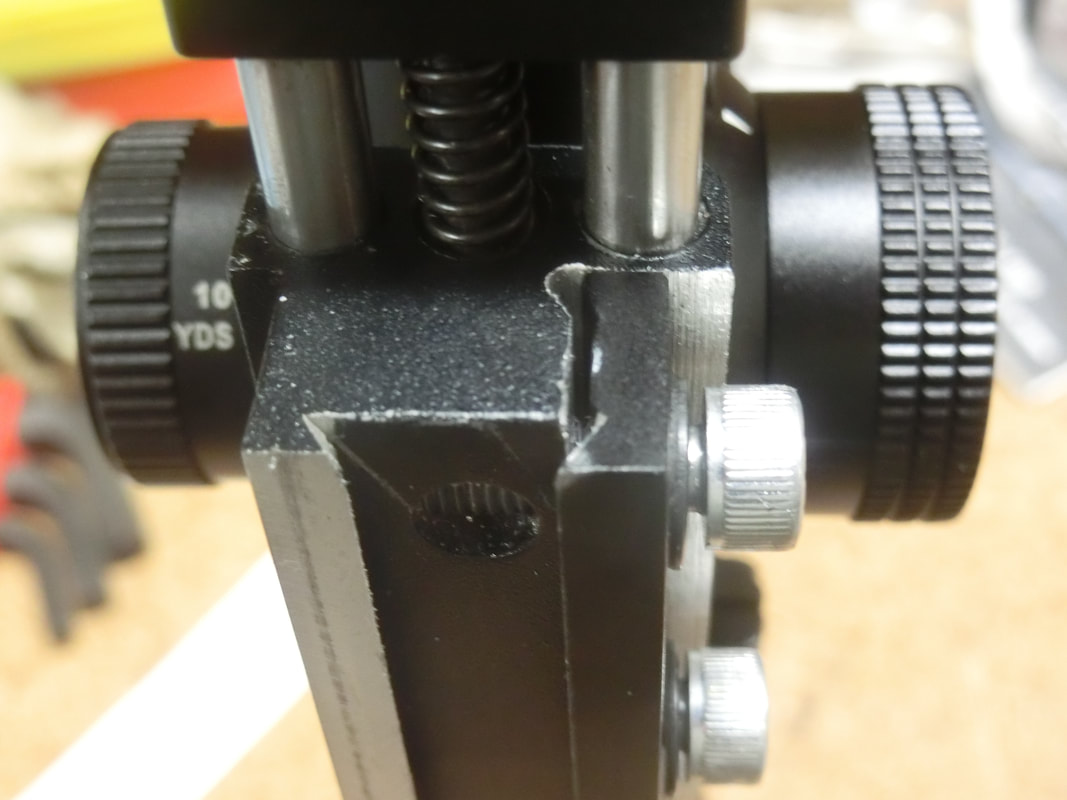
A substantial amount had to be milled out of the right side of the base, so that the moveable clamp could tighten well and still keep the proper angle.
Then about 0.5 mm's had to be milled from the bottom of the left side, to ensure that the mount sat level & square.
Since this rail plate has no stops, I re-drilled and re-tapped the holding screws to receive M4 screws and ensure a solid attachment..
Then about 0.5 mm's had to be milled from the bottom of the left side, to ensure that the mount sat level & square.
Since this rail plate has no stops, I re-drilled and re-tapped the holding screws to receive M4 screws and ensure a solid attachment..
Then came another challenge: The customer had decided on an Athlon scope, and those scopes have a rather hefty "saddle" which meant that 0.6 mm's had to be milled off the watertable to allow the scope to move freely in the ZR mounts.
All in all 7 solid hours of serious work were put into this, mostly setting up, measuring and re-measuring, and then re-checking everything once again before even starting the milling.
All in all 7 solid hours of serious work were put into this, mostly setting up, measuring and re-measuring, and then re-checking everything once again before even starting the milling.
So, what do we get for all that work?
And
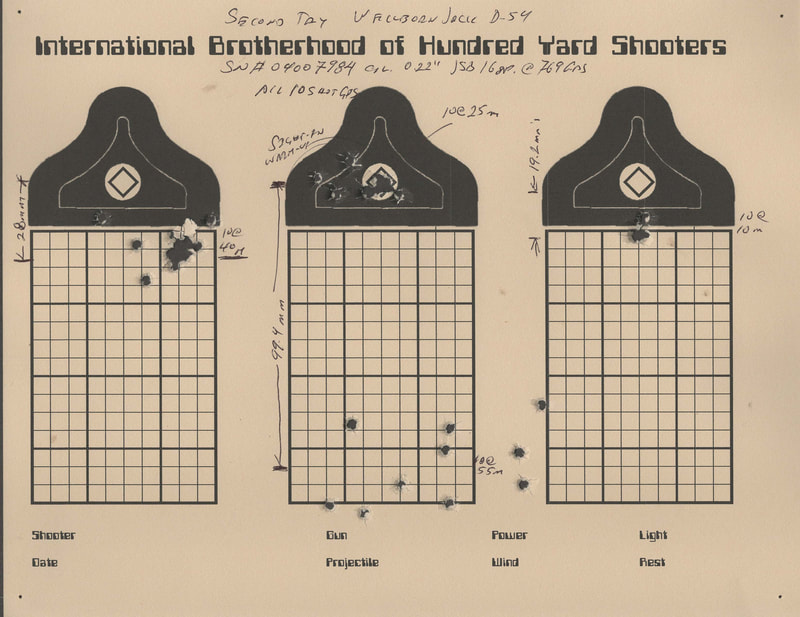
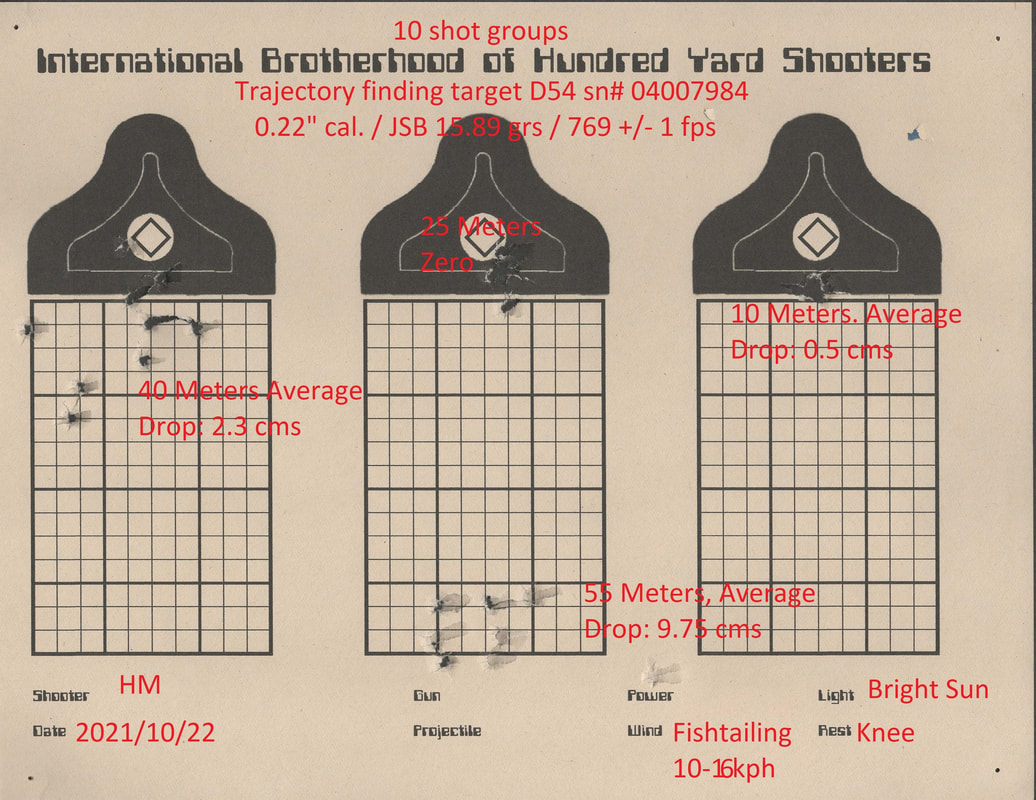
Do note:
- all these are 10 shot groups from a full powered (21 ft-lbs) 0.22" cal D54
- the 10 M groups are single hole
- the 25 M groups (zero) are barely larger than ½"
- the 40 M groups are about ¾"
all this from the knee/FT position.
For the first try some effort was made to compensate for the wind, for the second I tried to get a better feel for long distance (55 M = 60.2 yds) wind drift.
Wind was kicking hard and moving not only the pellet but the shooter also!
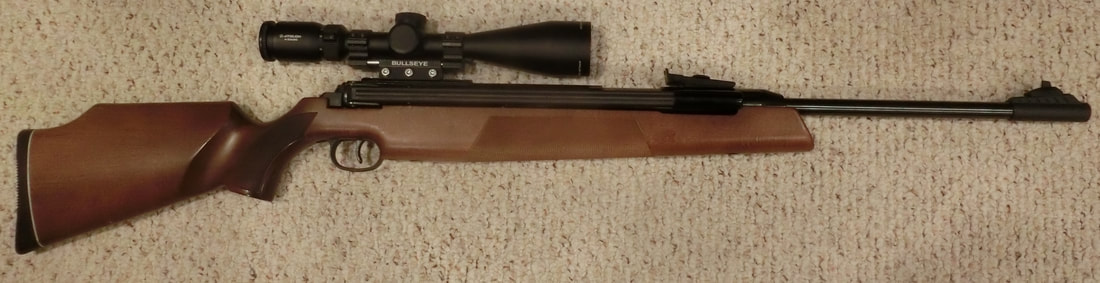
The rifle's architecture is a straight hunter, low-sitting scope for more reliable trajectory in the short to medium ranges, quite pleasing to carry and to shoot.
- all these are 10 shot groups from a full powered (21 ft-lbs) 0.22" cal D54
- the 10 M groups are single hole
- the 25 M groups (zero) are barely larger than ½"
- the 40 M groups are about ¾"
all this from the knee/FT position.
For the first try some effort was made to compensate for the wind, for the second I tried to get a better feel for long distance (55 M = 60.2 yds) wind drift.
Wind was kicking hard and moving not only the pellet but the shooter also!
The rifle's architecture is a straight hunter, low-sitting scope for more reliable trajectory in the short to medium ranges, quite pleasing to carry and to shoot.
So, from an almost "lost cause" case to a really good shooter.
Marvelous machines these are indeed!
Keep well and shoot straight!
HM
© 10/28/21
 RSS Feed